BlueStacks 3 Download For Windows
BlueStacks 3 download for pc and you can enjoy a powerful Android emulator for Windows that allows you to run Android applications on your computer. BlueStacks App Player is a feature-rich application that is meant to provide players with a seamless gaming experience on their desktop computers. It allows users to assign controls to their keyboard and mouse for quick access. It also works with touchscreen devices.
After completing the BlueStacks 3 download, you will notice a substantial improvement in your gaming experience. This is due to the fact that the programme renders games and other apps using the hardware on your computer. It also connects to your Google account, allowing you to effortlessly access apps from your smartphone on your PC. BlueStacks is popular because to its ease of use and seamless performance.
ad
Bluestacks 3 Android Emulator For PC Download features
- App Center – This gives you the newest and most popular game being played by other gamers.
- Gift Center – In the gift center, you’ll find special skins, characters, gold, gems, and many more gifts across hundreds of games.
- BlueStacks Select – With this, gamers get exclusive gifts, content, and other items directly from game developers.
- BlueStacks Friends – It is a built-in chat app to interact with other gamers. You’ll be able to use “Friends” chat to plan your strategies and progress faster in your games.
- World-Class Gaming Platform – It runs on the Gaming Platform which uses patented Hyper-G graphics APIs which allows you to play at maximum resolution with a high-quality display and refresh rates (including 144hz).
- Multi-Instance Function – Create separate instances for every person using your computer. This way, everyone can play on their own Google Play accounts without any overlap. You can play different games on different BlueStacks instances without any interference or confusion – simultaneously.
- Game Engine With Adaptive Environment Sync – Gaming engine powered by Android Nougat automatically adjusts to your computer’s unique specifications and will give you the best performance.
- Wider Gaming selection – Catalogs over 1.5 million games and 500,000+ flash apps
- Best Integration – Stream directly on Twitch or Facebook.
What are the benefits of the BlueStacks 3 Download?
Once you have BlueStacks 3 downloaded on your Windows Pc/Laptop, you will experience an improved front-end design, multiple instances & a brand new game engine. You receive personalized game suggestions, a new key-mapping interface, and easy chat with friends. You get to enjoy playing your favorite Android games, and running and testing apps on Windows and Mac. In short, the Bluestacks3 has made it easy to play Android games on any pc and other similar devices.
ad
The BlueStacks 3 download is fully loaded with a lot of amazing features and a versatile Android emulator for PC. In fact it is one of the most widely popular emulators among gamers with the largest mobile gaming platform for PC and Mac.
As per Bluestacks developers’ claim, the latest version (BlueStacks 5) is 6x faster than any smartphone. The phone emulator for pc allows you to play Android games on PC. Additionally, this Android Emulating software bridges the gap between the Android System and Windows by allowing users to run it on their PC.
BS3 enables your social media apps as well!
Furthermore, after BlueStacks 3 Download, you could make it easy to use your choice of any popular social media platforms i.e. WhatsApp, IMO For Pc, Facebook, Instagram, or Twitter. As the environment runs Android apps, you can also access the app to work with your Google Play account. In fact, BS3 will automatically configure to sync with your favorite games and social media platforms simultaneously.
What is BlueStacks?
BlueStacks is an Android emulator Software (Android Virtual Device-AVD) that emulates the Android environment on your PC. It is generally used for testing, bug-finding, and running various apps on a virtually controlled system on devices other than Android phones.
BlueStacks App Player development history
The concept of BlueStacks App Player launched on May 25, 2011, at the Citrix Synergy conference in San Francisco. Citrix CEO Mark Templeton demonstrated an early version of App Player onstage and announced that the companies had formed a partnership.
On June 27, 2012, the company released an alpha-1 version of its App Player software for Mac OS, while the beta version was released on December 27, 2012. In April 2015, BlueStacks, Inc. announced that a new version of BlueStacks for Mac was in development. The public alpha version of the App Player was launched on October 11, 2011. BlueStacks exited beta on June 7, 2014.
There are currently 5 versions of this software
Till date, it has launched 4 different versions including the existing BlueStack 3, early BlueStacks old versions like BlueStacks 1, BlueStacks 2 for PC, BlueStacks 4, and the latest released Bluestacks 5 offline installer.
Here today, we will let you know all features, utilities, and other useful information about BlueStacks download for Pc.
BlueStacks 1
In July 2015, BlueStacks, Inc. released a new version for macOS. Later Mac development and support were discontinued in November 2017. Additionally, development for MacOS has restarted, as a version dated March 2018 is available from the website.
BlueStacks 2
In December 2015, the developer company released the new version BlueStacks 2 which lets users run multiple Android Apps simultaneously. It is also available for Mac OS X 10.9 Mavericks or later. And currently, it is the most stable of the releases updated from 2018.
BlueStacks 3
In July 2017 BlueStacks 3 based on a brand new engine and front-end design. BlueStack added an App Center that personalizes game suggestions, an accounting system, chat, a new keymapping interface, and multi-instance. Furthermore ,the multi-instance allows users to launch multiple BlueStacks App Player windows using either the same or different Google Play account.
BlueStacks 3 user interface can be set according to one’s needs. Also, it can integrate itself with the custom software experiences that are designed and developed by PC manufacturers. Multi-instance allows users to launch multiple BlueStacks windows using either the same or different Google Play Store accounts. Like other similar emulator like LDPlayer and Nox Player runs Android apps, you can set BlueStacks Android Emulator to work with your Google Play Store account.
In an estimate, more than 370+ million users enjoy this Android Emulator for Pc with a superior gaming experience.
BlueStacks 3 System Requirements
| Operating System | Windows 10, Windows 8.1, Windows 8, Windows 7, Windows Vista SP2, Windows XP SP3 (32-bit only) |
| Processor | Intel Core i5-680 (PassMark 3500) or higher processor with virtualization extensions enabled in the BIOS |
| Graphics Card | The drivers for your PC’s graphics drivers should be updated for compatibility with BlueStacks as described in the following post |
| Memory | Your PC must have at least 2GB of RAM/main memory. (Note that having 2 GB or more disk space is not a substitute for RAM) |
| Storage Space | Your PC must have 4 GB of disk space available for storing Android apps/games and their data. |
| Network Connection | Broadband connection to access games, accounts, and related content |
| Required User | You must be an Administrator of your System. |
Recommended System Requirements
| Operating System | Windows 10 |
| Processor | Intel Core i5-680 (PassMark 3500) or higher processor with virtualization extensions enabled in the BIOS |
| Graphics Card | Intel HD 5200 (PassMark 750) or higher |
| Memory | 6 GB or higher |
| Storage Space | 40 GB free hard disk space |
| Network Connection | Broadband connection to access games, accounts, and related content |
| Additional Information | We recommend to use any good VPN after you installing BlueStacks. It helps you unban the IP and protect gaming privacy. Top-grade encryption and unlimited bandwidth speed. You may suggest to download iTop VPN for Windows here. |
| Required User | You must be an Administrator of your System. |
Download instructions
-
- First of all Download EXE File (Supports Windows XP, 7, 8, 8.1, 10)
- The above-mentioned EXE file size is 415mb so make sure you have a fast and stable internet connection to stop any interruption during the download process.
- Once the file is downloaded double click on it and it takes a few minutes from there to complete the installation process.
- After all the necessary instructions you accept all the terms and conditions and finally press install, a shortcut of BlueStacks App will be created on the home screen.
- Now you can run BlueStacks on Windows 7
- After Installing Bluestacks you want to check whether this emulator works or Not? so now you can download CSR Racing Mod Apk games and check it.
Additional requirements on BlueStacks download for Windows 7 32 Bit
- Your PC must have installed Service Pack 2 (SP2) or higher. (You can install it through Windows Update)
For Windows XP:
- Your PC must have installed Service Pack 3 (SP3) or higher. (You can install it through Windows Update)
- Your PC must have Windows installer 4.5 installed. (You can download it from http://download.microsoft.com/downloa… )
- Your PC must have .NET Framework 2.0 SP2, (You can download it from http://download.microsoft.com/download…)
It is nominally installed in the same drive where Windows is installed, usually C:. However, during installation, you may choose to have all of the apps/data located on another drive.
We do not recommend installing the BlueStack 3 if you have a virtual machine, e.g., Microsoft Virtual PC, VMWare Workstation, or Oracle Virtualbox, installed on the same PC.
Up-to-date graphics drivers from Microsoft or the chipset vendor.
The BlueStacks 3 download will work on all systems that fulfill the minimum systems requirements. However, for superior gameplay experience, the Recommended System Requirements here are representative of our top quartile of users who play MOBA, RPG games and their variants, Strategy games, etc. Additionally, BlueStacks Download for windows 7 32 bit is available now.
Bluestacks offline installer system requirements for BlueStacks 3 download for Windows 10
| Application Name | BlueStacks App Player |
| Processor | Dual-Core 1.3 GHz or Higher |
| Memory | 2 GB RAM Minimum |
| Operating System | Windows 10/8/7 |
| Storage | 50 GB HDD |
| Additional Softwares | Direct 9.0 or Higher, .NET Framework |
| GPU | AMD HD 6670 or Nvidia 1030 or Higher |
Bluestacks App Player FAQs
How To Install BlueStacks 3 Android Emulator?
You can install the BlueStacks App on the Windows machine as long as the following requirements are fulfilled:
- To install the BlueStacks App Player, you should be an Administrator on your PC.
- Your PC must have 2GB of RAM/main memory. (Note that having 2GB or more disk space is not a substitute for RAM)
- Your PC must have 4GB of disk space available for storing Android apps/games and their data.
- You must have DirectX X 9.0 or higher installed on your system
- The drivers for your PC’s graphics drivers should be updated for compatibility with BlueStacks App.
Note: You may refer our complete tutorial on how to download and install BlueStacks on pc
How Can I Uninstall An App In BlueStacks 3?
Purpose: This article will guide you on how to uninstall apps in BlueStacks 3.
Benefits: Uninstalling unwanted apps helps you in increasing the performance of BlueStacks App Player. Additionally this helps in saving the data (as some apps always run in the background consuming data and system resources).
Steps:
- Click on the Uninstall app button available on the toolbar at the bottom-right corner as shown below.
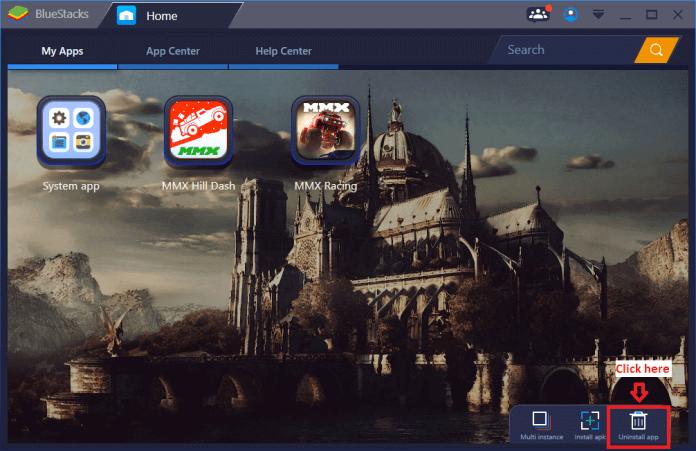
Click on X (cross button) next to the app icon. Refer to the image given below.

Click on Yes to uninstall the app.
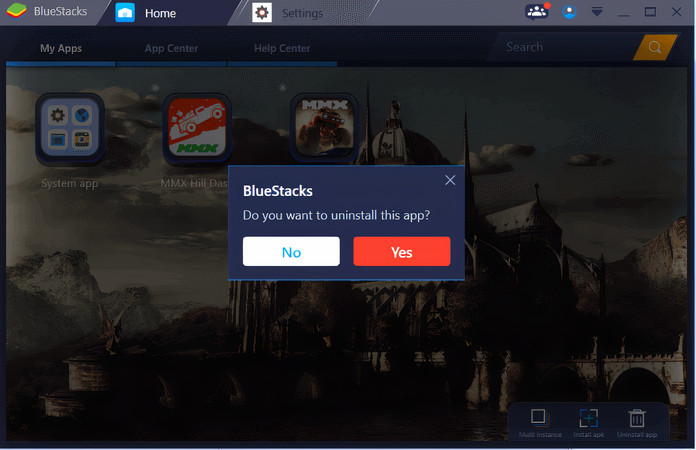
- You may also click and hold the app icon you want to delete and then click on X (cross button) next to the app icon to uninstall it.
Please note that apps under the System app cannot be uninstalled.
What To Do If BlueStacks Installation Fails?
If you are unable to install BlueStacks for PC, please follow the steps mentioned below to send us the install failure logs.
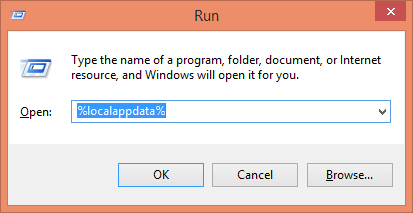
- Press “Windows+ R” on your PC.
- Type “%localappdata%” and press Ok.
![App-Run-Data]()
- Navigate to the “BlueStacks” folder present here, sort the content in this folder by clicking on “date modified” and send us all the logs for the specific date or of the most recent date on which you faced the issue.
![Run-Bluestacks-App]()
- You can create an email attachment and send an email to support at www.bluestacks.com.
How to play War Robots on BlueStacks?
Purpose: This article will acquaint you with the process to activate all the keyboard controls for War Robots.
Benefits: You will be able to use the keyboard controls with more accuracy in addition to using multiple apps at once.
Audience: Gamers who enjoy playing War Robots on BlueStacks App Player.
BlueStacks Versions affected: BlueStacks all version
Geo’s affected: All geo’s where the game is available.
Steps to activate keyboard controls
- Click F1 on the keyboard to activate the Shooting mode.
- Press and hold any of the direction keys (W, A, S, D) down.
- Move the mouse until you see the message “CONTROLS CHANGED: TOUCHSCREEN”. You are now ready to start the Battle.
Keyboard controls
| Keys | Assigned Function |
| W, S, A, D | Move Forward, Back, Left and Right |
| F1 | Toggle Battle Royale Mode (Allows mouse to aim like PC FPS) |
| Weapon 1 | 1 |
| Weapon 2 | 2 |
How to Root BlueStacks 3? (Version 2, 3 & 4)?
We will be rooting Bluestacks by using the One Touch Root method. There are some exploits to root a phone which works for all Android devices also. Additionally there are multiple applications like TowelRoot and KingRoot which provide these exploits. In this tutorial, we will be using KingRoot for rooting Bluestacks.
But many of readers asked us about a working root method on BlueStack for Pc as the Kingroot method is not working. So here we are with a detailed guide on How to Root BlueStacks 3 with BSTweaker 2 and SuperSU 2.82.
As BlueStacks aims at improving your experience of Android on your Windows/Mac computer, rooting can also be a part of the big improvement for it. Thus, you can still enjoy the wonderful apps which need root bluestack 3 permission.
Rooting BlueStacks 3, Step by step guide
By rooting the Android operating system you can have access and modify system files. It also lets you gain system permissions for third-party apps that do not come pre-installed on the phone. Third-party apps are then allowed to modify system files as well.
Using a rooted Bluestacks, you can run many penetration testing software like wifi hackers and packet sniffers which are developed for Android. You can also edit app data and use cheats for mobile games on your computer.
- Extract the downloaded BS Tweaker 5
- Open BlueStacks Tweaker.exe
- Start BlueStacks from the Main tab if it is not already started.
- Wait for BlueStacks to start completely.
- Go to the Helpers tab in BS Tweaker, you will see Root for BlueStacks option.
- Click on Patch and you BlueStacks is rooted, now you need to install SuperSu 2.79
- If you do not see the Patch option there may be an Unlock option. So Full Stop BS from Main, and Unlock then again start the BlueStacks and Patch for root.
- Now got to BlueStacks and click on Install apk (right bottom in BS 3) to manually install SuperSU. Install Supersuer.apk you extracted. (we are installing SuperSU 2.79 because latest SuperSU from play store is not working)
- After installing open SuperSU, select Expert user when asked. It will ask to update the SuperSU binary select continue and select the Normal mode. After updating binary su click on ok (reboot will not work since it is not an Android mobile).
- Now your BlueStack is completely rooted. You can check root status with root checker app available at play store. If you want to update SuperSU now you can do so.
- (Note: For now, there is no working method to root Bluestacks 3. The previous version that can be rooted in Bluestacks 2.)

To disable App Center & Help Center in BlueStacks open BSTweaker, go-to OEM tab and disable them
Is BlueStacks Safe?
Bluestacks is an android emulator for pc which lets you run Android apps and games on your Windows or Mac PCs. it’s not a virus or anything else. From my side, it is completely risk-free and you can use it freely. So, you should be careful about the install Bluestacks only on the device you own.
How To Resume PUBG Mobile If It Crashes When Using Facebook Login?
Purpose: This article will provide a workaround to prevent the PUBG Mobile from crashing when you use the Facebook login.
Benefits: You can use your Facebook login for PUBG Mobile.
Audience: Gamers who enjoy playing PUBG Mobile on BlueStacks.
BlueStacks Versions affected: all versions
Geo’s affected: All geo’s where the game is available.
Steps: If PUBG Mobile is crashing when you try to log in using your Facebook account, install the Facebook app on BlueStacks and then try logging in to PUBG Mobile with Facebook.
This workaround should enable you to use your Facebook login for PUBG Mobile.
The solution for AVG antivirus makes BlueStacks run slow.
Purpose: Recommend changes to AVG antivirus settings that are interfering with BlueStacks running efficiently.
Benefits: You will be able to use BlueStacks App Player without any slowdown even while AVG antivirus is running on your PC.
Audience: All users who have AVG antivirus running on their PC’s and are experiencing that BlueStacks runs slow.
BlueStacks Versions affected: BlueStacks 3 all version
Geo’s affected: All Geo’s
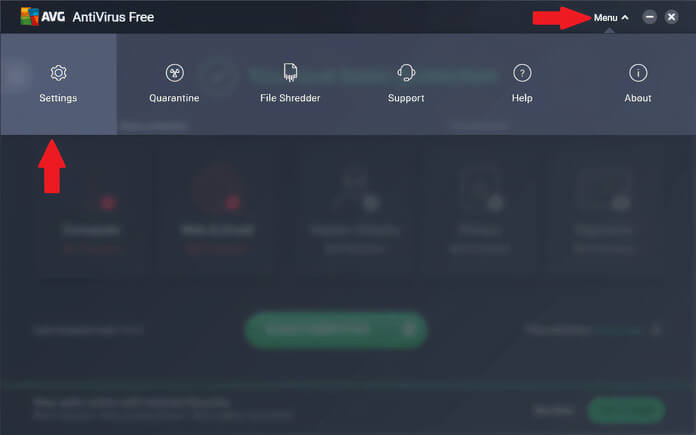
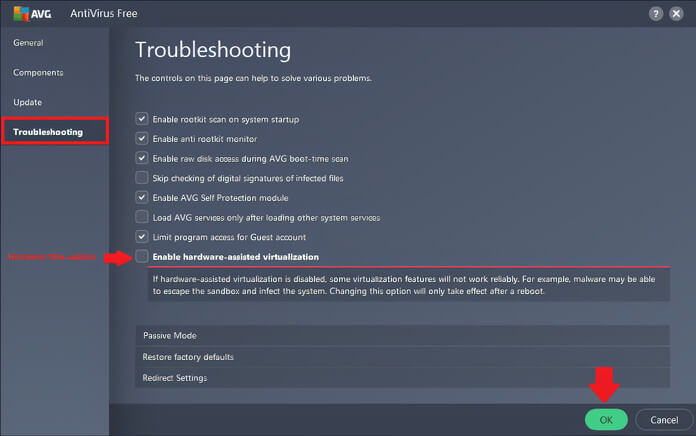
Steps: AVG slows down BlueStacks due to one of its settings. Please update your AVG antivirus settings as described below:
- Go to ‘Menu’ > ‘Settings’ of AVG-Antivirus as shown below.
![AVG-Antivirus-Program-Issue]()
- Click on ‘Troubleshooting’ on the left-hand side, uncheck the ‘Enable hardware-assisted virtualization’ option, then click on ‘OK’ to confirm and reboot your PC. You should experience BlueStacks feeling a lot zippier after this.
![Bluestacks Error Solution By Troubleshooting]()
BlueStacks versions affected: All versions of BlueStacks.
Audience: All users of BlueStacks.
Geo’s affected: All Geo’s
Check the current version of BlueStacks installed on your PC and follow the instructions.
1) If the version of Bluestacks installed on your PC is “3.52.66.1905” and above.
All your apps, in-app progress, in-app purchases will remain intact after a successful upgrade. However, any custom keyboard controls will not be saved. BlueStacks 4 comes with the best keyboard controls for all top apps and it also provides a tool to create/edit your own keyboard controls.
2) If the version of Bluestacks installed on your PC is less than “3.52.66.1905” but greater than or equal to “3.7.44.1625”.
You cannot directly upgrade by double-clicking on BlueStacks 4 installer. However, this can be done by installing an intermediate BlueStacks version.
First, you will have to upgrade to BlueStacks version 3.52.66.1905 by downloading and double-clicking the installer from this URL. Once this upgrade is successful, follow the steps as described in Point 1 of this article.
3) If the version of Bluestacks installed on your PC is less than “3.7.44.1625”.
Upgrade to BlueStacks 4 is not supported in this case. However, if you still wish to use BlueStacks 4, you will have to uninstall the current version of BlueStacks and do a fresh install of BlueStacks 4 by downloading it from the publisher’s website www.bluestacks.com.
Which is the latest version upgrade succeeding BlueStacks 3?
On September 18, 2018, BlueStacks announced the release of its latest flagship version, BlueStacks 4 with more added features, smoother graphics with better user experience. BlueStacks 4 brings seamless mobile gaming to the next level with lower memory usage, lower CPU usage, and significantly improved gaming performance. This magical fastest BlueStacks App Player is a tool that allows you to run Android applications on your PC with a comfortable menu. From its interface, you’ll be able to manage all the features on your virtual device and download and install tons of different apps in just a few seconds.
Purpose: This article will outline the steps you can follow for upgrading from your current version of the app to the latest version BlueStacks 4 download for pc.
Benefit: BlueStacks 4 lets you experience new capabilities, improvement in performance, robustness, stability, and ease of use. It offers new keyboard control capabilities, a new simplified UI with a clutter-free look.
As per BlueStacks review by an expert, it is one of the best Android Emulators for pc to run and play android games and apps on windows and mac, which is 6x faster than any smartphone!
| Application Name | BlueStacks App Player |
| Processor | Dual-Core 1.3 GHz or Higher |
| Memory | 2 GB RAM Minimum |
| Operating System | Windows 7/8/10 |
| Storage | 50 GB HDD |
| Additional Softwares | Direct 9.0 or Higher, .NET Framework |
| GPU | xHD 6670 or Nvidia 1030 or Higher |
BlueStacks App Player Comparison Chart
| Category | Bluestacks | Steam | Origin | uPlay |
| Price | Free | Free | Free | Free |
| Catalog | 1.5 Million Android Games 500,000+ HTML5/Flash games | 5600 | 620 | 72 |
| Compatibility | PC, Mac, Android, HTML5 and Flash | PC and Mac | PC and Mac | PC, PlayStation 4, Xbox One, Wii U, PlayStation 3, Xbox 360, Facebook, iOS, Android, Windows Phone, OnLive |
| Platforms (Mobile and HTML/Flash) | Yes | No | No | No |
| Stream Directly on twitch or Facebook | Yes | No | Yes | No |
| Multi-tasking | Yes | No | No | No |
| Play, Stream, Watch | Yes | No | No | No |
| Use Non-game Apps | Yes | No | No | No |
| System Specifications | 2GB of RAM/main memory 4GB of disk space available Dirext X 9.0 or higher installed .NET Framework 3.5 SP3 or higher | Operating system: Windows XP, Vista or 7 Processor: A quad-core CPU (such as an Intel i5 or i7 processor from 2011 or newer) Video card: An Nvidia 600 series GPU or newer, or an AMD 7000 series GPU or newer. RAM: 4 GB / 512 Mo Ram Hard drive: 1GB | 250MB of available disk space Windows 7, Windows 8/8.1, Windows 10 1GHz processor (Intel Pentium 4 or newer, AMD Athlon 64 or newer) 512 MB RAM | Operating System: 64-bit version of the following operating systems: Windows 7 SP1 / Windows 8 / Windows 8.1 / Windows 10 Processor: Intel Core i5-2500K @ 3.3 GHz or AMD FX-8120 @ 2.6 GHz RAM: 8GB Video card: Nvidia GeForce GTX 670 or AMD Radeon HD7970 / R9 280X or better (2048MB VRAM) Hard Drive: 30GB DirectX: 11 Sound: DirectX Compatible Sound Card with latest drivers Supported Controllers: Compatible with X-Input. |
Bluestacks Android Emulator Older Versions
| Software version | Compatibility | Release Date | Size | Download |
| BlueStacks 4 V 4.50.5 | Windows XP, Windows Vista, Windows 7, Windows 2000 | 15.02.2019 (The Latest) | 452.88MB | Download |
| BlueStacks 2 V 2.6.104.6367 | Windows XP, Windows Vista, Windows 7, Windows 2000 | 10.03.2017 | 318.95MB | Download |
| BlueStacks 1 V 0.8.4.3096 | Windows XP, Windows Vista, Windows 7, Windows 2000 | 24.06.2014 | 12.26MB | Download |
Top Alternatives for BlueStacks
- LDPlayer.
- Nox App Player.
- Gameloop.
- YouWave Android Emulator.
- Android X86.
- Remix OS Player.
- Memu.
- Genymotion.
Bluestacks 3 Android Emulator Overview
| License | Free |
| Version | V 3.56.76.1867 |
| OS | Windows XP, Vista, 7, 8, 10 |
| Language | English |
| Developer | Bluestack Systems, Inc. |
The BlueStacks 3 download emulator is intended as a high-performance mobile gaming interface. In fact it delivers a lag-free user experience and a powerful keyboard remapper, plus all the extras that’ll allow a keen or casual gamer to win a hard-fought mobile gaming contest. However, a fairly powerful computer is required to get the best out of Bluestacks 3.
ad




Comments are closed.