

Darktable Download For Windows 3.6.1

86.4 MB (Safe & Secure)
Darktable Photo Editor is an open-source photography workflow application and RAW developer. A virtual light-table and darkroom for photographers. It manages your digital negatives in a database, lets you view them through a zoomable lighttable, and enables you to develop raw images and enhance them.
Raw is the unprocessed capture straight from the camera’s sensor to the memory card, nothing has been altered. There are multiple alternatives in the open-source world for raw development (ufraw, dcraw, rawtherapee) but Darktable tries to fill the gap between the excellent existing free raw converters and image management tools(such as e.g. ufraw, rawstudio, f-spot, digikam, shotwell). It focuses on the workflow to make it easier for the photographer to quickly handle the thousands of images a day of shooting can produce. It’s also one of the very few FOSS projects able to do tethered shooting.
The internal architecture of Darktable allows users to easily add modules for all sorts of image processing, from the very simple (crop, exposure, spot removal) to the most advanced (simulation of human night vision). It works as an advanced image editor.
The user interface is built around efficient caching of image metadata and mipmaps, all stored in a database. The main focus lies on user interaction, both in terms of smooth interface design as well as processing speed. The high-quality output is also one of our goals.
All editing is fully non-destructive and only operates on cached image buffers for display. The full image is only converted during export. Raw image loading is done using raw speed, high-dynamic range, and standard image formats such as jpeg are also supported. The core operates completely on floating-point values, so Darktable for Windows can not only be used for photography but also for scientifically acquired images or output of renderers (high dynamic range).
You can also check the best virtual makeup software for the photo to enhance your photography.

How to use Darktable as a digital darkroom:
Darktable is designed to be a photography workflow application, meaning that if you want it to act as the center of your photo studio, it can be exactly that; you can tether your camera to it, bypass the need for an SD card tool, shoot straight into Darktable, and then review your photos, do filter-based non-destructive edits, and publish. It’s as complete a solution as you need.
Darktable basics
If you don’t have Darktable installed, you can either grab it for Linux or OS X if you’re on Linux (and why wouldn’t you be?), then you can probably find the latest version in your distribution’s software repository.
When you first launch Darktable, the program may seem a little daunting. Its interface is unique, but once you get the hang of it, Darktable is actually pretty simple. There are a few different modes that Darktable can run in. Most are named aptly:
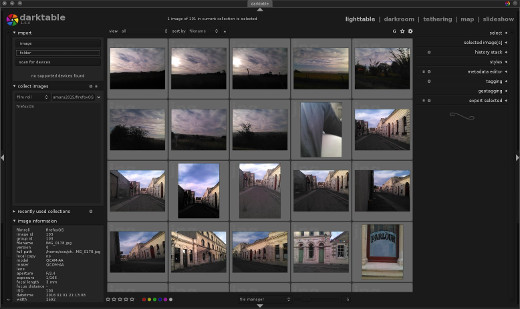
- Lighttable: an array of images, as if you were looking at your film negatives on a, well, light table
- Darkroom: the photo editing interface with non-destructive filters you can use to enhance a photo the same way you would in a dark room (or, to be fair, at some later stage)
- Tethering: for studio use, permitting you to shoot straight to disk
- Map: a world map showing geo-location for the current image or images
- Slideshow: a presentation mode, much like a slideshow
Each of these modes is accessible from the labels in the upper right corner of the Darktable window, but you’ll start in the lighttable mode.
Initially, you’ll not have any photographs loaded, so the first step is to import images, either on a per-file basis or by directory. To import, click one of the buttons in the import panel, located in the upper left corner of the Darktable window.
You can import RAW images or compressed images. When you import images, a virtual “film roll” is created and each photo is tagged as being a member of that roll. This is useful if you want to view only the photos taken during one specific shoot, or over your family holiday, and so on. Two things to keep in mind about this:
- The film roll designation is only a tag. Photos are not moved from where they live on disk when you import them into Darktable, so it’s safe to use tags to organize them within Darktable.
- You can tag a photo or group of photos with pretty much whatever you want. The film roll convention is a logical, film-like analogy that Darktable uses, but you can tag photos with any word or phrase that you find useful, and then filter your view of photos by tags.
Once you have imported a few photos, you’ll see them on a light table-style layout. The light table itself can operate in two ways: it can just be an array of photos (file manager mode), or it can be a dynamic photo viewer with mouse-wheel zooming and middle-mouse click navigation (think Blender-style efficiency). To switch between modes, use the file manager pop-up menu at the bottom of the light table panel.
The light table is truly just a photo viewer; there’s not much to it, aside from looking at all of your many choices, and possibly rating them (1 to 5 stars) based on how you (or your client) feels about them.
Most of your work will be done in the darkroom panel, so select a photo and click the darkroom label in the top right corner of the Darktable window.
Digital Darkroom
In the darkroom view, there are three main areas of interest:
- The left and right panels hold filter and property palettes. These are what you’ll use to apply effects to your photograph.
- The center screen displays your image.
- The bottom thumbnail bar provides quick access to your lighttable.
If you feel you need more room to work, you can hide panels and switch to full-screen, and if you find yourself doing any action repetitively, you can even assign keyboard shortcuts for quick access.
Your workflow will probably start with the panel on the right. Any filter placed on a photograph appears in the right filter stack. Available filters are available in the bottom right panel, labeled more modules.
The Darktable is best known for its image processing operation modules. As mentioned before, it’s capable of handling most basic image processing tasks. It helps you invert, crop, or rotate pictures, tweak the exposure, reconstruct the color info, set the white balance, correct various saturation or color-related levels, remove noise, apply lens correction, remove spots, fix chromatic aberrations, and sharpen any image, just to give you an example.
The Darktable does not disappoint when it comes to image processing effects either. It provides you with the options to add watermarks and frames, add vignettes and grain to your pictures, as well as various other interesting effects (Orton, bloom, colorize, graduated density).
You should also know that Darktable allows you to preview your image collections in a slideshow mode, which truth be told, is not yet in tip-top shape on Windows. Last but not least, the app allows you to visualize a wide array of details about your photos and even edit their metadata and geo-metadata.
System Requirements
| Memory | 4 GB RAM required. |
Official Video Intro Darktable Software
- GIMP
- digiKam
- RawTherapee
- Adobe Lightroom
- Snapseed
- Eagle
Darktable Software Overview

Technical Specification
| Software Name | Darktable Software For Windows V 3.6.1 |
| File Size | 86.4 MB |
| Languages | English, Italian, French, Spanish, Polish, Chinese, German, Japanese |
| License | Opensource |
| Developer | Johannes Hanika |
ad
Comments are closed.