
Tested ways to fix a ‘No Internet, secured’ error in Windows 10/11
"No Internet, secured" indicates you're connected to the internet but not transferring data. Read this article to fix this error in few easy steps.
No matter how proficient you are with computers, at some point in your life, you are going to struggle with the internet while working from home . This is a fact that cannot be avoided. And if you have a computer running Windows 10 or Windows 11, you could be familiar with the “No Internet, secured” notice, which is the most common internet issue of all the problems that people experience. Online security is irrelevant if you’re not online, right? Sometimes this notification shows when you have Internet connectivity. It shouldn’t be there whether you have Internet or not. How do you fix this ancient Windows problem?
There are many reasons for this error, the most common being a change in your configuration settings like your IP address, which could cause your router to have problems connecting to the Internet. Any program, including an update to the operating system, can cause this problem.

READ MORE:
- WiFi analyzer app to fix wifi network issues
- Learn how to setup home Wi-Fi Network
- What is Wi-Fi mesh network
ad
How to fix the ‘no Internet secured’ error
There are many ways to fix this problem. It’s a good idea to run through each of the below options, as any of it can fix the problem. It’s just that you don’t know which one will work for every occurrence of this error!
Since it is hard to pin down the exact cause of this error, you’ll have to try one or more of these solutions.
Check your Wi-Fi router
As previously stated, the most typical cause of the “No Internet, secured” condition is being too far from the source of your internet connection. This enables your computer to detect the Wi-Fi network and “connect” to it, but the signal will be too weak for data transmission.
Move your computer closer to the router, or move the router closer to your computer. In general, you should position your home’s internet router in a central area, high off the ground, and away from any items or obstructions that could interfere with the signal.
READ MORE:
- Learn, how to build a smart and secure home network
- Read this article to set your home Wi-Fi network
- How to set up a home internet network
Reboot your network router and computer
Restarting your router will reestablish its connection with your internet service provider (ISP) and all of your devices. It may sound too simple to be true, but a simple restart can resolve a variety of internet issues.
Restarting an internet router requires no special techniques. Unplug the router’s power cable for at least 10 seconds, then reconnect it and give it a few minutes to restart. Try reconnecting to the network once it’s ready.
Additionally, you should consider restarting your computer. This can also assist resolve a surprising number of bugs.
Check in Device Manager
You may update, disable and re-enable, and reinstall your devices, including the network adapter, through the Windows device manager (best accessible by typing “device manager” into the Start search bar).
In Device Manager, choose “Network adapters,” then locate and right-click your network adapter.
The following steps should be attempted in this order:
- Update driver.
- Enable “Flight mode” in the taskbar, restart the computer, then “Enable device” and disable “Flight mode.”
- Uninstall the device, restart the computer, and then reinstall the device. (This should happen automatically for integrated or motherboard adapters. To install the drivers for a USB adapter, simply disconnect and reconnect it.)
Try Out the Windows Troubleshooter
Windows 10 and 11 are difficult. Even the smallest PC runs dozens of processes, some from 20 years ago. Errors or glitches are almost inevitable.
Both Windows versions feature automatic troubleshooting tools. Windows provides two internet troubleshooters because they’re so common. These tools will check for fundamental errors and correct bugs.
To find both of Windows’ internet troubleshooters:
1. Open the Settings app on your PC.
2. In Windows 10, select Update & Security. In Windows 11, select System.
3. Scroll down the list of options and click Troubleshoot, then select Additional troubleshooters (10) or Other troubleshooters (11).
4. Click and go through both of the internet troubleshooting tools on this page. They’re called Internet Connections and Network Adapter.
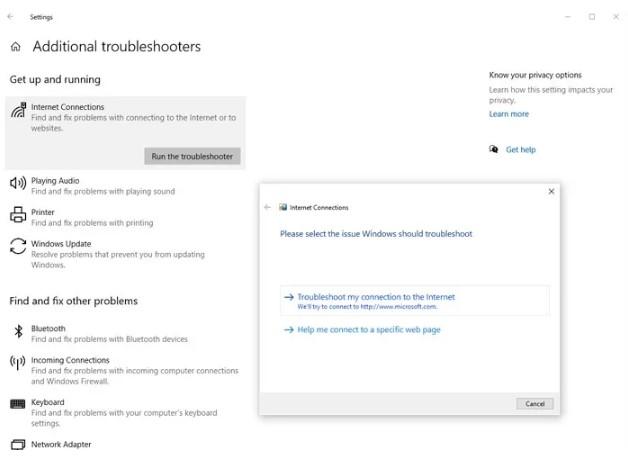
These tools should immediately identify and resolve the problem. Continue reading if it states that it cannot discover any issues or that it found an issue but cannot fix it.
Change your WiFi connection properties
This is an unusual issue, but you should also ensure that the Wi-Fi network and your PC are interacting correctly. If the PC determines that the Wi-Fi network does not support complete connectivity, it will not function.
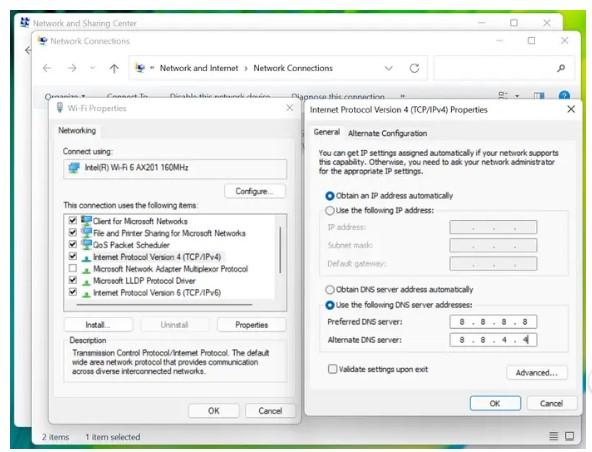
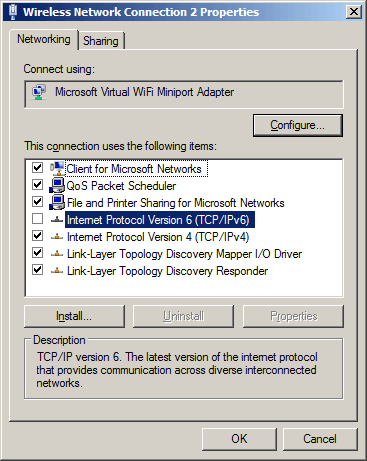
- While connected to the network you are attempting to fix, launch the Control Panel app and select Network and Internet, Network and Sharing Center, and Change adapter settings.
- Right-click the Wi-Fi network to which you are connected and choose Properties.
- On the Networking tab, ensure that the following seven choices are selected:
- Client for Microsoft Networks
- File and Printer Sharing for Microsoft Networks
- QoS Packet Scheduler
- Internet Protocol Version 4 (TCP/IPv4)
- Microsoft LLDP Protocol Driver
- Link-Layer Topology Discovery Responder
- Link-Layer Topology Discovery Mapper I/O Driver
4. If Internet Protocol Version 6 (TCP/IPv6) is selected, deselect it by clicking the corresponding box.
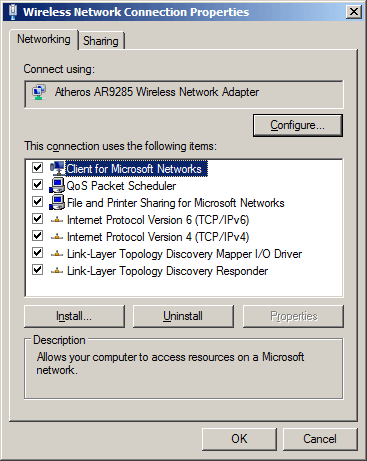
Check your internet connection again. Return here and recheck Internet Protocol Version 6 (TCP/IPv6) if nothing changes.
Change your DNS server
The Domain Name System (DNS) server of your Wi-Fi connection is what allows you to connect to websites and other computers. If your DNS server is malfunctioning, you will be disconnected from the internet.
In most circumstances, your PC will utilize the DNS server provided by your ISP. Manually configuring your DNS server can resolve “No Internet” issues.
- Follow the steps in the section Change your Wi-Fi properties to access the Properties window for your connection.
- To open a new window, double-click the Internet Protocol Version 4 (TCP/IPv4) option.
- Click the Use the following DNS server addresses option on the General tab.
- Enter the new DNS servers you wish to utilize. Try 8.8.8.8 and 8.8.4.4 if you are unsure; these are the addresses for Google’s Public DNS project. You can also try 9.9.9.9 and 1.1.1.1, which are Quad9’s DNS servers
- Click the OK button to save your changes.
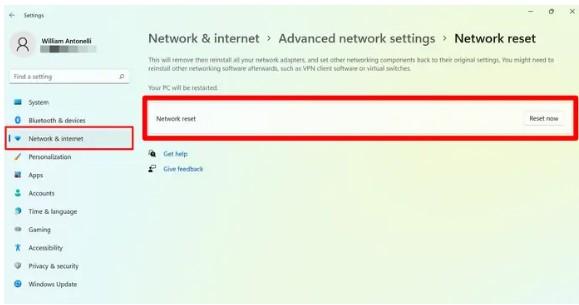
Try with resetting your network
If nothing else has worked, this is the only other computer-based action you can take.
In the same way that a factory reset will erase everything on your device and restore it to its previous configuration, a “network reset” will remove any Wi-Fi settings. It will be as if you have never connected your PC to the internet.
Note that this will delete any previously saved Wi-Fi passwords. Moreover, if your computer is linked to a larger network of computers, you will lose that connection as well.
- Launch the Settings application and select Network and Internet.
- In Windows 10, click the Status icon. Scroll down and click Advanced network options in Windows 11.
- Click Network reset, followed by Reset now.
- The system will resume. When it restarts, all of your Internet settings will be reset.
Update the network adapter
Sometimes, an outdated driver can prevent your computer from connecting to the Internet. To fix:
- Press the Windows key + R and type “devmgmt.msc” in the Run dialog box. Press enter and this will open the device manager window
- In this window, double-click on “Network adapters” to expand it
- Identify the network adapter that your computer is currently using, right-click on it and choose “update driver software”
![network-adapter]()
- In the “update driver” dialog box, click on the “Search automatically” option. Windows will search for the updated driver software
- Next, open “network and sharing center.” To open, right-click on the network icon in your computer’s notification area and choose “open network and sharing center”
- Look for “change adapter settings” in the left-hand menu and click on it
- Next, right-click on your wireless network and choose “properties”
- Uncheck the Internet protocol version 6 (TCP/IPv6) to disable it. Click OK
- Close the window and restart your computer. Now, you should be able to access the Internet
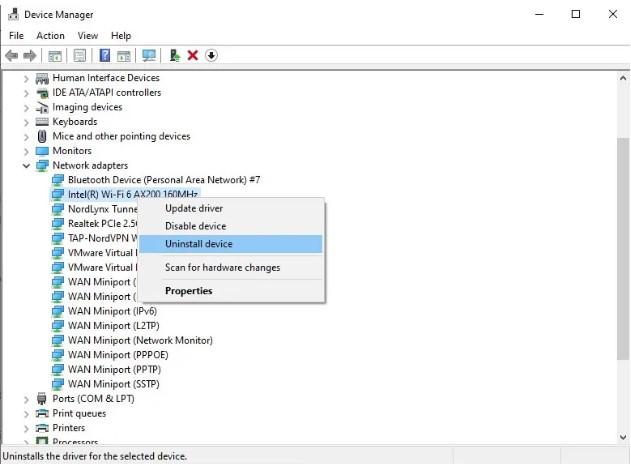
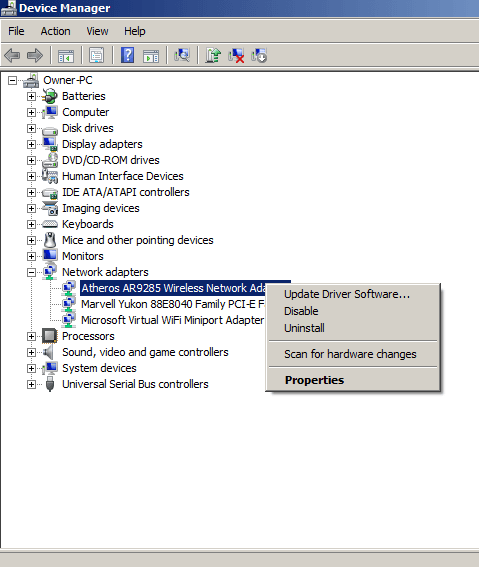
If you’re not able to access the Internet still, try uninstalling your network adapter. To do that:
- Open the device manager and double-click on network adapters to expand it
- Locate the network adapter you’re using for Internet connection, right-click on it, and choose “uninstall.” This will uninstall the network adapter from your computer
- Next, look for a menu item called “action.” right at the top of the pane. Click and choose “Scan for hardware changes.” Windows will automatically scan and detect the network adapter and will even install it for you
- Wait for the installation and then, restart your computer
This should fix any network adapter-related problems.
Reinstall network driver software
The majority of the hardware on your Windows computer is controlled by “drivers,” which are small pieces of software that instruct the machine how to operate. Some drivers may malfunction over time, causing the hardware they control to cease functioning. In this instance, the driver can be reset by uninstalling and reinstalling it.
To do this:
1. Right-click the Windows icon in the taskbar and choose Device Manager from the resulting menu.
2. Open the Network adapters menu in Device Manager and locate your computer’s Wi-Fi driver. Its name varies from computer to computer, although words such as Wi-Fi 6 and Wireless Network Adapter are indicative.
3. Right-click the driver and select Uninstall device.
4. In the dialog box that displays, select Delete the driver software (Windows 10) or Attempt to delete the driver (Windows 11), and then click Uninstall.
5. Restart your PC.
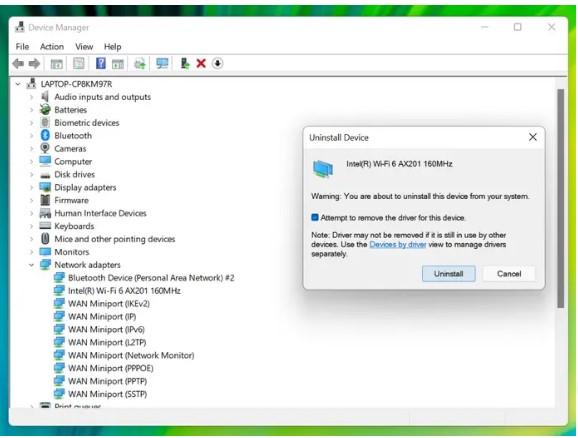
As the machine restarts, the Wi-Fi driver will be reinstalled. This will (hopefully) resolve any existing problems.
Note: Check the website of your PC’s manufacturer for updated Wi-Fi drivers.
Modify the TCP/IP properties
If you’re unable to connect to your Internet, and if you’re using Windows 10 creators’ update or Windows 10 Fall Creators Update, try changing the TCP/IP settings.
- Hold the Windows key and press the letter “R.” In the run window, enter “ncpa.cpl” and click OK
- This will open the “network connections” window
- Identify your WiFi connection, right-click on it and choose “properties”
- Double-click Internet protocol 4 or TCP/IPv4
- Choose “Obtain an IP address automatically” and “obtain DNS server automatically” options
- Next, click the “advanced” button. You can find it on the right-hand bottom of the dialog box
- Go to a tab called “WINS”
- Scroll down to the NetBIOS setting and choose “enable NetBIOS over TCP/IP” setting. Click OK on all the dialog boxes
![netbios setting during fixing no Internet secured error]()
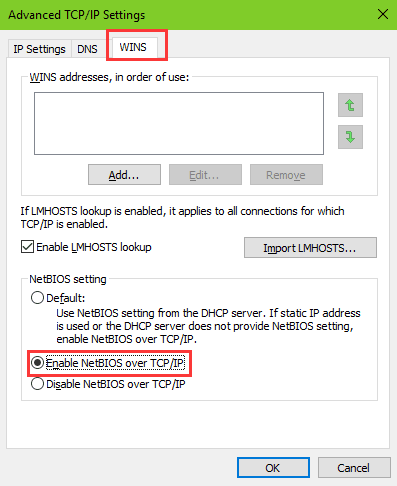
Closeout of everything. Wait a few minutes and open the network adapter again. This time, the IPv4 connectivity should be in the “Internet” state, and this should open any web page for you.
READ MORE:
- Types of computer networks
- What is 5G wireless technology and how it would change our lives
- Pros and cons of fixed wireless broadband
Using the command prompt, refresh your connection.
The Command Prompt is a potent but difficult-to-master application that allows you to control virtually every part of your computer. If you know the orders to input, there is nothing to fear despite the menacing appearance of the screen.
Right-click the Command Prompt that appears in the search results and select Run as administrator.
Once it’s opened, you’ll need to execute five separate commands. After entering one command and pressing Enter, proceed to the next.
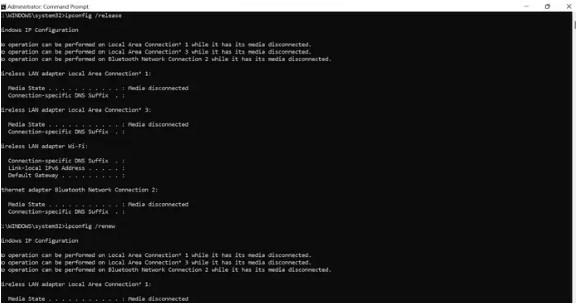
- netsh winsock reset
- netsh int ip reset
- ipconfig /release
- ipconfig /renew
- ipconfig /flushdns
Then restart your computer.
Change power management properties
Another possible cause of the “no Internet secured” error could be due to power management settings. You’ll most likely face this problem if you’re using Windows 10 creators update or Windows 10 Fall Creators Update versions. To work around this problem:
- Press the Windows key + X to get to the jump list
- Select device manager and expand network adapters
- Double-click your wireless network and go to the “power management” tab
- Uncheck the “Allow the computer to turn off this device to save power” option
- Restart your computer and check if you can connect to the Internet now.
Disabling WiFi sharing program
In Windows 10, the router driver can have a conflict with the wireless driver and this can throw up “no internet, secured” error. To fix this conflict,
- Open network adapters. Right-click on the wireless network you’re using and choose “properties”
- Click on “sharing” tab
- Uncheck “Microsoft network adapter multiplexor protocol” and any other item related to WiFi sharing. To know which items are related to sharing, click on each item and below, you’ll get a description of its purpose. Based on this description, choose the items you have to uncheck
- Closeout of network adapters and try connecting to the Internet
Yes, the “no Internet secured” error is a common error. You’ll most likely get it in Windows 10 than in other versions. Since many changes in configuration settings can cause this error, you’ll have to run through different options to get a fix. In our experience, one of the above solutions should fix this problem for you.
Let us know in the comments section if you’ve found any other way to solve this problem.
ad
Comments are closed.