
If you are an avid mobile gamer or an app enthusiast, chances are you have come across BlueStacks—an immensely popular Android emulator that allows you to run your favorite Android apps and games seamlessly on your PC. However, there are times when even the most reliable software encounters hiccups, and you might find yourself frustrated when the BlueStacks engine refuses to start. In this comprehensive guide, we will delve into the common causes behind this issue and provide effective solutions to get your BlueStacks emulator up and running again. Whether you are facing ‘BlueStacks Engine won’t start‘ or ‘BlueStacks not launching‘ problems, our step-by-step troubleshooting tips will help you overcome these obstacles and get back to your Android virtual experience in no time. So, let’s dive in and troubleshoot the BlueStacks startup issue together!”
Why Does Bluestack Error Pop Up On The Screen?
ad
Encountering this error message after updating BlueStacks has been a common occurrence for many users. It seems that the issue arises due to a bug in the update process, leading to the error message. By default, BlueStacks often uses OpenGL as its graphics option, but this can be manually fixed by switching to DirectX. Alternatively, you can try reinstalling BlueStacks to see if that resolves the problem. Another potential solution is to switch to an earlier version of Windows or enable virtualization, which might help in repairing the “BlueStacks Engine Won’t Start” problem.
If you face this error, attempting to restart your PC or the BlueStacks Engine may also be worth trying. It’s crucial to remember that once this problem happens, users are unable to start the Engine or use their PC to play Android games.
In some cases, this issue might also occur after a Windows update. Once again, it appears to be related to a bug either in the Windows or BlueStacks update. In rare instances, improper settings or disabled virtualization technology could also be contributing factors to the problem.
ad
📚 Also Read: How to Change Location on BlueStacks
Ways To Fix Bluestacks Engine Won’t Start
The “Bluestacks Engine Won’t Start” error message may appear after updating Bluestacks. This is likely due to a bug in the update.
To fix this issue, you can try the following methods:
1. Disable the Antivirus Application
Consider disabling your antivirus application, especially if you are using Avast. Typically, there is an option to disable it. Simply right-click on the antivirus icon in the system tray and choose the “Disable” option.
Temporarily disable the antivirus application and then check if BlueStacks functions properly during this period. If BlueStacks works fine without any issues, it suggests that the problem is primarily caused by the security application. To avoid such issues in the future, consider switching to a different security application.
2. Adjust the RAM Capacity
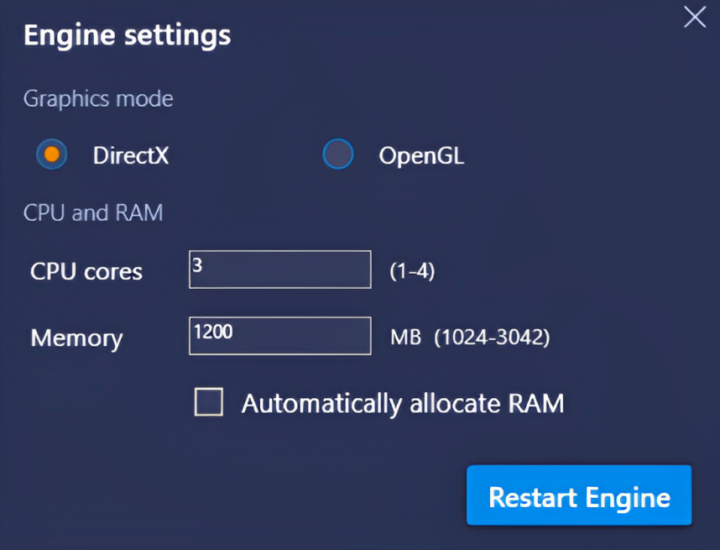
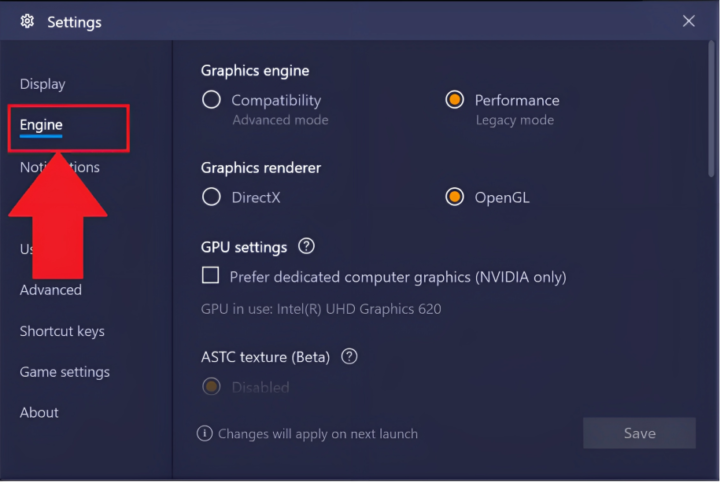
In BlueStacks, you have the option to choose between using OpenGL or DirectX in the Engine settings. By default, BlueStacks is set to use OpenGL. However, switching to DirectX and rebooting the system often resolves the issue at hand. To make this change, follow the steps below:
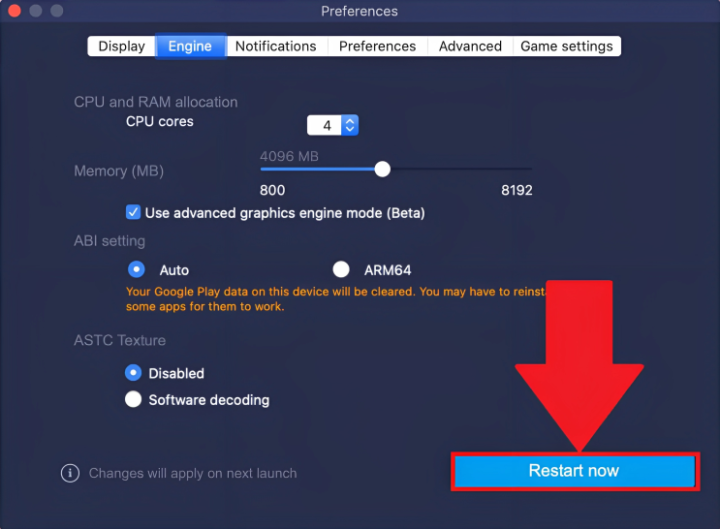
- Open BlueStacks and click on the downward arrow representing “Options” located in the top right corner, next to the tools icon. Then, click on “Settings” and navigate to the “Engine” section on the left panel.
![click on Settings and navigate to the Engine section on the left panel.]() Within the Engine settings, select “DirectX” and apply the changes. Don’t forget to restart your system to ensure the modifications take effect.
Within the Engine settings, select “DirectX” and apply the changes. Don’t forget to restart your system to ensure the modifications take effect.
 Within the Engine settings, select “DirectX” and apply the changes. Don’t forget to restart your system to ensure the modifications take effect.
3. Enable The Virtualization
To resolve this issue, it is important to ensure that virtualization is enabled on your PC. Many users have successfully addressed the problem by enabling the Virtualization option in their PC’s BIOS settings.
Virtualization provides a significant boost to Intel hardware while virtualizing, thereby helping BlueStacks run smoother and faster. However, before enabling the Virtualization technology, it’s essential to determine whether your system supports this feature or not.
To check the availability of Virtualization Technology, follow these steps. The method for testing the availability varies depending on your processor. If you have an Intel processor, follow the instructions in the Intel section.
On the other hand, if you have an AMD processor, disregard the Intel section and proceed to the AMD section to follow the provided instructions. By doing so, you can ensure that Virtualization is properly enabled, allowing BlueStacks to perform optimally.
Here are the specific instructions for checking virtualization support on Intel and AMD processors:
Intel processors:
- Open a command prompt.
- Type the following command and press Enter:
systeminfo | findstr /i "Virtualization Enabled in Firmware"
If the output of the command includes the word “Yes,” then your PC supports virtualization.
AMD processors:
- Download and install the AMD-V Detection Utility: https://www.amd.com/en/support/kb/faq/pa-100.
- Run the AMD-V Detection Utility.
- The utility will display a message indicating whether your PC supports virtualization.
4. Attempt Using the Repair Tool
If you have tried all the previous methods and the BlueStacks Engine Won’t Start issue remains unresolved, it is advisable to consider using the Reimage Repair Tool.

This powerful tool can scan and restore any missing or corrupted files, thereby pinpointing the root cause of the problem. Additionally, Reimage can optimize your system for optimal performance, ensuring smoother operations. By utilizing the Reimage Repair Tool, you stand a better chance of resolving the BlueStacks startup problem and enhancing your overall system functionality.
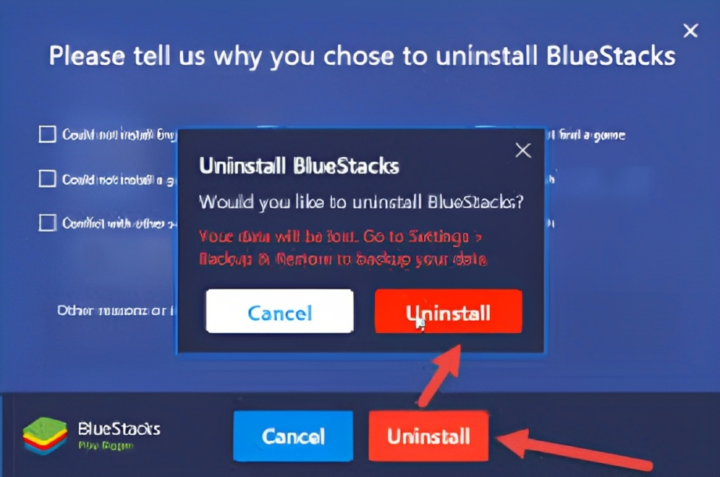
5. Perform a Complete Deletion and Reinstallation
Uninstalling and reinstalling BlueStacks can often resolve the “BlueStacks Engine Won’t Start” issue. Here are the step-by-step instructions for the process:
- Press the Windows key and start typing “%temp%” (without quotes) and hit Enter. Hold the CTRL key and press A (CTRL + A) to select all the contents in the temp folder.
- Press the delete key on your keyboard to remove the selected items, and confirm any additional prompts. Ensure to save any important files before deleting. You can download the BlueStacks uninstaller from various sources on the internet.
![BlueStacks uninstaller]() After downloading the uninstaller, run it and click “Yes” to grant the necessary permissions. Once the uninstallation process is complete, click “Ok.” Now, proceed to install BlueStacks again and download the latest version from the internet.
After downloading the uninstaller, run it and click “Yes” to grant the necessary permissions. Once the uninstallation process is complete, click “Ok.” Now, proceed to install BlueStacks again and download the latest version from the internet.![download-bluestacks]() Press the Windows key and R simultaneously, type “MSConfig,” and hit Enter. In the Boot tab, check the “Safe Boot” option, and choose “Minimal” under Safe Boot. Click “Ok.”
Press the Windows key and R simultaneously, type “MSConfig,” and hit Enter. In the Boot tab, check the “Safe Boot” option, and choose “Minimal” under Safe Boot. Click “Ok.”![Press the Windows key and R simultaneously, type MSConfig, and hit Enter]() Restart your computer when prompted, and it will boot into safe mode. Once in safe mode, locate the downloaded BlueStacks installer and run it to install BlueStacks on your device. Remember to turn off Safe Mode after the installation is complete.
Restart your computer when prompted, and it will boot into safe mode. Once in safe mode, locate the downloaded BlueStacks installer and run it to install BlueStacks on your device. Remember to turn off Safe Mode after the installation is complete.- Again, press the Windows Key + R, type “MSConfig,” and hit Enter. In the Boot tab, uncheck the “Safe Boot” option, and click “Ok.” Restart your computer once again to return to normal mode. Verify whether BlueStacks is now functioning correctly on your device.
 After downloading the uninstaller, run it and click “Yes” to grant the necessary permissions. Once the uninstallation process is complete, click “Ok.” Now, proceed to install BlueStacks again and download the latest version from the internet.
 Press the Windows key and R simultaneously, type “MSConfig,” and hit Enter. In the Boot tab, check the “Safe Boot” option, and choose “Minimal” under Safe Boot. Click “Ok.”
 Restart your computer when prompted, and it will boot into safe mode. Once in safe mode, locate the downloaded BlueStacks installer and run it to install BlueStacks on your device. Remember to turn off Safe Mode after the installation is complete.
6. Install the Most Suitable Windows Version
If you started experiencing the BlueStacks issue after a recent Windows update, it is likely related to the latest Windows build. In such cases, the best course of action is to revert to the previous version and wait for a future Windows update that doesn’t cause the problem.
Please note that there is a specific time limit (usually 10 days) within which you can revert to the previous Windows build after an update. Beyond this period, the option may not be available. To revert to the previous build, follow these steps:
- Press the Windows key + I to open the Settings menu.
![Press the Windows key + I to open the Settings menu]() Go to “Update & Security.”
Go to “Update & Security.”![Go to Update & Security.]() In the left pane, click on “Recovery.”
In the left pane, click on “Recovery.”![In the left pane, click on Recovery.]() Click on the “Get Started” button under “Go back to an earlier build.”
Click on the “Get Started” button under “Go back to an earlier build.”
 Go to “Update & Security.”
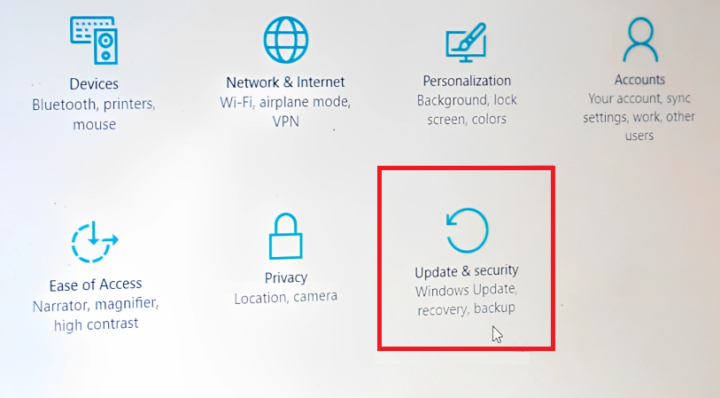 In the left pane, click on “Recovery.”
 Click on the “Get Started” button under “Go back to an earlier build.”
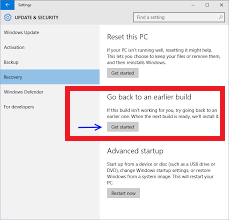 If the “Go back to an earlier build” option is greyed out and unavailable, it means that reverting to the previous version is no longer possible. In that case, you should proceed with the steps presented on the screen, and if the option is available, click the “Get Started” button to initiate the process.
7. Restart The Engine
BlueStacks is a popular Android platform that offers the convenience of running Android games and applications on your PC or Mac. However, there are instances where you may encounter an error message stating that the Engine couldn’t be launched when starting BlueStacks.

Upon encountering this error, users often attempt to restart the Engine from the error prompt or even reboot the PC to give it another try. Unfortunately, these common solutions often do not resolve the issue and prevent users from utilizing BlueStacks as intended.
8. Reboot The Device
Refreshing or updating Windows is often an effective way to resolve this issue. Start by checking for any available Windows updates on your PC and install the latest ones.
Once the updates are installed, restart your computer and launch your game to see if the issue has been resolved. Performing regular updates ensures that your Windows system is optimized and can often lead to a smoother gaming experience without the previous problem.
9. Try Altering The Security Properties
The default security settings might be the cause of the issue. To verify and rectify this problem, follow these steps:
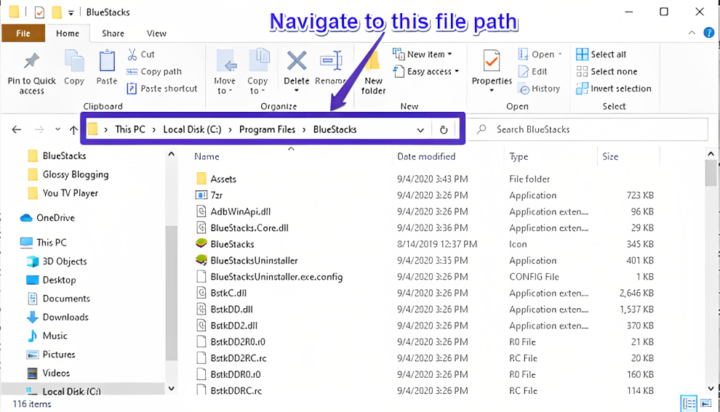
- Navigate to the Bluestacks installation directory and open it.
![Bluestacks-filepath]() Locate the HD-StartLauncher file, right-click on it, and select “Properties.”
Locate the HD-StartLauncher file, right-click on it, and select “Properties.”![HD-StartLauncher]() In the Properties window, go to the “Security” tab and click on “Edit.”
In the Properties window, go to the “Security” tab and click on “Edit.”![Edit-properties]() Ensure that the “Allow full control” option is turned on in the permissions section.
Ensure that the “Allow full control” option is turned on in the permissions section.![Allow-full-control]() Apply the changes and close the window.
Apply the changes and close the window.
 Locate the HD-StartLauncher file, right-click on it, and select “Properties.”
 In the Properties window, go to the “Security” tab and click on “Edit.”
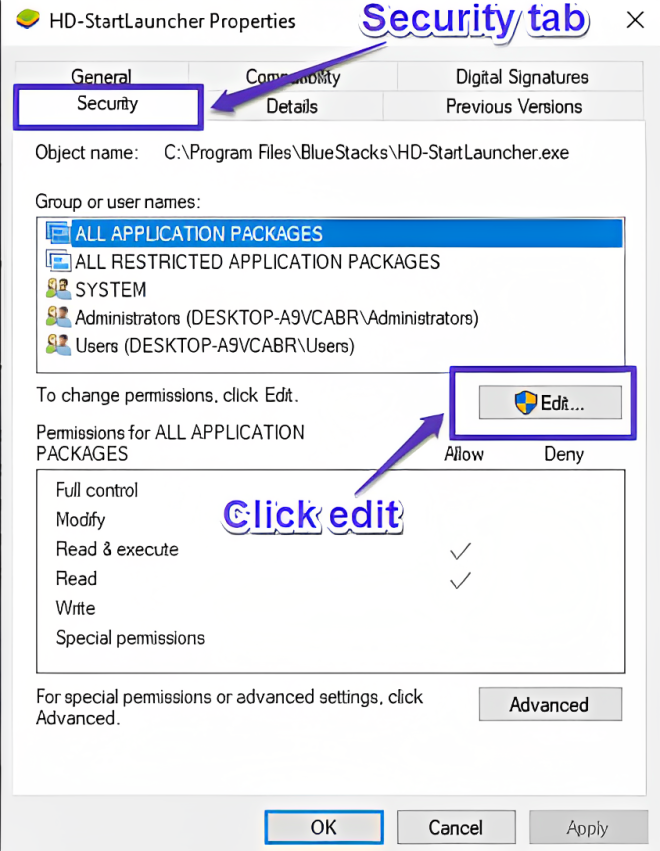 Ensure that the “Allow full control” option is turned on in the permissions section.
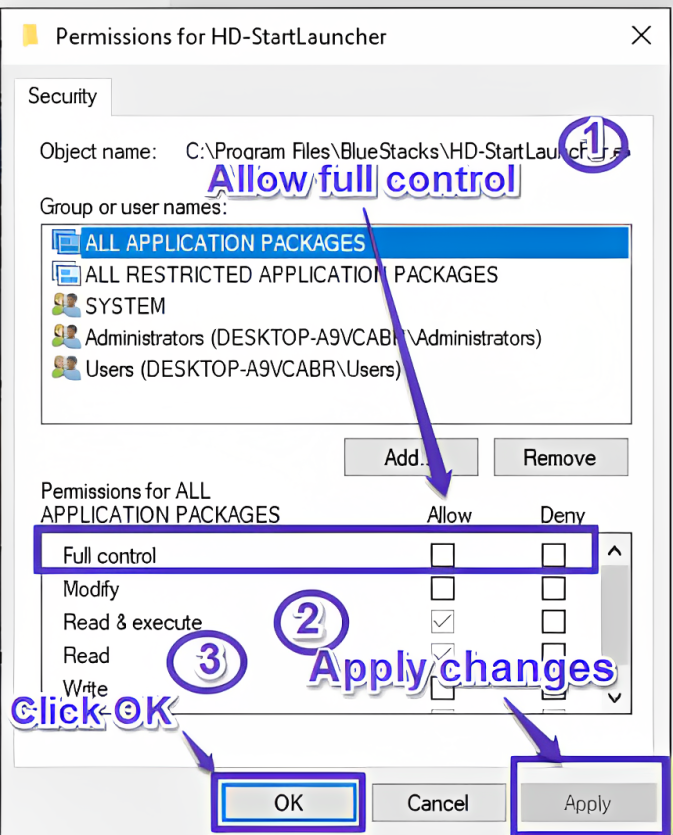 Apply the changes and close the window.
By granting full control permissions, you will have the necessary control to run the emulator and effectively resolve the BlueStacks engine not starting error.
10. The Graphics Are Incompatible
The “BlueStacks 3 couldn’t turn over the motor” issue on Windows 10/8/7 occurs when attempting to launch the BlueStacks 3 application. It may arise because your PC doesn’t support BlueStacks 3.
 BlueStacks 3 will suggest restarting the PC or the Engine to resolve the problem, but this might not always provide a complete solution to the issue.
11. Use Compatibility Mode to Run Bluestacks
If you are familiar with running applications in safe mode to troubleshoot issues on Microsoft, we can follow the same approach to address the Bluestacks engine problem. To enable safe mode for the Bluestacks engine, follow these steps:
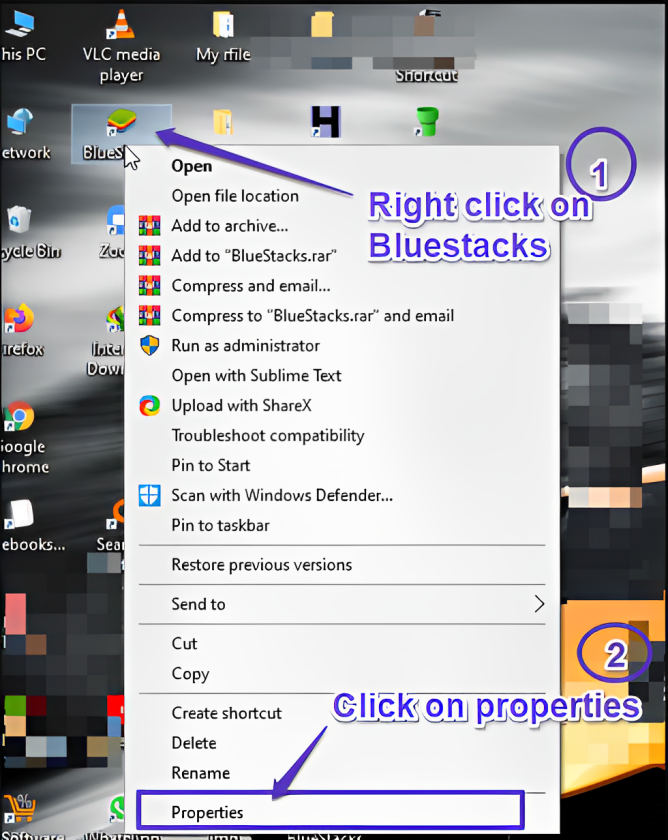
- Locate the “Bluestacks engine” shortcut on your desktop, right-click on it, and select “Properties.”
![rightclick- BlueStacks-properties]() In the Properties window, go to the “Compatibility” tab.
In the Properties window, go to the “Compatibility” tab.![BlueStacks-compatitibilty-tab]() Click on the checkbox labeled “Run this program in compatibility mode.”
Click on the checkbox labeled “Run this program in compatibility mode.”![Click on the checkbox labeled Run this program in compatibility mode.]() Click on “OK” and then “Apply.” If a window pops up, select “Run the compatibility troubleshooter” and click “Yes.”
Click on “OK” and then “Apply.” If a window pops up, select “Run the compatibility troubleshooter” and click “Yes.”- Windows will automatically determine the most suitable mode for the emulator.
 In the Properties window, go to the “Compatibility” tab.
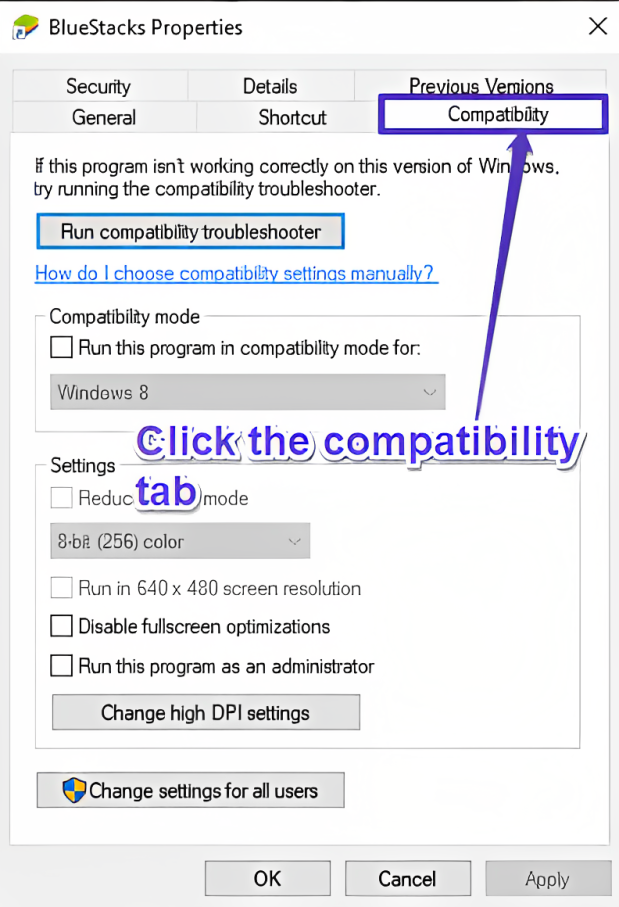 Click on the checkbox labeled “Run this program in compatibility mode.”
 Click on “OK” and then “Apply.” If a window pops up, select “Run the compatibility troubleshooter” and click “Yes.”
FAQ’s
What should I do if the BlueStacks Engine still won’t start after trying all the solutions?
If the BlueStacks Engine still won’t start after trying all the solutions, it is essential to reach out to BlueStacks support or community forums. They may have additional troubleshooting steps or be able to provide specific guidance for your unique situation.
Why does the BlueStacks error pop up on the screen?
Encountering the “BlueStacks Engine Won’t Start” error message after updating BlueStacks is a common occurrence for many users. It is likely caused by a bug in the update process, leading to the error message. BlueStacks often defaults to using OpenGL as its graphics option, but you can manually switch to DirectX to resolve this issue. Alternatively, reinstalling BlueStacks or switching to an earlier version of Windows might help fix the problem.
Is Bluestacks Engine Good For My PC?
People in modern technological age use various Android apps on their systems, and to do so, they use an emulator. The Bluestacks engine is a popular Android emulator. As useful as it is, it can occasionally display the vexing issue of the Bluestacks engine failing to start.
Does BlueStacks support the latest Android versions and apps?
Yes, BlueStacks usually supports the most recent Android versions and apps. However, due to software changes and app development, compatibility difficulties may happen on occasion. BlueStacks routinely provides updates to fix such compatibility concerns and ensure a pleasant user experience.
Yes, BlueStacks is regarded safe to use. It is a well-known and commonly used Android emulator, and the official version is devoid of spyware and viruses. To avoid potential security risks, get BlueStacks from the official website or authorized sources.
Conclusion
BlueStacks provides a seamless platform for enjoying Android apps and games on your PC. Despite encountering the “BlueStacks Engine Won’t Start” issue, our comprehensive guide offers effective solutions to troubleshoot and resolve the problem. Follow the steps provided to enhance your Android virtual experience and get back to enjoying your favorite apps and games hassle-free with BlueStacks. Happy gaming!
ad
Comments are closed.