
Are you looking for a convenient way to enjoy YouTube videos offline? With VLC Media Player, you can now download YouTube videos effortlessly and watch them anytime, even without an internet connection. In this guide, we’ll walk you through the steps to use VLC to download YouTube, a versatile and widely-used media player application. With VLC’s powerful features and easy-to-use interface, you can save your favorite YouTube videos directly to your device for offline viewing, allowing you to enjoy them at your convenience. So let’s explore how you can make the most of VLC Media Player to download and enjoy YouTube videos offline.

ad
Method 1: Downloading YouTube videos using VLC and a web browser.
The process of vlc media player download youtube videos is simple, you play the video in your browser and save the file by right-clicking on the video. The important thing is to transfer the video playback from YouTube to your browser. By following these steps, you may quickly download YouTube videos and have them accessible offline, allowing you to watch your favorite material whenever and wherever you decide on.
For Windows Users:
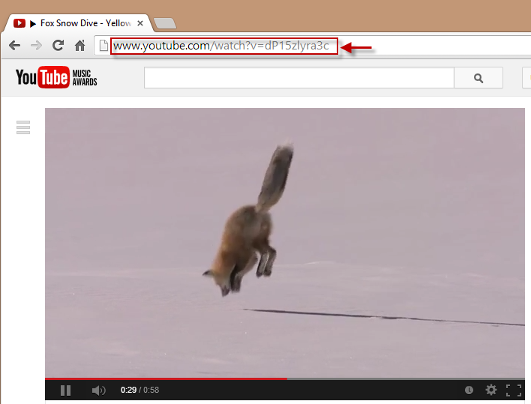
1. To download a video from YouTube, the first step is to obtain the URL of the video while it’s being played on the YouTube platform. This URL is crucial as it allows you to access and download the video directly. By following this simple step, you’ll be on your way to saving YouTube videos for offline viewing and enjoying them at your convenience.
ad
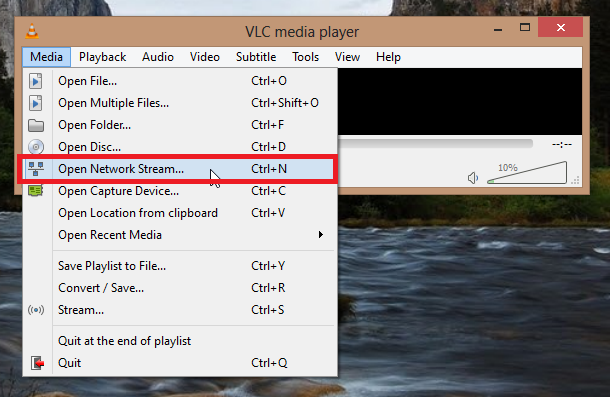
2. Launch VLC, click “Media” from the top menu and choose “Open Network Stream.”
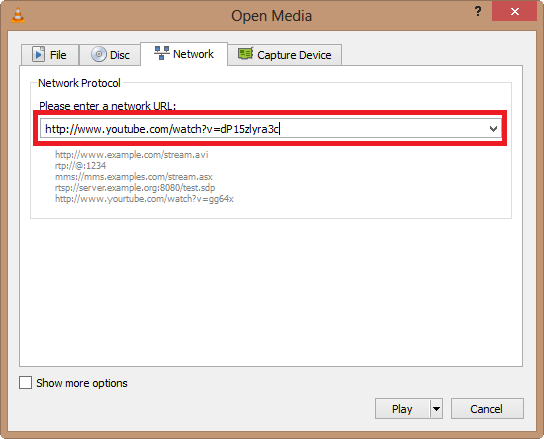
3. Paste the copied URL into the network URL bar. When you press the Play button, VLC will begin to analyze it.
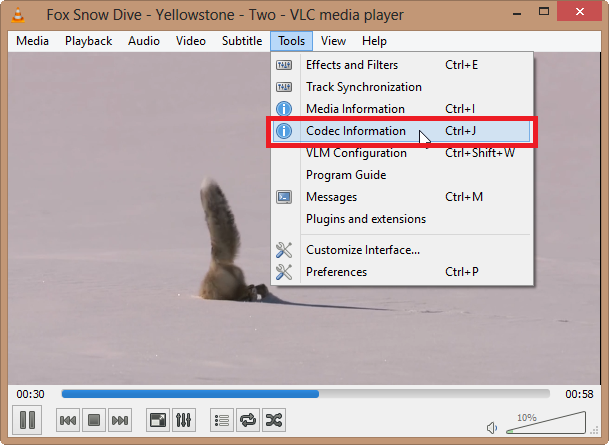
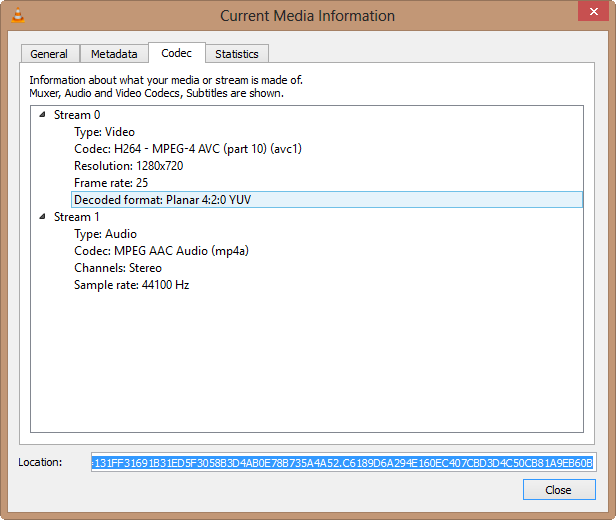
4. The YouTube video will open and play in VLC after some time, depending on your internet connection and video length. Now, go to the “Tools” menu and select “Codec Information.”
5. Ctrl+A while holding the mouse gives us the video file location, as shown in the image below:
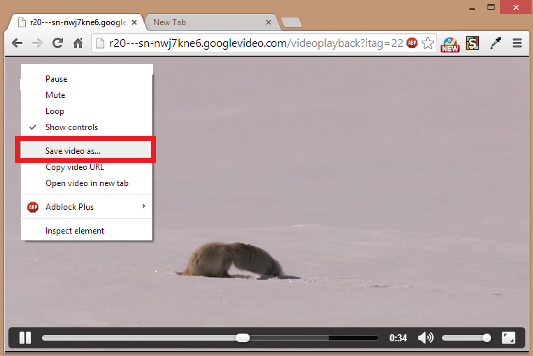
6. Open your browser and paste the copied URL in the address bar.

7. Press “Enter.” It may take some time for the YouTube video to load. Once it loads, right-click on the video and choose “Save video as” to download it to your Windows PC.
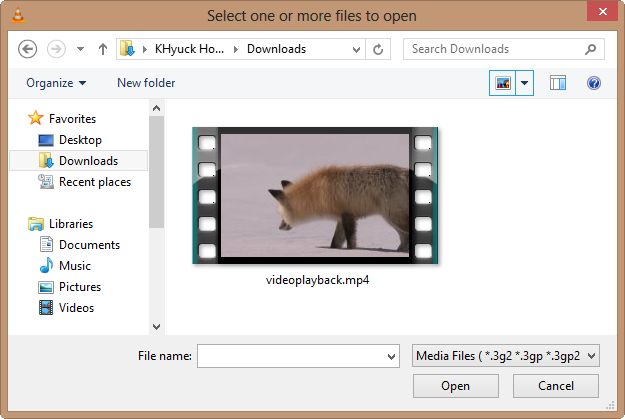
8. Once the file has been successfully downloaded, you now have it stored on your PC. You can access the file in the designated location where you chose to save it. With VLC Media Player installed on your computer, you can enjoy offline viewing of the downloaded YouTube video at your convenience.
For Mac Users:
1. Start by visiting the desired video on the YouTube website. Once you have found the video you want to download, copy its URL from the address bar of your web browser.
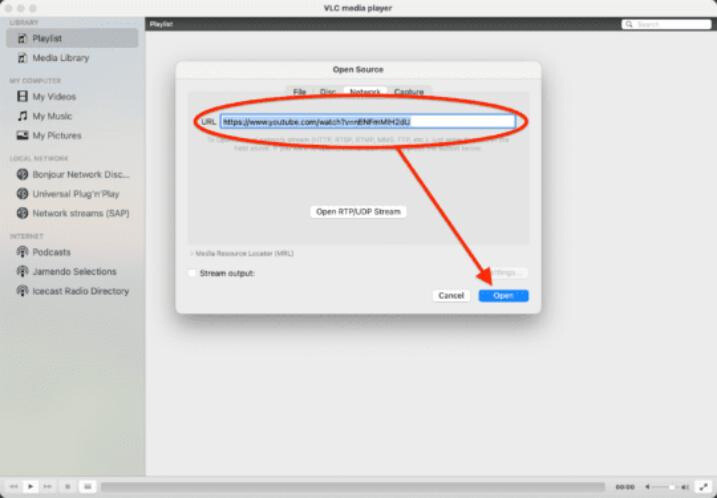
2. To begin the process of downloading a YouTube video using VLC on your Mac, launch the VLC media player. Then, navigate to the menu panel and click on “File” followed by “Open Network…”.

3. After opening the network window in VLC on your Mac, just put the copied URL of the YouTube video into the URL bar. After you’ve pasted the URL, click “Open” to continue.
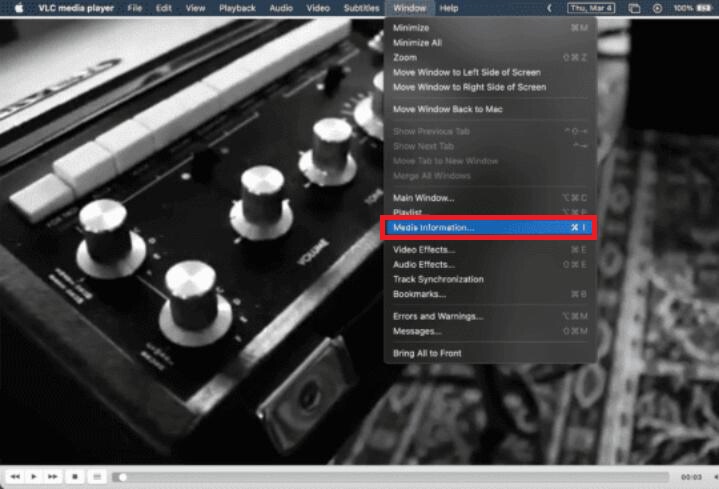
4. Once VLC successfully locates and starts playing the video from the provided URL, you can proceed by selecting “Window” and then “Media Information” from the VLC menu.
5. Next, you can copy the URL from the “Location” bar displayed in the Media Information window.
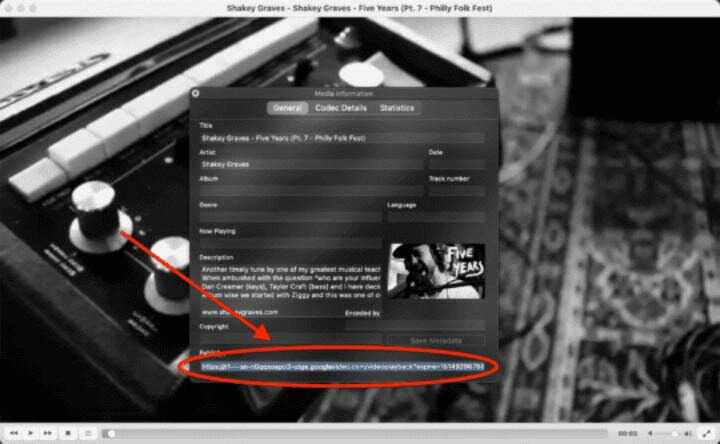
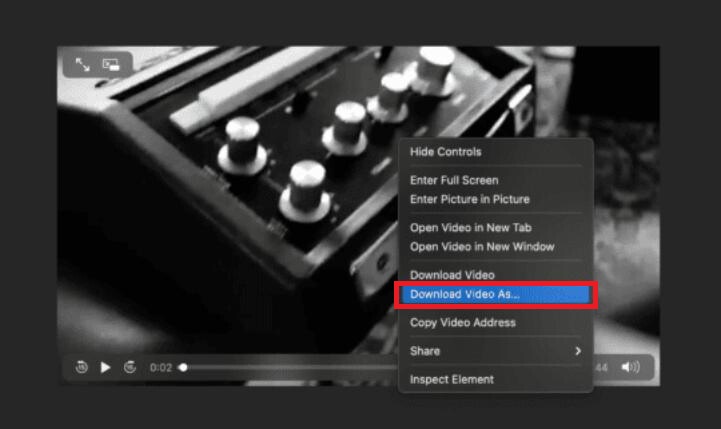
6. Open your favorite browser and paste the copied URL into the address bar to download the YouTube video to your Mac. To see the video, Press “Enter” into the browser. When the video has finished loading, right-click on it and select “Download Video As” from the context menu. This initiates the download and saves the YouTube video to your Mac.
Method 2: Downloading YouTube Videos with VLC by Streaming and Saving the Video as a File
If you want to download videos from YouTube using VLC, you can utilize its streaming feature to save the video as a file. This allows you to store the video on your Windows or Mac device and enjoy it offline without any buffering issues.
To download YouTube videos using VLC’s streaming feature, follow these steps:
1. Open the VLC media player application on your Windows or Mac computer.
2. Navigate to the YouTube video you want to download in your favorite web browser.
3.Copy the URL of the YouTube video from the address bar of your browser.
4. In VLC, click on “Media” in the menu bar, and then select “Open Network Stream” (for Windows) or “Open Network” (for Mac).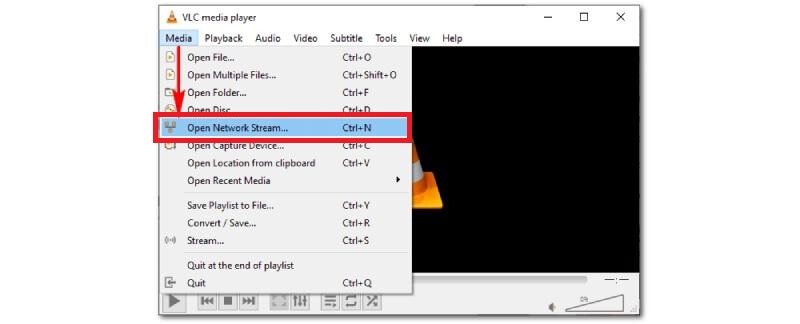
5. Paste the copied YouTube video URL into the designated field in the “Network” or “Open Network” window, then click “Play” or “Open”.
6. VLC will start playing the YouTube video. Pause the video by clicking on the “Pause” button.
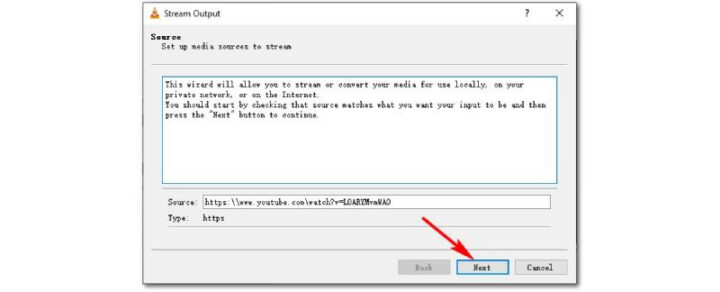
7. Now, in the menu bar, select “File” and then “Convert/Stream” (for Windows) or “Streaming/Exporting Wizard” (for Mac).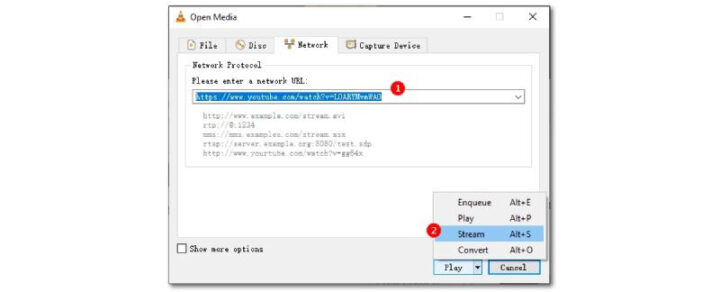
8. Click “Destination File” or “New Destination” in the “Convert/Stream” or “Streaming/Exporting Wizard” window to specify the output file path and name.
9. Choose a location on your computer to save the downloaded video, provide a suitable file name, and select the video type (such as MP4) for the output file.
 10. Click “Save” or “OK” to save the file.
11. To start the download process, click “Next” or “Stream” in the “Convert/Stream” or “Streaming/Exporting Wizard” box.
 12. VLC will start streaming the YouTube video to the specified file location, downloading it to your computer.
 13. Wait for the download to complete. The amount of time required will be determined by the length and quality of the video.
14. When the download is complete, you can find the downloaded YouTube video in the specified file location on your Windows or Mac device.
You may use VLC’s streaming capability to download videos from YouTube by following these steps. This allows you to download the videos to your computer and watch them at your leisure, without buffering interruptions.
Method 3: Downloading YouTube Videos with Subtitles Using VLC
If you enjoy watching YouTube videos with subtitles, downloading them along with the video using VLC is a simple process. Here’s a step-by-step guide on how to download a YouTube video with subtitles using VLC:
Step 1: Copy the Transcript of the YouTube Video
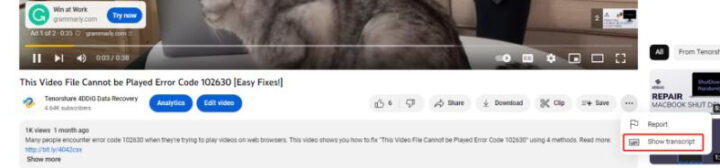
- Open the YouTube video that you want to download.
- Look for three vertical dots located beneath the video title. Click on them to reveal a dropdown menu.
- From the menu options, select “Show transcript.” This will display the transcript of the video.
- Copy the transcript by selecting the text and pressing Ctrl+C (Windows) or Command+C (Mac).
- Open a text editor like Notepad on your computer and paste the copied transcript into a new document using Ctrl+V (Windows) or Command+V (Mac).
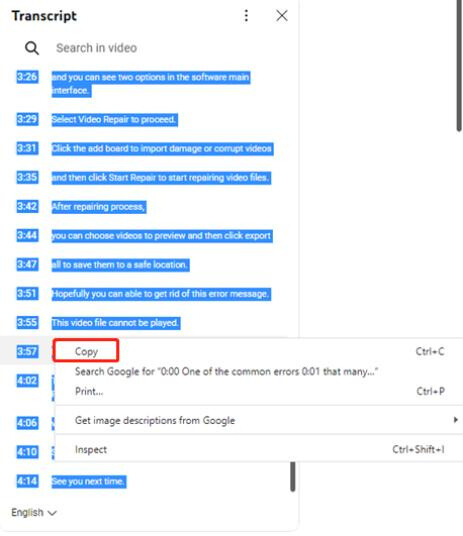
- Save the file with the desired name and choose the .txt file extension to preserve it as a text file.
Step 2: Convert the TXT File to SRT Format
After saving the transcript as a text file, you can proceed to convert it into an SRT subtitle file by following these steps:
- Open your favorite web browser and search for a TXT to SRT converter online.
- Select a reliable converter website and click to its conversion tool.
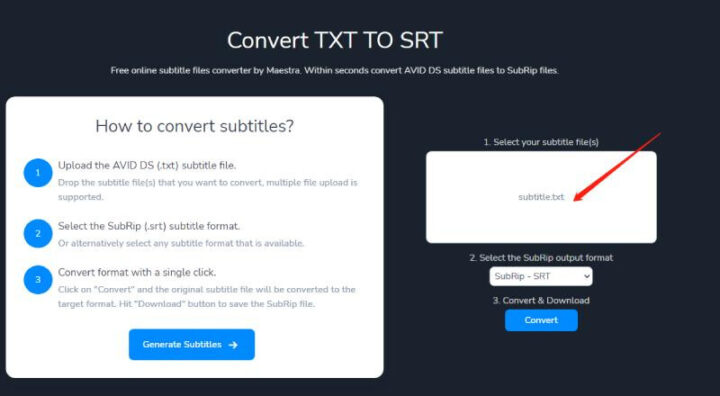
- Upload the TXT file you previously downloaded to the converter website by clicking the “Choose File” or “Upload” button.
- Select the output format as SRT (SubRip Subtitle) from the available options.
- Initiate the conversion process by clicking on the “Convert” or “Start” button.
- Wait for the conversion to be completed. Depending on the size of the file, this could take a few seconds or minutes.
- Once the TXT file has been successfully converted into an SRT subtitle file, you will be given a download link or a button to download the SRT file.
- Click on the download link or button to save the SRT subtitle file to your computer.
Step 3: Open the Downloaded YouTube Video in VLC
You can use the methods described above to open the downloaded video file from YouTube in VLC. Here’s a quick recap:
- Launch VLC media player on your device.
- Click on the “Media” tab in the menu bar.
- Choose “Open File” from the drop-down menu.
- Navigate to the location where you saved the downloaded YouTube video file.
- Select the video file and click on the “Open” button.
To open the video file in VLC, you can alternatively utilize the drag-and-drop approach. Simply drag and drop the downloaded video file into the VLC media player window from your file explorer or desktop.
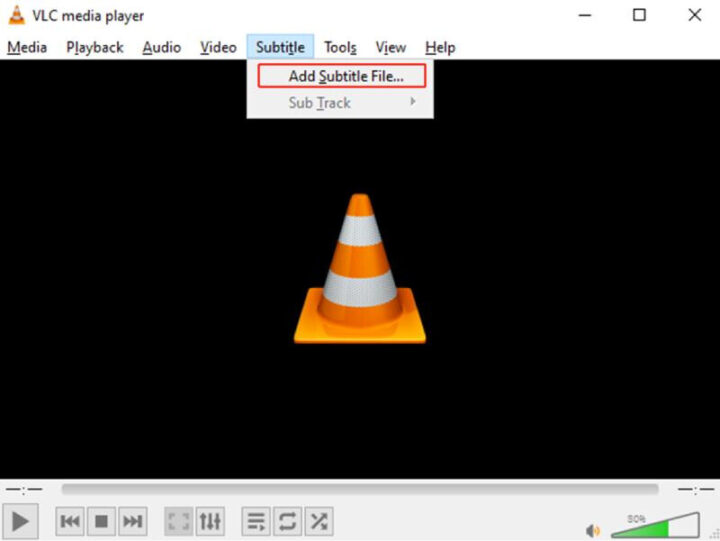
Step 4: Add Subtitles to the Video in VLC
Follow these procedures to add the downloaded SRT subtitles to the YouTube video in VLC:
- From the menu bar in VLC, click on “Subtitle.”
- Choose “Add Subtitle File” from the drop-down menu.
![From the menu, choose “Subtitle” and then “Add Subtitle File.”]() Browse your computer’s files and locate the downloaded SRT subtitle file.
Browse your computer’s files and locate the downloaded SRT subtitle file.- Select the SRT file and click on the “Open” button.
 Browse your computer’s files and locate the downloaded SRT subtitle file.
VLC will automatically display the subtitles while playing the YouTube video after you have loaded the SRT subtitle file. By entering the “Subtitle” menu and selecting the necessary options, you may change the subtitle settings in VLC, such as the font size, color, and position.
Step 5: Save the Video with Subtitles Using VLC
You can also save a video with subtitles using VLC. But make sure the video and subtitles file name is the same.
- Open the VLC media player. To enable subtitles, select “Subtitle,” then “Subtitle Track,” before selecting “Track 1” from the menu. Then, click “Media” and then “Convert/Save.” This will open the “Open Media” dialog.
- Select the video file you wish to save with subtitles by clicking the “Add” button. Then click “Convert/Save” to continue. Select your desired output format and the destination file location in the “Convert” window.
- Click the “Subtitle” tab in the “Edit Selected Profile” window. Check the “Add Subtitle File” box and then click the “Browse” button to select the appropriate SRT subtitle file.
- After you’ve chosen an SRT file, click “Start” to begin the converting process. VLC will save the video with embedded subtitles permanently.
When the conversion completes, you will have a video file with subtitles. You can now watch this video in any media player, and the subtitles will appear automatically.
Conclusion
VLC Media Player is a simple and versatile tool for downloading YouTube videos and watching them offline. You can effortlessly save your favorite YouTube videos and view them at your leisure without worrying about buffering or internet connectivity thanks to its streaming function and the simple methods detailed in this article. The ability of VLC to accommodate many formats, including subtitles, improves the watching experience even further. You have an excellent tool at your disposal by using VLC Media Player to build your personal video library and view your favorite stuff whenever and wherever you want. With VLC Media Player, you can enjoy the comfort of offline viewing and take your YouTube experience to the next level.
ad
Comments are closed.