What Is DNS Server And How Does It Work
A DNS server, also known as a Domain Name System server, is responsible for translating web addresses into their corresponding IP addresses.
DNS servers are responsible for converting the domain names that users type into the address bar of their browsers to the corresponding numeric IP addresses. This ensures that users are directed to the appropriate website. You can’t access websites without a DNS server.
Before building and launching a website, owners must register a domain name with a hosting firm. However, computers do not speak the same language as humans, thus domain names must be translated into something legible and compatible with computers.
What is DNS server?
A DNS server associates domain names with their corresponding IP addresses. Domain names are human-friendly web addresses, such as download.zone, but IP addresses are computer-friendly numerical codes, such as 123.546.7.8.
Well, A Domain Name System (DNS) server is core of the internet system – without a DNS server, it would be impossible to find certain websites on the internet using a web browser.
If it helps, you can compare the DNS server as similar as a phone book. When you command your computer to load a website, the DNS server looks up the website’s name to find the right IP address to use. If you do this, your computer will be able to find it and load it correctly.
READ MORE:
- What is Dynamic DNS and how it works?
- Types of servers and their utilities
- The difference between HTTP and HTTPS
- List of the top web hosting services in 2022
How does a DNS server work?
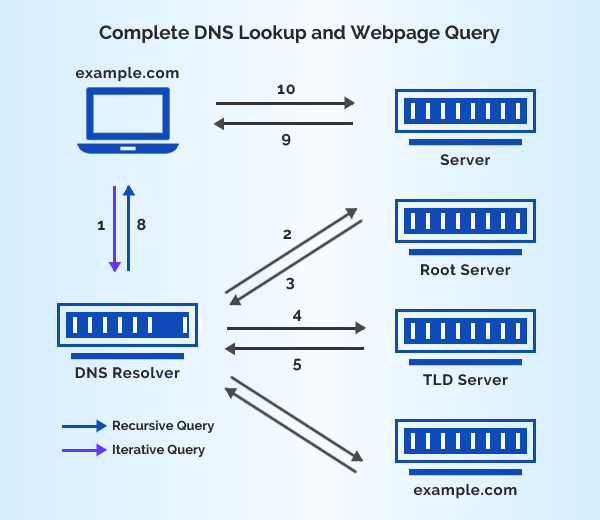
When you type in a URL, what you are really doing is instructing your computer to locate another IP address and establish a connection with it. In order to accomplish this, it makes use of a group of interconnected servers, which together make up the DNS server:
- The DNS recursive resolver
- The root nameservers
- The TLD nameservers
- The authoritative nameservers
Here’s how DNS server works.
Step-by-step DNS process

- You type in your web browser to load a webpage that you want to view. Your web browser needs an IP address in order to read a domain name like “www.download.zone” because computers are unable to understand the English language. Your request is therefore forwarded to a DNS recursive resolver as a result of this. The mission of the DNS recursive resolver is to locate the IP address that is associated with the website that you entered.
- The first thing that the resolver does is determine the “Top Level Domain” (also known as “TLD”) of the website; in other words, it determines if the website is a .zone, .com, .net, .org, or some other kind of site. This is accomplished by sending a query to the root nameserver, which maintains a list of each website that is associated with a particular TLD.
- When the resolver has determined the TLD, it then navigates to the nameserver that corresponds to that TLD (for instance, the.com nameserver) and requests that it locate the correct IP address.
- After locating the IP address, the TLD nameserver sends it to the authoritative nameserver so that the latter can determine whether or not the address in question is accurate.
- The authoritative nameserver will then send a message to the address in question and wait for a response; if it receives the correct response, it will then know that it possesses the correct IP address for the website that you are looking for.
- The authoritative nameserver verifies the IP address and then gives it back to your web browser if it is accurate.
- The loading of your webpage will begin as soon as your web browser has received the correct IP address.
All of this occurs in a matter of seconds; if your Internet connection is particularly quick or if you’ve recently visited the page (see below for additional information), it can occur in milliseconds.
Changing DNS server

Your web browser typically utilizes a conventional, public DNS server, which is typically configured and maintained by your internet service provider.
However, some skilled users modify their DNS server manually. This will increase your Internet speed and safeguard your privacy.
Changes to your DNS settings can be made under the “Network” option of your computer’s Settings app. You can try the Google Public DNS or any number of other custom DNS servers if you’re seeking for a new DNS.
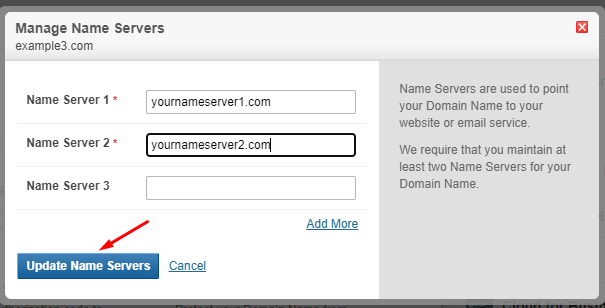
| More: Learn how to edit/update/change GoDaddy nameservers
What is the DNS caching?
If you visit a new website, your browser will execute the steps indicated in the preceding section. But if it did this for every website, things could get slow; hence, your web browser stores recently visited websites in its cache.
In addition to the method described previously, recursive resolvers are also capable of resolving DNS queries utilizing cached data. After retrieving the proper IP address for a particular website, the resolver will temporarily store that information in its cache. During this time, if further clients send requests for this domain name, the resolver can bypass the regular DNS lookup process and just respond with the cached IP address.
Once the caching duration ends, the resolver must get the IP address again and create a new cache entry. This time limit, known as the time-to-live (TTL), is established directly in each site’s DNS records. Typically, the TTL ranges between 24 and 48 hours. A TTL is required because web servers occasionally change their IP addresses, preventing resolvers from serving the same IP address forever from the cache.
FAQ
Why would you change your DNS?
Change your IP address with a VPN to access geo-restricted material. Changing DNS hides your location. Unlike a DNS, a VPN reroutes your connection through a separate region. VPNs offer extra privacy through encryption, which sometimes impede connections.
- Access restricted web material based on your physical location (like Netflix)
- Improve your Internet connection speed (sometimes third-party DNS servers are faster than the default)
- Maintain a secure online environment for youngsters.
- Using third-party DNS servers with additional security measures, you can safeguard your devices and data (mainly focused on anti-phishing)
- Your internet connection is not functioning, and you suspect a DNS issue.
What should you do if your DNS server is down?
There are various signs that your DNS server may be down, and if you want to restore it yourself, you’ll have to put in some effort. Some HTTP status codes, including 502 errors, 503 errors, and 504 errors, may indicate a DNS problem.
If you believe that your DNS server is offline, there are a few simple techniques to confirm or even resolve the issue:
- Connect with a different device — If you are experiencing troubles with only one device while all others can connect successfully, the issue is likely device-specific.
- Try a different browser or window – Is the issue affecting all devices? Try a different web browser or a different web browsing application.
- Resetting your modem and router will restart the entire connection, which is frequently all that is required.
- Connect through a wired connection – Plug in your Ethernet cable to determine whether the Wi-Fi is the only problem.
If you are still experiencing issues after following the steps above (or if you get a “DNS server unavailable” warning), it is possible that your DNS. server is down.
READ MORE:
- Difference between modem and router
- What Is Good Internet Speed And How Much You Really Need
- Which Types Of Internet Connection Is Good For You
Clear the DNS cache
On Mac:
- Navigate to Applications.
- Click Utilities.
- Double-click Terminal.
- Run the following command: sudo dscacheutil -flushcache
- If the command succeeds, the system does not return any output.
On Windows:
- Open the Windows Command prompt.
- In the open prompt, type ipconfig /flushdns
- You should receive a message of your success as confirmation when the cache is cleared.
Change your DNS
On Mac:
- Navigate to System Preferences.
- Click on Network.
- Click on Advanced.
- Go to the DNS tab.
- Click the + sign at the lower left to add a new DNS server.
- Type in the numbers of a public DNS server (you can get this from a third-party DNS server).
- Click OK.
- Select Apply.
On Windows:
- Navigate to Network and Internet settings.
- Click on Change Adapter Settings.
- Right-click on your active network connection and select Properties.
- Left-click on Internet Protocol Version 4 (TCP/IPv4) and select Properties. (If you use IPv6, change that as well.)
- Click Use the following DNS server addresses: and type in a new DNS server address (you can get this from a third-party DNS).
ad


Comments are closed.