How To Change Nameservers for My Domain Name on GoDaddy
Nameservers are the principal DNS controllers for your domain, and if you don’t have the settings for your nameservers correct, neither your email nor your website will work properly. To modify your domain’s nameservers, your domain name must first be registered with GoDaddy with your account. It is imperative that you have access to the new nameservers before you begin the process of switching to a new provider for your domain nameservers.
Simply adhere to this simple and easy to follow instructional guide in order to change the nameserver of your GoDaddy domains.
ad
Nameserver broad definition
Before going forward, let me first give a brief understanding of Nameservers in this para.
A server that translates domain names into their corresponding IP addresses is called a nameserver. It is an essential part of the infrastructure of the internet and plays an important part in directing traffic to the appropriate website.
When a user enters the domain name of a website into their browser, the browser then sends a request to the nameserver that is associated with that domain in order to discover the IP address of the server that is hosting the website.
ad
The browser is then able to connect to the appropriate server and show the webpage after receiving the right IP address from the nameserver, which it received in response.
Nameservers can be utilized for a variety of domain name applications, including top-level domains (TLDs) like. com and. org, as well as NTLD like www.download.zone. It is possible for the hosting company, the domain registrar, or a third party service provider to operate the nameservers for a website.
In a nutshell, a nameserver functions similarly to a phone book for the internet and enables users to access websites and services by entering a human-readable domain name rather than an IP address. In other words, a nameserver is a domain name resolver.
Why you need to change nameservers
There are a few different scenarios in which you can find it necessary to switch your nameservers, including the following:
- When you choose to switch to a different web hosting company, you will need to update your nameservers so that they point to the servers that are maintained by the new web hosting provider.
- If you want to use a custom DNS service, for example because it provides a higher level of security or because it has more complex features, you will need to alter your nameservers so that they refer to the servers that are used by the custom service.
- Changing your domain registrar requires you to update your nameservers so that they point to the servers that are provided by the new registrar. If you change your domain registrar, this step is necessary.
- Improving the performance of your website If you want to improve the performance of your website, you can change your nameservers so that they point to a Content Delivery Network (CDN). This type of network will distribute the content of your website across a number of servers that are located in various geographic areas.
- When you are having problems with your website, such as it not loading or displaying errors, changing your nameservers may be able to fix the issue.
Now you are all aware about the nameserver and why you need to change it in some specific circumstances explained above. Let us see how to change nameservers of your domain name registered with GoDaddy.
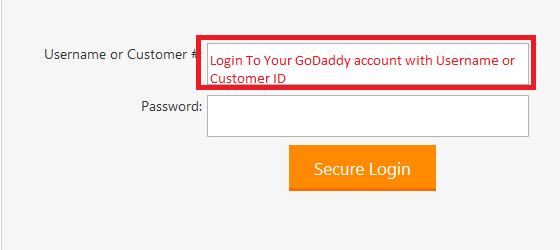
Step 1
Step 2
After login to your GoDaddy account Click “Domains” button, on left side of the screen along with Hosting, Email and My Products section respectively.
Step 3
Click to select the domain name you want to change the nameservers and click “Edit DNS” on the 3 dots showing parallelly with your domain name (please see the below image)
Step 4
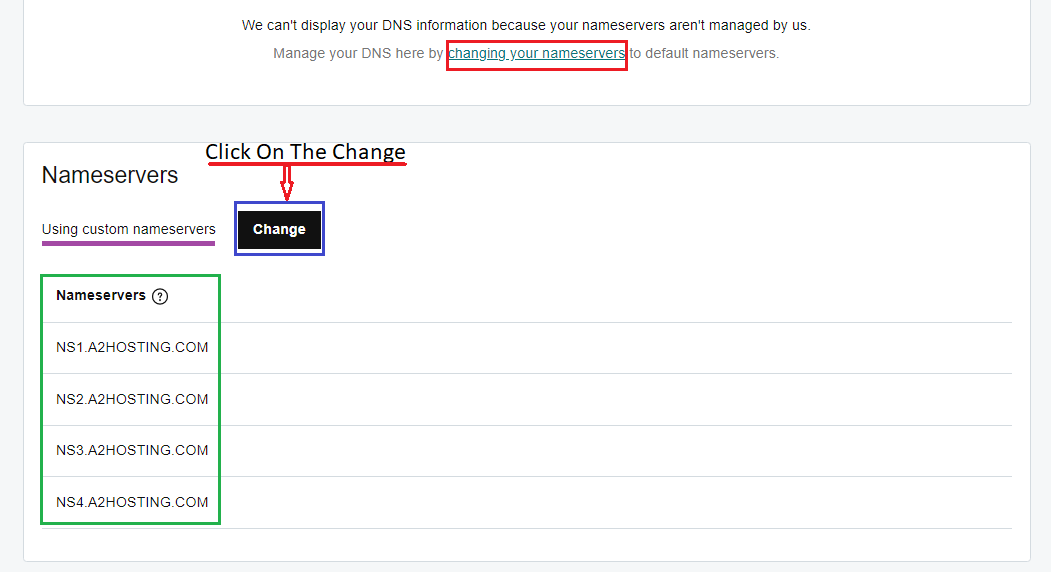
A new page will be opened once you clicked on the “Edit DNS” option. You will find manage your DNS and changing your nameservers at the bottom of the page. (Please see the below image with the color marked in the bottom of the page)
Step 5
A new page will be opened once you clicked on the “Edit DNS” option. You will find manage your DNS and changing your nameservers at the bottom of the page. (Please see the below image with the color marked in the bottom of the page)
Step 6
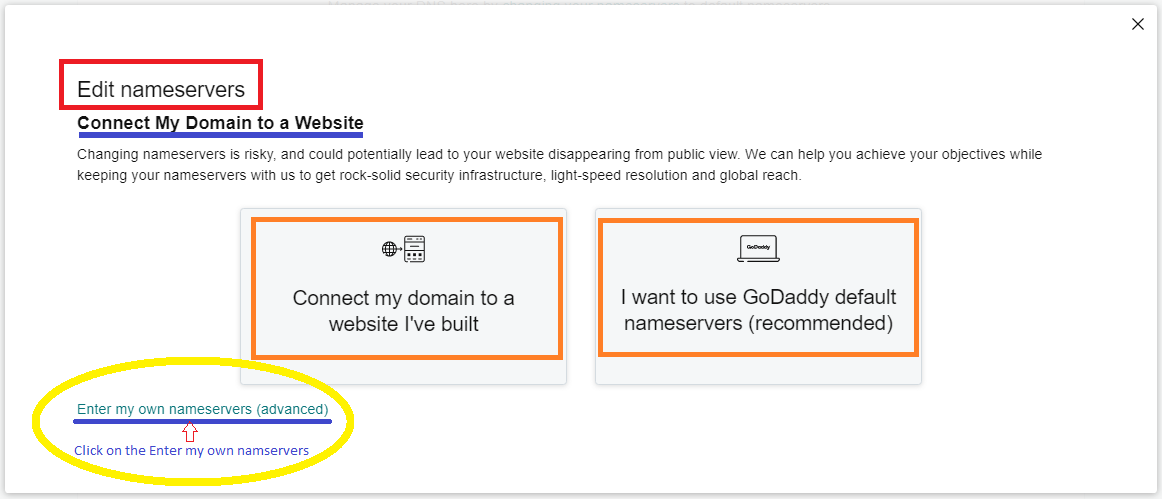
Upon clicking change, there is one another page will be opened here you will find ‘Edit Nameservers’ section with some options.
- Connect my domain to a website I’ve built: You can connect your domain to a website that was built on another platform, such as Shopify, Squarespace, Weebly, or WordPress, by using our GoDaddy wizard.
- I want to use GoDaddy default nameservers (recommended): Your domain will be updated to point to a set of nameservers provided by GoDaddy automatically. This choice is only accessible to you if you are not already utilizing the nameservers provided by GoDaddy.
- Enter my own nameservers (advanced): Simply type in the nameservers that were provided to you by your hosting provider.. (You have to click this option, see the image below)
Step 7
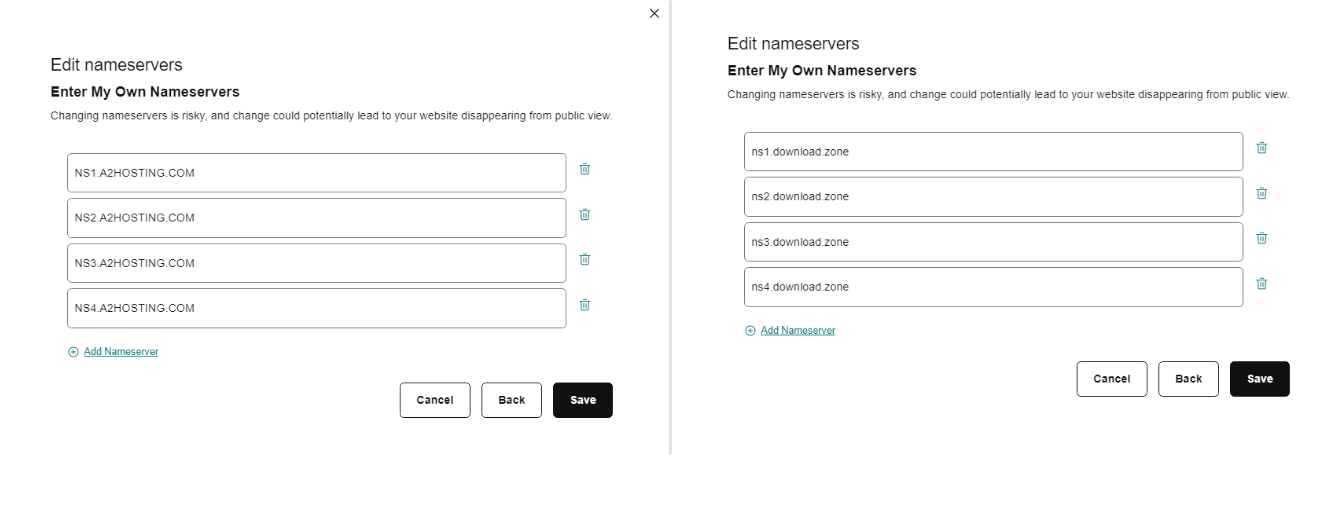
Once you clicked on ‘Enter my own nameservers‘, you will have a new window (see the below image on the left side) where you will find GoDaddy default / or your hosting nameservers (Here I have A2hosting nameservers as my site is hosted there). Here you can easily enter/edit your your own nameservers (see the image in the right hand side, I have did it for a demo).

| More: Read more about GoDaddy account log in issues and fixes
Please do not forget to click on ‘Save’ (in the bottom right) after you change/edit/update your nameservers on GoDaddy.
That’s all done!
You have successfully changed your nameservers, just keep some patience. Most DNS changes will spread across the Internet within a few hours, but it can take up to 48 hours for everything to spread. Nameserver propagation time is affected by many things, such as your TTL, your ISP, and the registry for your domain. You may check the status of your updated DNS here.


Comments are closed.