
A PC screenshot is ubiquitous. Those without a third-party program can do it manually. Prt Sc/Print Scrn captures the entire PC screen. Press the Print Screen key in Windows to take a full PC screenshot and copy it to the clipboard or screenshots folder.
However, the Windows has other screen-capture methods.
This article explains how to screenshot Windows 11/10/8/7. We’ll answer FAQs.
- Full or minimized Windows 10 screenshots?
- How can I take a PC screenshot quickly?
- Windows game bar pictures and recordings.
In the frequently asked questions section, we also cover how to capture a screenshot on Windows 11.
ad
In Windows 11, this can be done in a variety of ways, such as by taking a screenshot of the full screen, of a particular window, or of a piece of the screen. Let’s go through each of them one at a time.
More: Learn how to take screenshot on Mac
How to Take a Screenshot in Windows 10: Simple Tricks
The methods shown below demonstrate how to screenshot on Windows to capture full or minimized screenshots:
- To take a screenshot, press the Print Screen key while the screen is minimized or full-screen.
- To capture the computer screen, use the game bar: On the Windows operating system, you can take a full or minimized screenshot.
- Prt Sc + Alt (print screen button) capture of a screen.
- Screen capture with Windows + Print Screen.
- On Windows, use the Snipping Tool app to capture a screenshot.
- Taking a screenshot with the Snip & Sketch app.
- Capture screenshots on your PC with a third-party app or image editor.
Method 1: Press the Print Screen button/shortcut.
Windows 10’s Print Screen key takes screenshots quickly. (Prtscn). This button is located above the Function (F#) keys. Windows+Print Screen captures and saves your full screen. The screenshot will be saved to Pictures > Screenshots. Let’s examine:
Simply follow these steps to capture your entire screenshot on Windows:
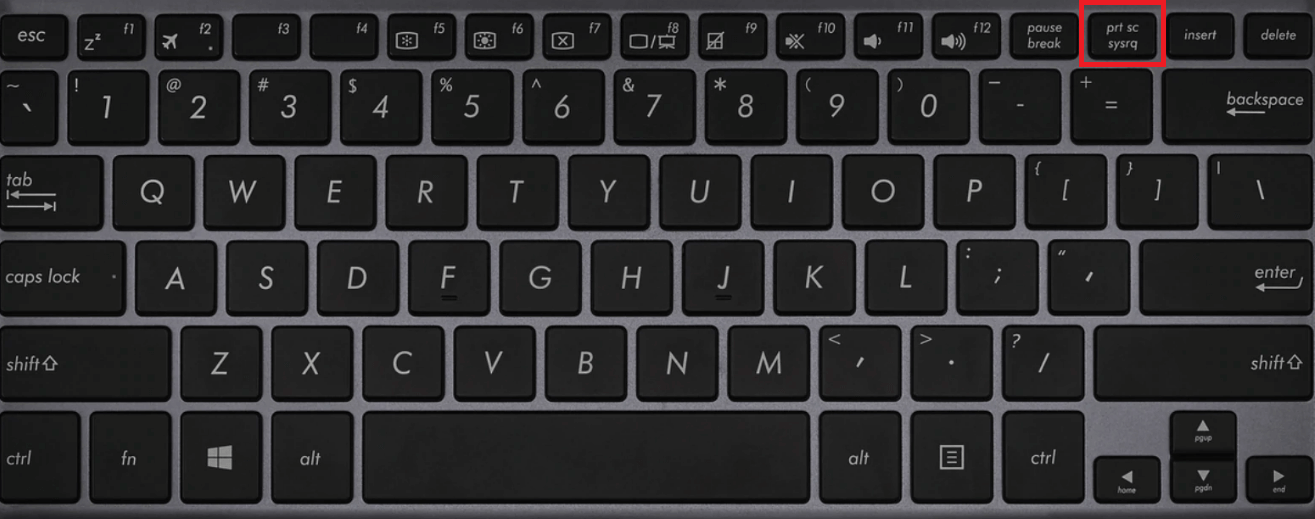
- To make the exact screen you want to print an active window, press PrtScn on the upper-right side of your keyboard.
- You can take a screenshot of your PC using the keyboard’s Prt Sc/Print Sc buttons. To capture a full computer screen, press the PrtScn/Print Scrn button. The screenshot will be saved to your Clipboard automatically.
- To save the file, copy and paste the screenshot into any program that supports image inserts, such as Microsoft Word or Microsoft Paint.
- To capture your entire screen and save it automatically, press the Windows key + Print Screen key [windows key print screen]. To indicate that you’ve just taken a screenshot, your screen will briefly dim.
- The screenshot will be saved to the Pictures > Screenshots folder by default.
To trigger the screen capture, you may need to press the Function (Fn) key and the Print Screen button on some keyboards, i.e., Fn + PrtScn button/or Print Scrn (print screen).
Print screen saves the entire screen to the clipboard. Check your screen’s lower right corner for saved screenshots.

Multiple displays will be blended into one image.
This method copies the image to the Clipboard by default. After that, you can copy it (Ctrl+V or Right-Click > Copy) and paste it into a document or image processor (Like Microsoft Paint, or even Photoshop).
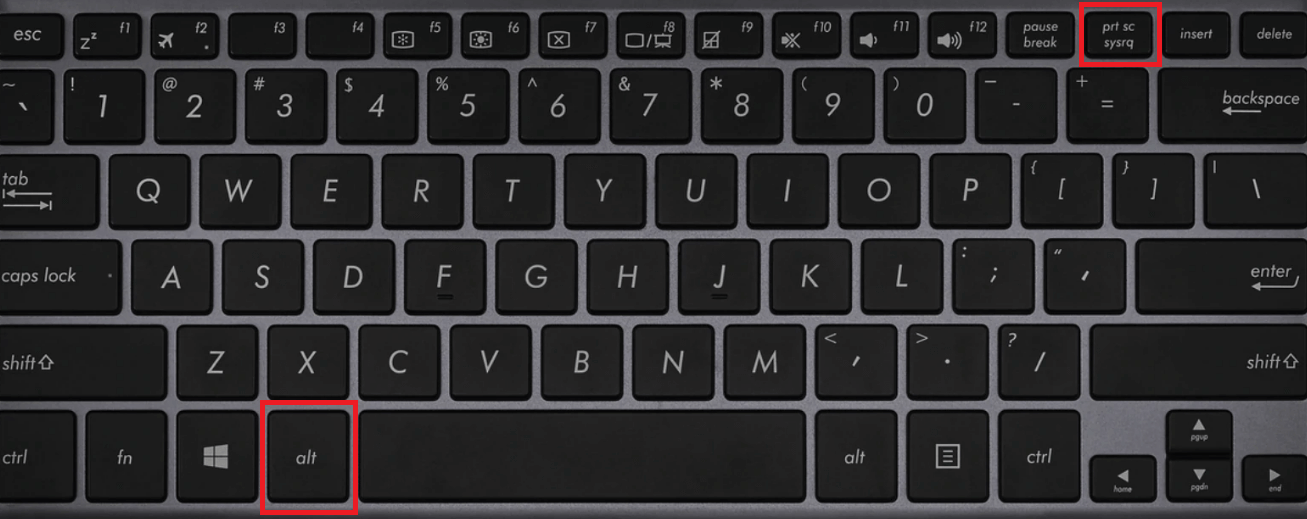
Method 2: Press Alt + Prt Sc (print screen button) capture of a screen.
- You can use the keyboard shortcut Alt + Prt Sc to capture only one active window (print screen).
- To take the screenshot of the active window you want, and not just any window, you will need to select the said window by clicking on it first.
- Then, press Alt + Prt Sc (the print screen button) or the Windows key print screen.
- This will save the image to your Clipboard, which you can access by pasting it somewhere else.
If you want to save the image as a file, you can use a keyboard shortcut to do so.
- Simply hold down the Windows key (with the Windows logo) and press the Prt Sc key (print screen key). [Print Screen] (Windows key).
- This creates a file from the image.
- It is usually found in C: Username>Pictures>Screenshots.
Method 3: Screen capture of the Windows logo and the Print Screen.
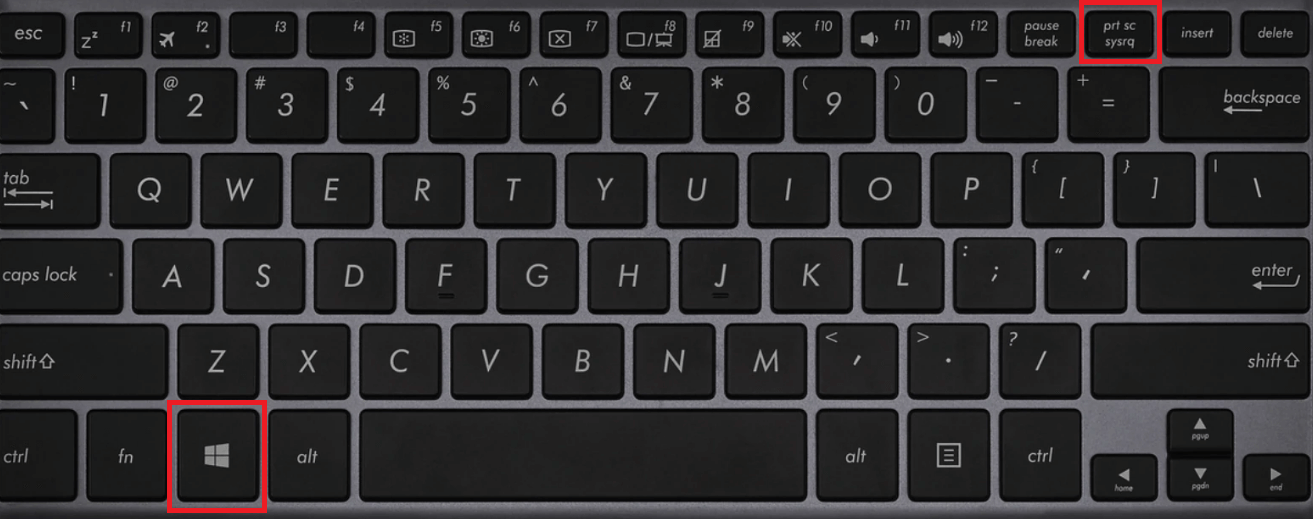
- To take a screenshot of your PC on Windows 10 and save it automatically, press the Windows key + Prt Sc (print screen).
- The screen will dim, and a screenshot of the entire screen will be saved to the Pictures > Screenshots folder.
If your Print Screen button isn’t working properly, see How to Fix Print Screen Not Working on Windows 10.
Method 4: Take a screenshot with the Snipping Tool.
If you want to customize, annotate, or share your screen captures, the snipping tool is the best way to screenshot on Windows. The Snipping Tool app is great for taking screenshots. It has existed since Windows Vista. It can be used for;
- Take a screenshot of the entire screen on your computer.
- A rectangle on the screen, or
- A random screenshot.
It is important to keep in mind that taking a screenshot with a snipping tool does not immediately result in the creation of an image file; nonetheless, the user is given the choice to do so.
Here’s how to use the snip and snipping tools to take a screenshot of your PC:
- You’ll need to use the search bar to find the screen snipping tool app. If you don’t see the search bar, right-click on the taskbar, hover over Search, and select Show Search Box. A window with the active snip sketch tool will appear.
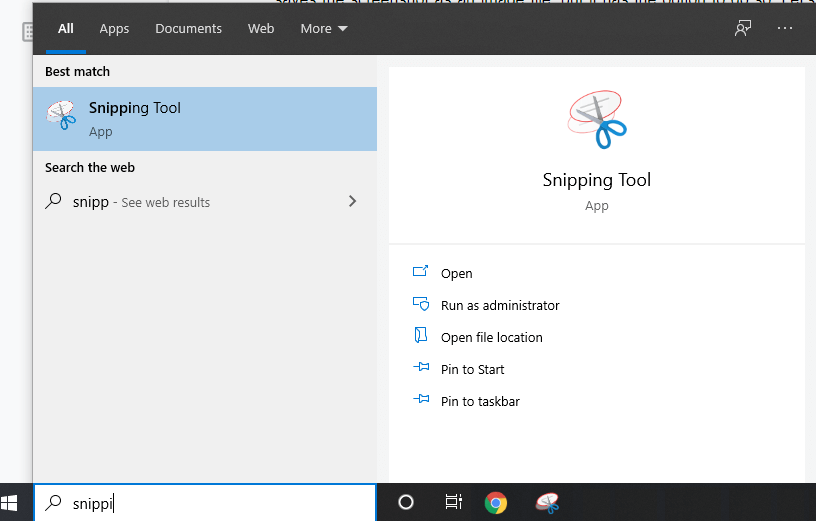
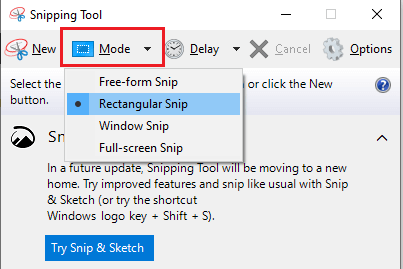
- A new window will appear. Choose the mode of capture for the “snip” you want to take here: free-form, rectangular, window, or full-screen capture. We’ll show you how to grab a rectangular screen snip.
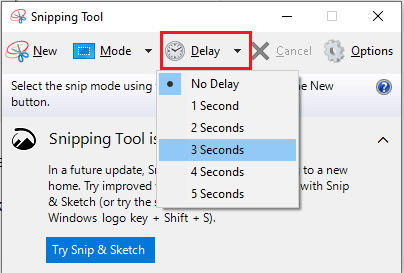
You can also use the Snipping Tool to set a screenshot delay, which allows you to take screenshots after a certain amount of time. This is handy for capturing pop-up menus and tooltips. By clicking on delay, you can specify how long you want to wait before taking the screenshot in seconds.
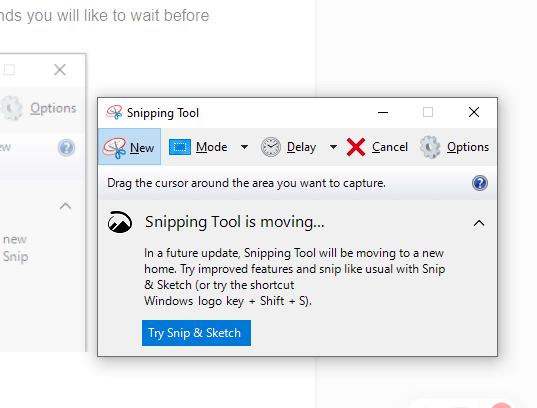
- When you’re ready to take the screenshot, select New. The screen will gradually fade out, and the cursor will change to a cross. If you choose the delay option, the screen will fade after the number of seconds you specify.
- If you chose the Rectangular screen snip mode, you can create a rectangle on the screen by clicking and dragging. The screenshot will be the rectangle you draw.
- If you chose the Free-form snip, you can draw any shape you want. Keep in mind that the screenshot will be taken once you stop pressing the right-click button.
- If you chose the Window snip, you can now click on the windows you want to capture a screenshot of.
- Finally, clicking on the full-screen snip will cause the tool to take a full-screen screenshot of the entire screen.
After you’ve taken the screenshot, you have several options.
- You can save the image as a file by selecting File > Save as… and saving it to the location of your choice.
- You can send it as an attachment to an email or as an email attachment by selecting File>Send to > Email recipient.
- By selecting File > Print, you can print the screenshot.
- By selecting Edit > Copy, you can copy the screenshot to your clipboard.
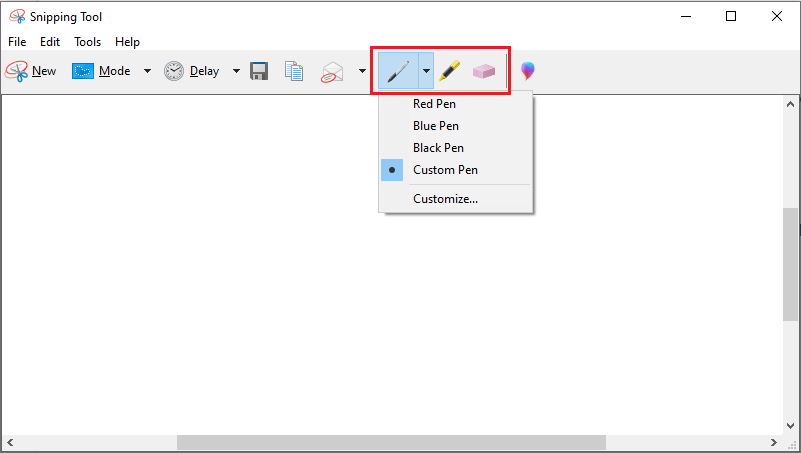
- You can also use the Pen or Highlighter functions to edit the screenshot. The colour of the pen can be changed. This is useful if you want to draw the viewer’s attention to a specific section of the screenshot.
Method 5: Take a screenshot with the Snip & Sketch app.
On Windows, the Snip & Sketch software (or snip sketch tool) replaced the Snipping Tool and is one of the drawing tools offered to users. The Snip & Sketch program is the ideal way to screenshot on Windows if you want to alter, annotate, or share your screen captures.
- Use the keyboard shortcut Windows Key + Shift + S to launch Snip & Sketch, or search for it in the search bar.
- Your screen will dim, and a mini menu will appear at the top, giving you the option to capture a rectangular, free-form, window, or full computer screen.
![]()
- You can choose how you’d like to grab a screenshot. These are the same options found in the Snipping Tool. They are from left to right:

- Full screen capture or Snip, Rectangular PC screen Snip, Freeform Snip, Window Snip, and Full screen capture or Snip
- Taking a screenshot here copies the image to your Clipboard.
- You can then paste it into a document (such as a Word or Google document) or an image processor (by pressing Ctrl+V or Right-Click> Paste) (Like Paint, or even Photoshop).
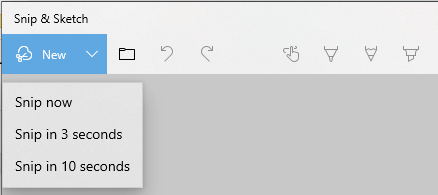
- A new window will appear if you search for Snip & Sketch in the search bar.
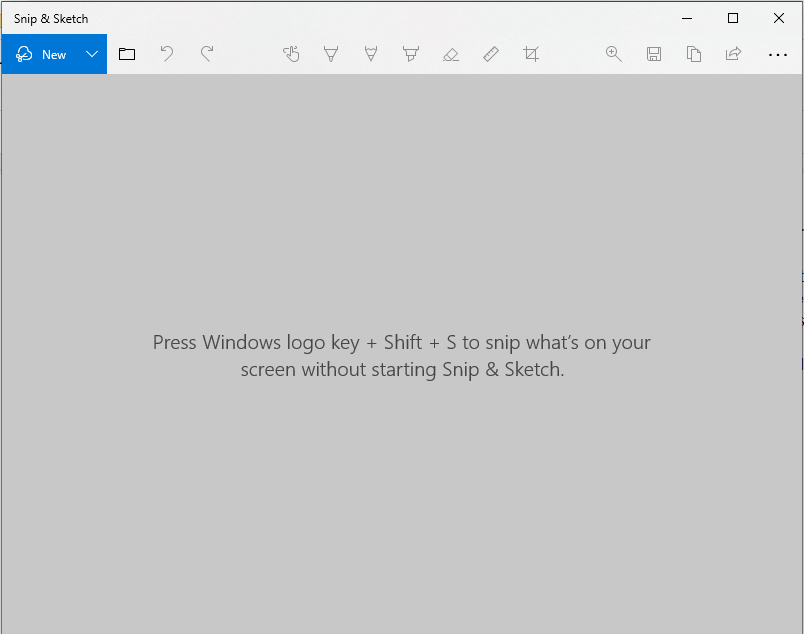
- In this window, you can either click New to begin taking your screenshot or the arrow pointing down next to it to Snip in 3 or 10 seconds.
![]()
- When you select one of the options, the screen will darken and a toolbar will appear at the top. These are the same options that are available in the Snipping Tool. Rectangular Snip, Freeform Snip, Window Snip, and full computer screen Snip are from left to right.
![]()
- After you’ve chosen one of them, you’ll be able to take the screenshot you want, whether it’s a rectangle, a freeform, a specific window, or a full screen screenshot.
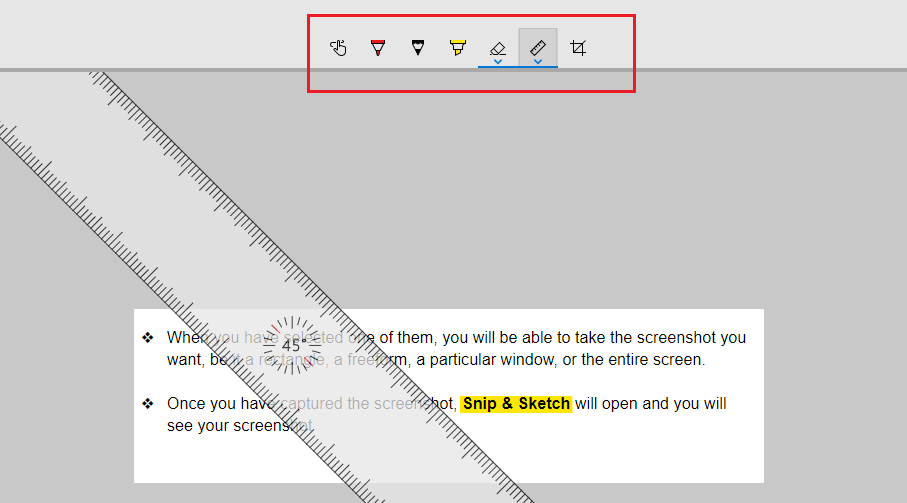
- The Snip & Sketch app will open and display your screenshot after you’ve taken it. A ballpoint pen, a pencil, or a highlighter can be used to make annotations. You can either delete them using the eraser or make the annotations you want with a ruler (which you can rotate with the mouse wheel). Cropping the screenshot is an additional option.
![Window 11]()
- After you’ve finished editing the image, use the buttons in the top right corner to Save, Copy, or Share it. By selecting Save, you can specify where you want the image saved. Clicking Copy will copy the image to your Clipboard, while clicking Share will allow you to share it with your contacts via email or other apps.


Copy words or images from your PC screen using the snip sketch tool or Windows snapshots. Save and share edits or notes made with the Snipping Tool. Using snip sketch, you can capture the following snips:
Also, snips are instantly copied to the Snipping Tool window, where you may edit, save, and share.
Shortcut Windows key+Shift+S launches Snip & Sketch. The Snip & Sketch feature is also accessible via the Start button’s alphabetical list of apps and the notification panel’s lower right corner. If you forget the shortcut, look for it. (Pin the app to your taskbar if you routinely take screenshots.)
When you capture a screenshot, it’s automatically saved to your clipboard and a preview appears in the lower-right corner (notification panel). Click the preview notice to open Snip & Sketch and tweak the screenshot before saving or sharing.
Method 6: Taking a screenshot with the Game Bar.
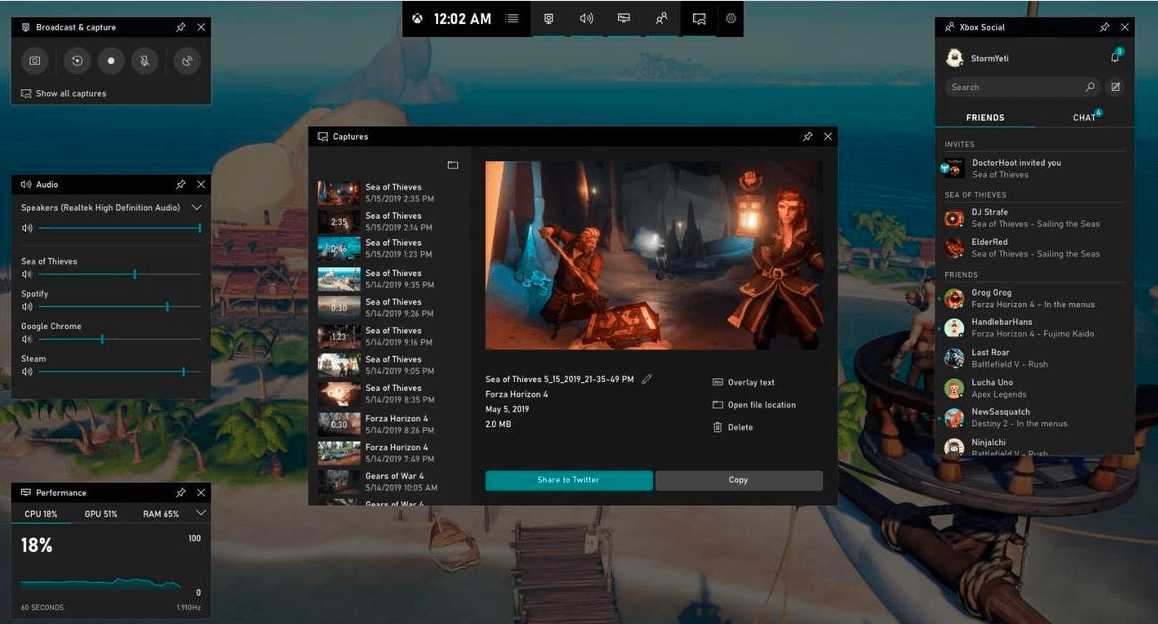
The final method is using the Game Bar. Windows 10’s game bar lets you record gaming footage, movies, and photos, among other things. Game bar screenshots can be taken even when not playing. Let’s see how to use:
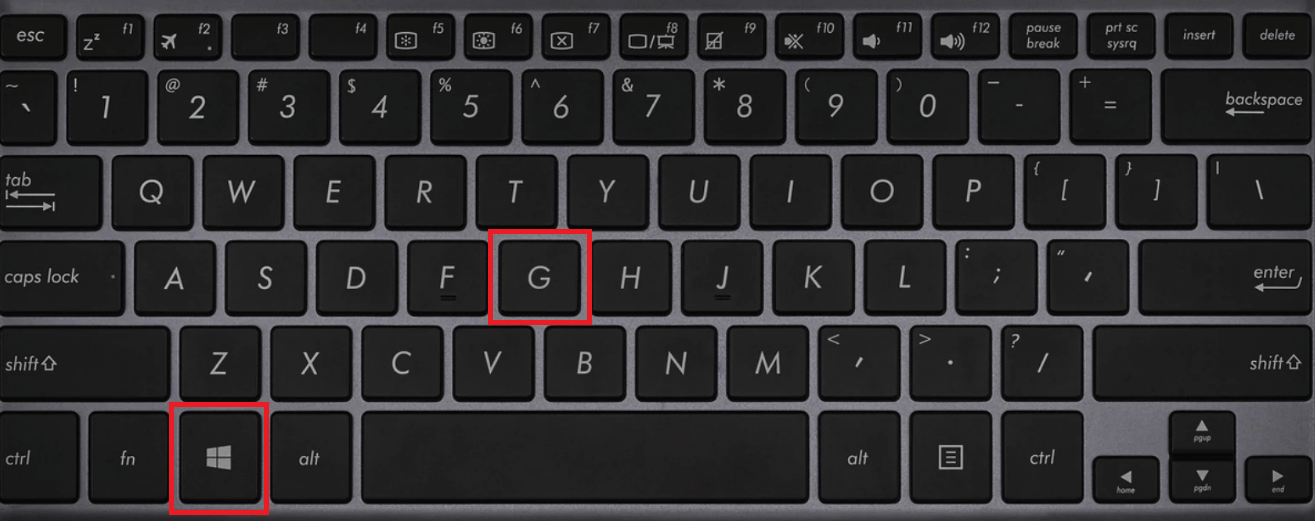
- To access the Game Bar overlay, press Windows Key + G. (windows key G). Make sure your active window is the exact window/screen you want to capture before pressing this.
![]()
![]()
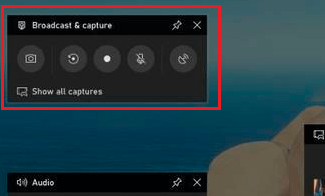
- A window labelled Broadcast & capture will appear in the top right corner of the screen. To take a screenshot, click on the Camera icon. The screenshot will be saved as a PNG file in “C:UsersUsernameVideosCaptures.” This image will be displayed in full-screen mode.
![]()
Method 7: Capture screenshots on your PC with a third-party app.
If Windows’ screenshot methods don’t work, utilize third-party programs. Windows screenshot tools need third-party integrations. They capture scrolling screens and allow easy sharing between work programs. Third-party print screen software interfaces with image editing, project management, file sharing, and messaging to boost tool efficiency and worker productivity.
Third-party screen capture tools include the following:
- ShareX
- PicPick
- ScreenPresso
- Snagit
- Apowersoft Screen Capture Pro
- Droplr
- CloudApp
- Screencast-O-Matic
Screenshot Guide for Windows 11
In Windows 11, there are several ways to capture a screenshot. Here are four different methods for showing you how to screen capture on Windows 11.
Method 1: Using the Prt Sc key, take a screenshot of the entire screen.
In Windows 11, you’ll use the PrtSc key on an active window, just like in Windows 10.
- Tap on the PrtSc key
- The screenshot will be saved to your clipboard, but you will not receive any notification that it was successfully taken.
- To see the full-screen screenshot, press Ctrl-V and paste it into a program such as Microsoft Paint or Microsoft Word, or even into the body of an email.
Method 2. Use Windows key + PrtSc key to take a full screen screenshot and save it to your computer
- The Windows key + Print Scren keys, like the PrtSc key windows key, will take a screenshot of your entire desktop, but only on an active window.
- It will, however, save the screenshot to a folder on your computer.
- If you press the keys correctly, your entire screen will flash, indicating that the screenshot has been taken and saved automatically.
- All of your full-screen screenshots can be found in Pictures -> Screenshots.
Method 3: Use the Snip & Sketch Tool to capture only a portion of the screen.
Perhaps you only want to capture a section or an active window of the PC’s screen. In this case, Windows 11 allows you to take a partial screenshot with the snip and sketch tool:
- When you press the Windows keys Win + Shift + S, your screen will flash and a small Snipping Tool menu will appear at the top.
- From left to right, this screen will allow you to do the following:
- A rectangular screen Draw a box around what you want to capture.
- Draw any shape around what you want to capture with a freeform snip.
- Window Snip: Choose a window to capture.
- Snippet: Capture your entire screen (same thing as PrtScr).
Method 4: Take delayed screenshots with the Snipping Tool.
- To take a computer screenshot, enter Snipping Tool into the Search feature and launch the application.
- When you click New, a mini Snipping Tool menu appears, from which you can select one of several snips.
- However, with this full-featured version of the Snipping Tool, you can select any of the four snipping options (rectangular, freeform, window, and fullscreen) and then select a delay option.
- In the sketch window, you can select a 3-, 5-, or 10-second delay.
This will give you some time to set up whatever you’re trying to screenshot and may make the process easier than taking the shot manually. - Simply press Win-Shift-S to take the delayed screenshot, which will be copied to your clipboard. You can also edit the screenshot preview that appears and save it to your computer as a JPEG, PNG, or other format.
ad
Comments are closed.