
How to Set Up a Home Network- Beginners Guide
Every home and small business has a network and Internet. PCs, iPads, etc. are connected to a home network and the internet.
Home network setup by connecting all of your old electronics to Wi-Fi is a major step in establishing a sense of normalcy in your new resident. Wi-Fi set up at home have never been simpler to manage. Getting your brand-new abode online entails four primary procedures:
- Find an internet service provider (ISP)
- Install your equipment
- Set up your wireless network
- Connect your devices
It doesn’t matter if you are setting up a home network first time or if it’s been so long that you’ve forgotten the basics; this post will get you back on track.
Home network setup: step by stem guide
1. Obtain an ISP (Internet Service Provider)
The first thing you need to do to get online is choose an ISP that serves your area (ISP). Several possibilities exist in most places (at least in the United States), although typically just one firm provides each service. If there is more rivalry in larger cities, this could not hold true.
The following are the most crucial considerations when selecting an internet service provider:
- Availability
- Speed
- Reliability
- Price
- Customer service
The availability of an item might quickly limit your options. Find the most suitable residential Internet service providers in your area. While residents of larger cities may have their pick of several Internet service providers (ISPs), those in more remote or smaller communities may be limited to just a few.
Internet through satellite is another viable alternative that may be used anywhere in the United States. You can also use your phone as a mobile hotspot, however we don’t suggest this method. Compared to standard internet plans, phone plans typically feature far lower data limits and much slower download speeds. You shouldn’t get a hotspot plan, for instance, if you prefer to watch multiple episodes of your favorite show on Netflix in one sitting when you get home from work.
Most people choose an internet plan based on its speed, but it’s better to think about how much speed you actually need before committing to the fastest, most expensive plan.
It’s not always about how fast something is, but how reliable it is. Fiber connections, in particular, have a much higher success rate than other kinds of networks. The quoted download speeds for cable and DSL are generally lower in practice, and bad weather can interfere with satellite internet connections.
Although it may appear like price is a simple issue, many factors are often disregarded. Home networking installation and equipment fees are just the beginning and may add up quickly, so it’s important to factor them in before you commit to a move. Be aware of plans that increase your rates or expenses unexpectedly. There should be no surprises when it comes to the cost of your internet service.
Finally, consider customer service. A quick solution is desired whenever an issue arises. If the connection isn’t very stable, this becomes much more crucial. If you’re interested in DSL, for instance, research the provider’s track record to ensure they fix issues promptly and don’t let their infrastructure deteriorate.
The following are the types of internet service providers you have to choose from.
- Digital Subscriber Line (DSL): This is provided through your local phone service company.
- Cable Broadband: Typically offered through the local cable company.
- Fiber Optic Broadband: Offered by your cable company and other local internet providers.
- Wireless: Usually provided by cellular phone companies.
- Satellite: Offered by satellite cable or internet companies like DISH or local internet providers.
- Dedicated leased line: A fixed bandwidth connection dedicated to only your internet connection. Usually very expensive and used by larger companies for their office internet connections.
There are a few ways to find local internet service providers.
Google “internet service provider” to obtain contact information for companies.
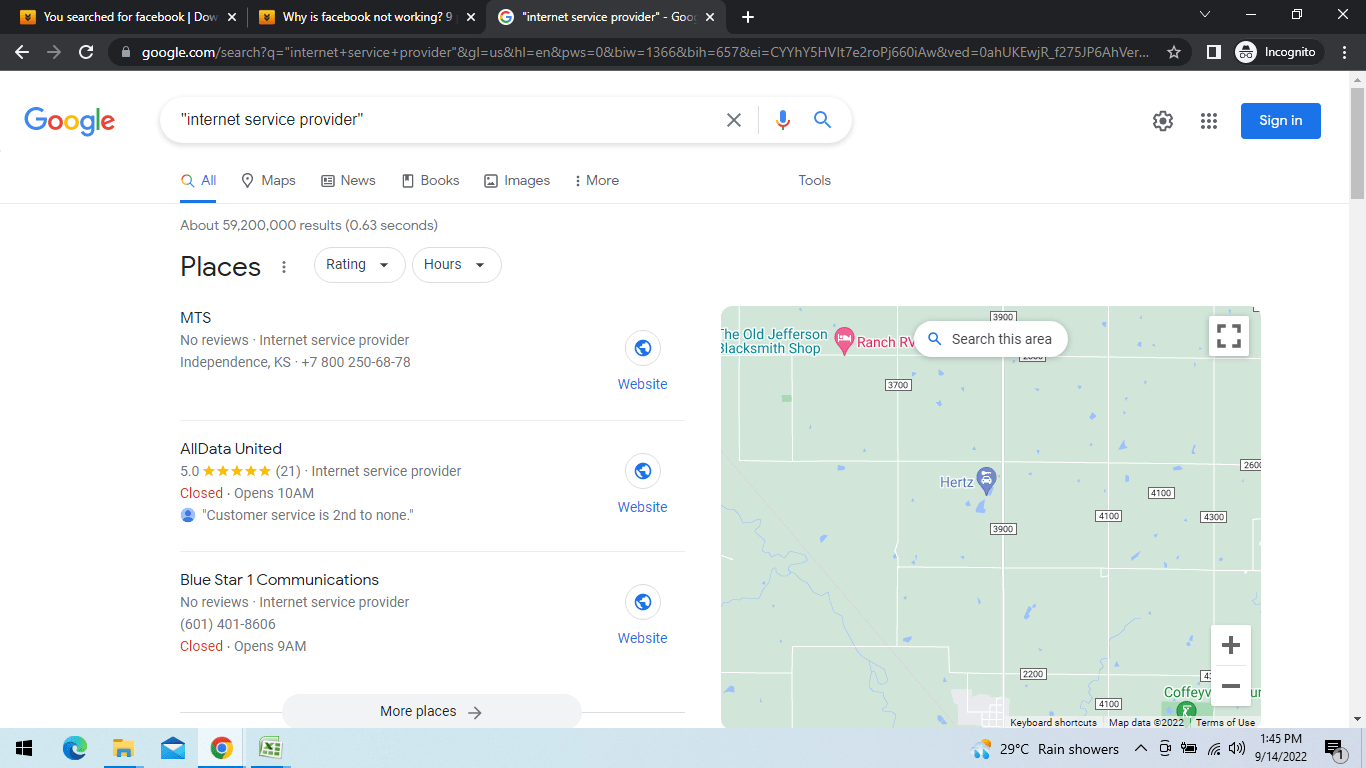
It’s not always clear which internet access types these companies offer. Use an online directory to find the correct internet provider.

READ MORE:
- Types of computer networks
- What is Wi-Fi and how it works
- What is 5G wireless technology and how it would change our lives
- Pros and cons of fixed wireless broadband
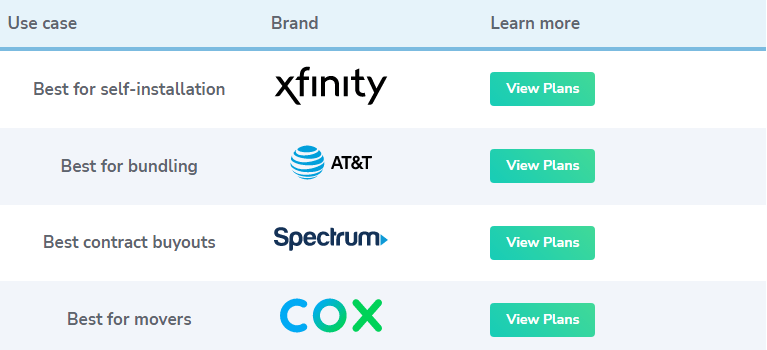
The best internet service providers
If you’re looking for the best internet service provider—perhaps because you’re moving—then check out our favorite
2. Basic components need to set a home/small business internet
- Router or Wireless router – Connects the network to the Internet.
- Wireless Access Point – Used to Connect Wi-Fi equipped devices to the network.
- Ethernet HUB or Switch -Used to Connect Ethernet equipped devices.
- Cable cat 5, cat5e or cat 6 with RJ45 connectors.
- Telephone Cable with RJ 10 connectors.
- Broadband Filters.
3. Install router/modem
When you are setting up home internet service subscription based package, your provider will send you equipment to put in your home so that you may access the internet. There are two options here. You can either hire a specialist to do the installation for you, at a cost, or learn how to do it yourself. Each option has valid points, so let’s examine them.
First things first: if your home’s internet connection requires new cable to be buried or connected to utility poles, a professional installation will be required. In addition, some ISPs’ premium packages necessitate expert installation of the necessary hardware. Before you get started, you should see if self-installation is a possibility.
ADSL and VDSL, utilized in DSL modem routers, are merely data transport technologies that utilize existing phone lines. As a result, these modems will have a phone connector that may be connected to the wall’s phone jack.
READ MORE:
- Difference between modem and router
- What Is Good Internet Speed And How Much You Really Need
- Which Types Of Internet Connection Is Good For You
Home network setup by professional (paid)
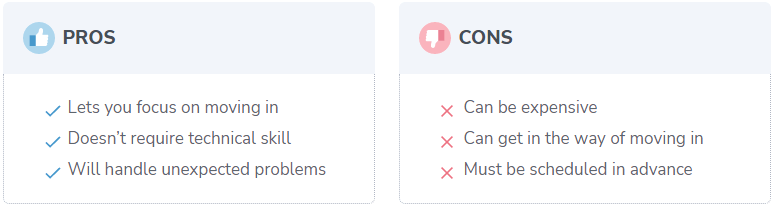
Professional installation is easier. This is great if you’re eager to unpack or have other home difficulties.
However, Home networking service by professional agency would be pricey, especially in older homes without internet wiring. You can choose where the connection enters your home. You can put your modem and router in your office, not a bedroom or basement.
Professional installation takes a few hours, especially if it’s the first time. You can speed up the procedure by:
- Make sure that your computers, laptops, and smart TVs are unpacked and ready to be connected to your network.
- Don’t place boxes or furniture in front of outlets.
- If you have devices on large desks or entertainment centers, make sure they’re pulled out 3–5 feet away from the wall.
- Keep your pets secured in areas away from where the technicians are working. This can include backyards if the technicians are installing new cables.
- Make sure that you or another adult can be present in the home throughout the installation.
Additionally, it is recommended to include some buffer time around the installation in case the technicians run into any issues or are delayed in arriving. You shouldn’t try to fit Internet installation into a packed schedule.
Self installed home network setup (free)
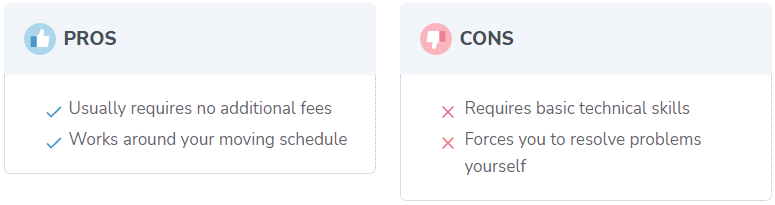
Installing something yourself can appear difficult if you don’t have a technical background, but it’s typically not too difficult. After the stress of moving, the money you save could be very welcome.
When performing a DIY installation, you must take the following measures:
- Obtain a do-it-yourself installation kit by placing an order.
- Connect the modem to your network and activate it.
- Just plug in the power cord.
There will be a power cord, an Ethernet cable, and an outlet cable included in your self-installation kit in addition to your modem and router (which are commonly combined into a single device often called a “wireless gateway”) (the type of cable depends on the type of connection you have). Prior to beginning the installation, check to see that you have all of the required components in your kit.
The GPON data transfer technique is built into the modem if you have a fiber optic internet connection.
If you don’t have a combined modem/router from your Internet service provider, then you’ll need to use an Ethernet cable to connect your router to your modem.
Once plugged in, the indicator lights for each internet connection should come on in sequence. While most devices can accomplish this in under a minute, it may take upwards of twenty minutes.
When the warning signs stop blinking, please accept our congratulations. Getting online at home is now a reality. You must now render it functional.
As always, certain Internet service providers (ISPs) may let you purchase your own modem instead of renting one, saving you money each month. Sometimes, an Internet service provider will charge a monthly cost in addition to the setup price if you don’t utilize the ISP’s approved modem.
If you’re not tech savvy, it’s best to let your internet service provider (ISP) provide the router they’ve tested to be compatible with their network.
After receiving your modem at home, connecting to the internet couldn’t be easier.
- Connect the modem to your home network by plugging it into an available Ethernet port. When using satellite internet, you’ll want to set up shop near a window or near a cable or phone jack.
- Make sure the modem is connected with phone, fiber optic, or cable port is plugged into a working outlet in your house.
- Connect your modem to an electrical socket using the provided power adapter.
- After turning on your modem, you may need to call your internet service provider to make sure they can establish a connection.
4. Wireless home network setup
From your laptop to your smart TV to your thermostat, most of the devices in your home likely link to your wireless home network setup. Due to the fact that many modern gadgets lack a jack for a physical cable, creating a wireless network is now a prerequisite for getting them up and running.
There are two main components to establishing a network connection: establishing a connection to your router and establishing a secure network.
Connect your router
Many current routers feature mobile apps that offer you remote access and management. Even if your router doesn’t work with an app, you can still configure it manually. A standard web browser and the IP address of your router are all that’s required. It’s typically listed in the router’s handbook or printed on a sticker affixed to the device. If it doesn’t work, look for it yourself.
Connecting your router on a Windows system:
- Open up the Command Prompt and type in IPCONFIG.
- The address you’re looking for will be listed as the “default gateway” and will consist of four numbers separated by periods.
Connecting your router on a Mac:
- Open your network settings.
- Select the “TCP/IP” tab
- The IP address will be listed under “router.”
In order to access the security settings of your router, you must first obtain its IP address, then connect an Ethernet-enabled device directly to it.
Set up your network security
You’ll need your router’s username and password before you can log in. When prompted, provide the username and password you used when setting up your router at your former location. If this is a brand new router, the default login information will be listed either on the device itself (often on a label on the underside of the packaging) or in the accompanying user guide.
Network security is simple to implement once you have the proper data:
- Sign in using your login username and password
- Change your network name (SSID).
- Set your security protocol to WPA2.
- Set your new password.
Even though you can just use the default settings, we strongly suggest changing both because it is creating a home network setup much safer.
When you and other people look for Wi-Fi networks in your area, you will see your network name, also called its SSID. Set it to a name you will recognize right away when you see it in the list.
WPA2 is the most secure type of security for Wi-Fi networks. It is also known as WPA2-PSK or AES. Make sure your password is strong and easy to remember when you set it up. It’s also a good idea to use a password that you don’t mind giving out to guests who might want to use your Wi-Fi. Don’t use a password you’ve used elsewhere.
5. Connect your devices
If you’ve gotten this far, you’re almost done! Now that your wireless network is up and running, you can start connecting your devices to it.
Get a phone or laptop and test your connection before you start. Your wireless network should show up with the name you gave it, and you should be able to sign in with your new password. If everything is working, you can connect the rest of your devices.
Remember that all the devices that were connected to your Wi-Fi in your old home will need to have their network information updated in order to connect. This includes computers, laptops, and any other smart devices you may have.
How to set a wired connection
To connect with an ethernet cable, just plug one end of the cable into the ethernet port on your computer or laptop. Plug the other end into one of the network ports on the back of your router (not your modem!).
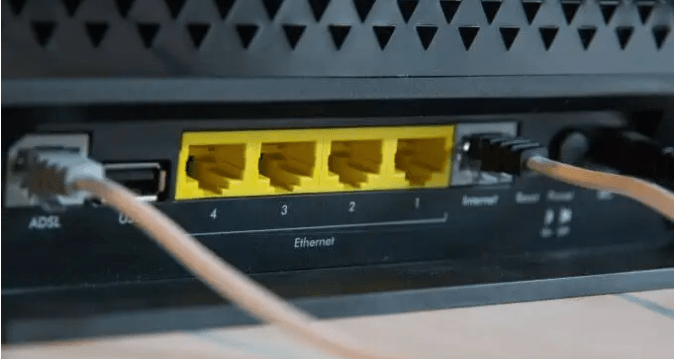
How do you determine which port on the back of your router to connect to?
These network ports are typically indicated in yellow. Also, they are generally numbered. Avoid inserting devices into the “Internet” port, as it should only be used to connect your internet modem.
Once Ethernet is connected, your computer or laptop will have an instantaneous Internet connection.
Wired Network Advantages
- Fast typically 100 Mbps to 10 Gbps
- Secure and reliable.
Wired Network Dis-Advantages
- Doesn’t work with devices that don’t have an Ethernet port e.g. tablets and smart phones.
- Not so easy and fast to setup as it requires running cables. However Home plug or powerline adapters can be used instead.
- Not so easy for visitors and mobile devices (laptops) to connect to.
Main Uses
It Is best used for network backbone i.e. connecting between router, network switches and wireless access points on different levels (floors).
How to set up Wireless internet connection at home
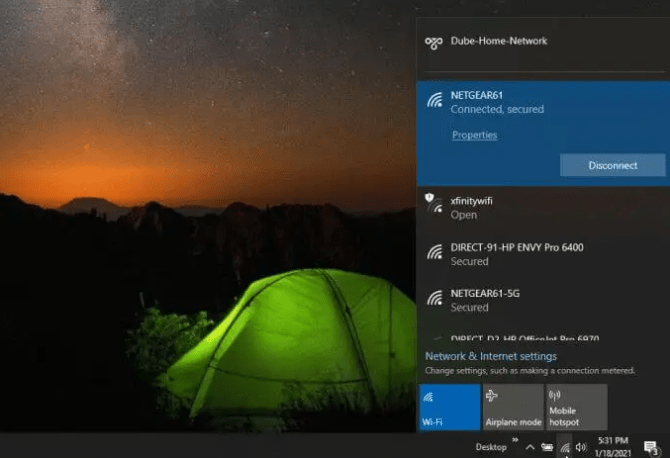
To connect your Windows 10 PC or laptop to your home WiFi network, just click the wireless icon in the lower right corner of the taskbar. This will show a list of all the WiFi networks to which you can connect. Just click Connect and enter the password for the network.
To connect a Mac to a WiFi network, click the WiFi icon in the menu bar, choose Turn WiFi on, and then choose the WiFi network you want to connect to.
Open Settings on your Android device, tap Connections, tap Wi-Fi, and then tap the network you want to connect to. Open Settings on your iPhone, tap Wi-Fi, turn Wi-Fi on, and then tap the network you want to join.
If you try to connect a device and it says it’s connected to the internet but you can’t get online, you’ll need to try more advanced ways to fix your internet connection.
At this point, your home should have an internet connection that works and a WiFi network that you can use to connect all your devices that can connect to the internet.
Things to consider while connecting wireless devices in home network setup
- Ensure the Wi-Fi on your device is powered on.
- Your wireless devices like smartphones, laptops, PCs, tablets, gaming systems, iPods, etc., should have the Wi-Fi switched on to connect to the internet seamlessly.
- Go to the device’s settings.
- Visit your device’s settings and find the network settings. Click on the Wi-Fi icon on your laptop or PC’s toolbar, which will show the connections available nearby.
- Find your Wi-Fi network.
- In your network settings, you will find several connections available. Find your broadband network or hotspot by the name you’ve set as default. Select the network and enter the password. If you’re connecting to a public network, ask the person responsible for the network for it. However, open public networks don’t require a password to connect.
- Wait for the device to connect.
- It takes a few seconds for the network to connect to your device. If the connection times out, more than often, it’s because the device is far from the network. In this case, move closer to the Wi-Fi network and reconnect.
- Test the connection.
Wireless Network Advantages
- Easy to setup from an end user perspective.
- Allows easy access to smart phones, Tablets and mobile devices.
- No cables to run.
Wireless Network Dis-Advantages
- Not as Secure as wired networks without proper configuration, and easy to setup insecurely.
- Not as fast as wired networks.
- Not as reliable as wired networks.
Main Uses
Connecting peripheral devices such as computers, smart phones, and tablets, among others.
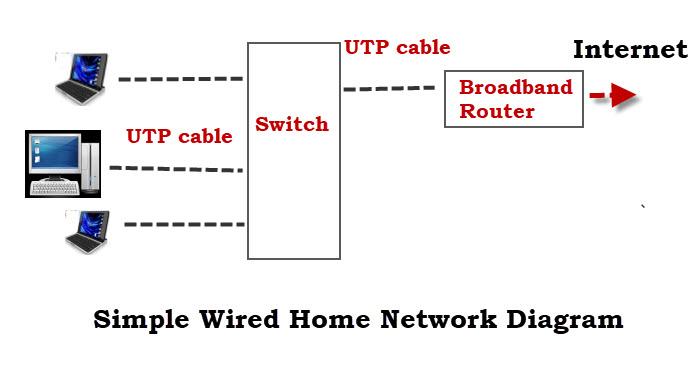
Most home networks will utilize both wired and wireless connections.
Increasing the capacity of your home network
In large homes/offices, it may not be able to connect all devices directly to the Wireless router; therefore, extra networking components will be required.
You can extend your home internet network in the following ways:
- Increasing your Wi-Fi network’s coverage by installing additional Wireless Access Points or a more potent access point.
- Alternatively, you can extend the home wired network setup by running cables into additional rooms
- Or by adding home plug adapters on your power lines. See Extending a Home Network
Home network IP addresses
All your devices will require an IP address.
This is provided automatically by a service known as DHCP, which is provided by the home router by default.
As they are subject to change, IP addresses issued by a DHCP server are known as dynamic addresses. You can also manually assign addresses, which are known as static addresses.
Static addresses are not often issued, but are frequently required when port forwarding is utilized.
They can be assigned via the network settings of the device, although it is preferable to use reserved addresses on the DHCP server.
Additionally the addresses used on your home network setup are known as internal addresses.
When you connect your gadget to the Internet, it will utilize an external IP address. This is the IP address of the router or network hub. See Internal IP Addresses vs. External IP Addresses for a complete explanation.
READ MORE:
- What is a dynamic IP address, and how it works?
- Do you know the difference between static and dynamic ip address
Finding your DNS, IP, MAC, and router IP addresses
You might need to determine your DNS server or the IP or MAC address of:
- Your Home Router.
- Your own computer/tablet/phone
The most important tool is ipconfig (Windows) or ifconfig (Linux).
The image below displays the ipconfig command with the /all option. i.e. ipconfig/all
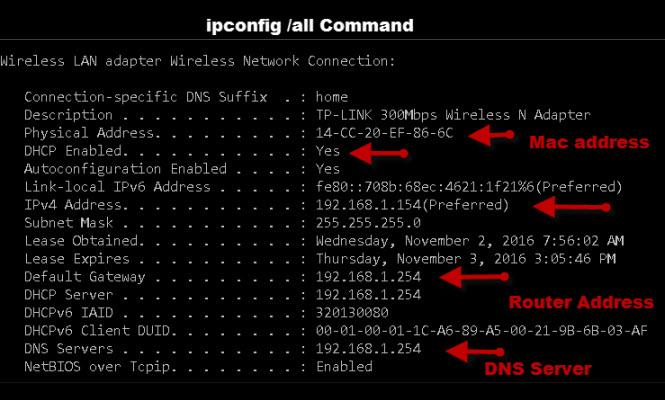
Your home router serves as the entry point to the Internet. Some devices refer to the default router when reading your setup, while others use the phrase default gateway.
In the image above, the IP address is 192.168.1.254
Splitting your home internet network
For security purposes, you may need to divide your home network. This is especially true in small business network setup, such as eateries, where customers also have network access.
Many current routers feature guest networks for this purpose, and their configuration is straightforward.
Utilizing VLANs is a frequent but less straightforward alternative. See Using and Comprehending VLANs
Configuration of firewalls on home networks
A Firewall functions as a router, and on small networks, the most common configuration is a firewall/NAT router combo in which a single device performs as both a NAT router and a firewall.
Your home or small business network’s PCs and devices are protected from Internet intruders by a firewall.
It effectively functions as a digital one-way gate, preventing devices on the Internet from accessing your network while enabling devices on your network to connect to devices on the Internet. (schema depicted below)
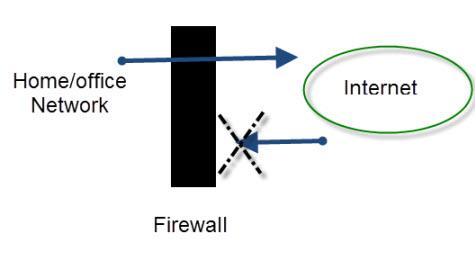
For small home/office networks, the firewall is integrated into and part of the Internet-accessing router.
By default, only connections from the local network to the Internet are permitted, but not connections from the Internet to the home network.
However, if you need Internet-connected devices to connect to your network (as is commonly the case for gamers), you can configure port forwarding.
Checking Internet and network speeds
On any network, the speed is limited by the component with the slowest speed.
The data transfer rate between a computer with a Gigabit network card and a computer with a 100Mbit/s network card is limited to 100Mbit/s.
Comparable to traffic signals and roundabouts, shared devices such as switches and Wireless access points are network choke points.
LAN Speed test is a very handy tool for determining the speed of your local network. See understanding Home network speeds.
Enhance home internet network efficiency
Optimizing the network’s performance is the final step in its construction. There are numerous methods for measuring performance, including the following:
- bandwidth, which is typically measured in megabits per second;
- latency, which is how long it takes a packet to arrive and is measured in milliseconds; and
- jitter, which is the amount of variance in latency, also measured in milliseconds.
Most network speed tests will offer you with all of these figures, allowing you to see whether your performance has improved as you make adjustments. Read more about the Differnce between bandwidth and latency.
Since Wi-Fi has more variables to assign, the majority of optimization often occurs on the Wi-Fi side. For instance, the home’s physical layout might impair performance, and impediments such as walls, glass, and microwave ovens can cause interference.
In addition to optimizing your performance, knowing which Wi-Fi network channels your neighbors are utilizing is also helpful. For 2.4 GHz bands, it is recommended to select channels 1, 6 or 11 because they do not overlap. Since neither channel 4 nor 8 are in use, it would appear that they are the best options. However, due to channel width, these channels generate interference and overlap with the commonly used channels 1, 6, and 11.
After optimizing the network infrastructure, it is time to optimize the applications. This procedure might begin with the router’s QoS assignment for the network. QoS allows certain types of packets to have a higher priority than others. In this step, you can give video or VoIP traffic a higher priority so that a game or large download does not influence the quality of a video conference call. Consult your router’s manual for specific instructions on how to configure QoS.
ad
Comments are closed.