How To Do Fast Audio To Text Transcription From Your PC
In the early years of the 80s-90s, for all your dictation, thoughts, ideas or special notes required manual typing to document it in written form. Constant writing or typing on a keyboard can be hazardous to your health, and even more so a mouse. You may highly potential to have Musculoskeletal injuries from typing. In general sense, writing is arduous and takes a break every once in a while. Such hindrances influence efficiency, though an ideal scenario involves automatic audio to text transcription software to meet all your above requirements with the pleasure of mind with high efficiency too.

ad
More: You would like to know about this free typing software
Transcribing is an effective substitute for writing and typing. Transcription is the art of converting thoughts and speech into written form. In the modern world, there is software for speech-to-text conversion. Here today we will explain how to transcribe your audio to text effectively and at a great pace!
How to transcribe your audio to text fast
In 2020, audio to text transcription is no longer as tedious as it once used to be. Transcribe is the most comprehensive transcription tool that helps you transcribe audio at least 2-3x faster.
ad
Here’s a step-by-step guide to help you audio to text convert:
1. Choose between self or automatic audio to text transcription

Automatic transcription: For clear and well-recorded audio, Transcribe offers state-of-the-art automatic conversion of audio to text.
Self transcription: Prefer to Transcribe on your own? Transcribe 2-3x faster by using features like voice typing (dictation) and an integrated editor combined with a media player. Skip to Step 3 to learn more.
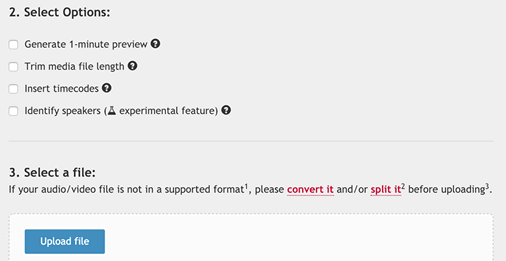
2. For machine transcription, click on “New Automatic Transcription”
Before uploading the file to audio to text transcription, you can set various options such as choosing to see a preview first or configuring timecodes to be inserted in the transcription.

After upload, you will receive an email as soon as the transcription is ready.
3. For self-transcription, click on “New Self Transcription”
Click on “Choose audio/video” to select the recording that you wish to transcribe. We support common audio and video file formats.

Once you choose the file, an audio player will open up right above the text editor.
4. Control the playback of the audio file
Transcribe provides handy keyboard shortcuts to control the playback of the audio. For example, you can slow it down, rewind or skip forward using these shortcuts.
- Esc: pause/resume
- F1: slow down
- F2: speed up
- F3: rewind 2 seconds
- F4: forward 2 seconds
- F6: insert timestamp
Mac users: switch your F1-F11 keys to function as standard function keys
5. You are now ready to transcribe the audio by using Dictation (voice typing)
Click on the green “Dictate” button. Once it turns orange, you can begin speaking.

Simply listen to the audio in a headphone and repeat what you hear in your own voice. Transcribe’s fast & highly accurate dictation engine will convert your voice to text.
We typically find this method to be 2-3x faster than typing.
While we work on improving the quality of fully-automated machine transcription, you can leverage dictation as a time-saving technique. We support English, Spanish, French, Hindi, and almost all other European & Asian languages. Please read this detailed guide on converting your speech to text using dictation.
6. Transcribe audio by slowing it down
If you’re unable to do voice to text transcription via voice typing, Transcribe’s tightly integrated player & editor can still halve the time it would have otherwise have taken you switching between a media player and an editor, while juggling with a mouse and keyboard.

You can slow the audio down, listen to it and just type along. Be sure to use the handy keyboard shortcuts mentioned in Step 4 to effortlessly control the audio playback to match your typing speed.
Transcribe will auto-save every keystroke. The transcribed text is stored in your browser and is not sent to our servers. This data is persisted even if you restart your browser or computer as long as you don’t clear your browser’s cookies or cache.
7. Use Templates and auto loop features for additional help
Be sure to explore the Templates feature using which you can set certain shortcuts to expand into longer words or sentences. For eg, you can set “S1:” to expand to “Speaker 1:” automatically, when you type “S1: “.
You can also use the auto-loop feature to get the audio to automatically pause for a few seconds while you type and then resume, without you having to press pause and play each time.
8. Configure a Foot Pedal for even more help
Using a foot pedal allows you to free up your hands to focus on typing while using your feet to control audio playback. If you do a lot of transcriptions or you’re a professional transcriptionist, you can save yourself a lot of idle time using a foot pedal. Saving 2 seconds with every play/pause will quickly add up to a good increase in productivity, allowing you to hyper-optimize your workflow and do more transcriptions in less time.
Transcribe supports the following foot pedals:
- Infinity USB Foot Pedal
- Olympus RS26, RS27, RS28
- vPedal vP-1 USB pedal
- Philips ACC2310
After you load your audio, simply click on the foot pedal icon in the audio toolbar to get started.
9. When you are done, export your transcript
When you are done transcribing, you can export the text as a .doc file to your computer – just click the export icon in the toolbar above the editor. We affix the date and time to the end of the downloaded file’s name so you can easily track multiple versions of your work.
Try it now, You have done a great job, keep it up!
ad


Comments are closed.