How To Root BlueStacks Latest Version On Windows
BlueStacks is one of the most well-known Android emulators for Windows PC, which enables users to use Android apps and games on their computers. There are some restrictions on what you can do with the emulator, though. One option to unleash BlueStacks’ full potential is to root it, which will give you more administrative power and access to new features. This post will walk you through the process of rooting the most recent version of BlueStacks on Windows and offer advice on how to make the most of the program. Read on to find out how to root BlueStacks newest version on Windows if you’re ready to advance your BlueStacks experience.

ad
How to root BlueStacks?
There are a few different methods that you can use to root BlueStacks, depending on your specific needs and preferences. Here are some of the most common BlueStacks root methods:
Using the BlueStacks Tweaker
The BlueStacks Tweaker is a popular tool that can be used to root BlueStacks. It works by modifying the BlueStacks installation files and adding root access. This method is relatively simple and straightforward, and it’s a good option if you’re not comfortable with more complex rooting methods.
ad
The BlueStacks Tweaker is a tool that can be used to root BlueStacks. Here is a brief step-by-step guide to using the BlueStacks Tweaker:
1. Download and install BlueStacks on your computer.
2. Download the BlueStacks Tweaker tool from a trusted source and run the BlueStacks Tweaker as an administrator.
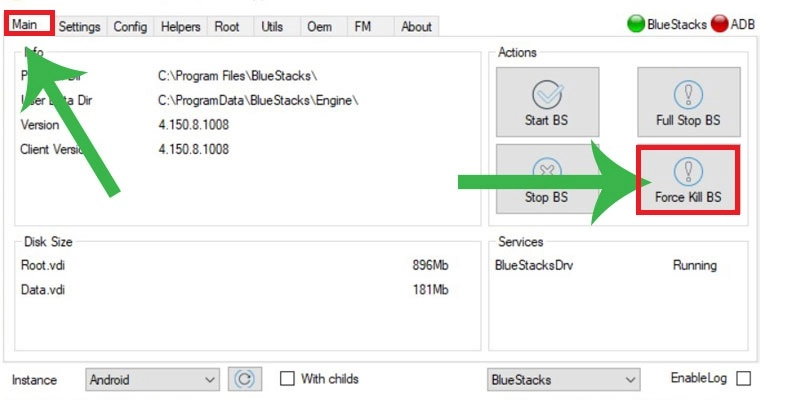
3. Click “Main Tab” in the BlueStacks Tweaker and then “Force Kill BS” as displayed in the below image.

4. Now both BlueStacks and ADB indicators will turn red.

5. Click on the “Unlock” button to unlock the root access.

6. Click “Start BS” on the “Main Tab” page. Both the BlueStacks and ADB indicators will become green once BlueStacks restarts. Return to the “Root Tab” and select the “Patch Tab” now.

7. Install SuperSU and even update the SU Binary after patching Bluestacks.
8. You’ve done! Restart your rooted copy of Bluestacks.
After completing these steps, BlueStacks should be successfully rooted, and you should have full access to its features and functions.
Using SuperSU
SuperSU is a popular rooting tool for Android devices, and it can also be used to root BlueStacks. This method involves installing SuperSU on BlueStacks and using it to grant root access to other apps.
SuperSU is a popular rooting tool that can also be used to root BlueStacks. Here is a brief step-by-step guide to using SuperSU to root BlueStacks:
- Download and install BlueStacks on your computer.
- Download SuperSU from a trusted source and save the file to your computer.
- Open BlueStacks and click on the “Install APK” button.
- Select the SuperSU APK file that you downloaded and click on the “Open” button.
- Follow the on-screen instructions to install SuperSU on BlueStacks.
- Open SuperSU and update the binary if prompted.
- Grant SuperSU root permissions if prompted.
- Click on the “Settings” button and select “Enable Superuser” to enable root access on BlueStacks.
- Restart BlueStacks.
Now you have successfully rooted BlueStacks and have full access to its features and functions.
Supported versions of BlueStacks With SuperSu
Using BS Tweaker, we can root BlueStacks 4 as well as all previous versions from 2.5.xx to 4.3.xx. All of the most recent BlueStacks versions are supported by BS Tweaker, which is continuously updated.
- BlueStacks 3N,
- BlueStacks 2
- BlueStacks 3
- 64-bit versions of BlueStacks 4 and BlueStacks 4
Requirements & Downloads
- Your Windows laptop or computer has BlueStacks installed. If BlueStacks isn’t already installed, download and install it from here.
- Download BlueStacks Tweaker 5 via this link.
- Download .Zip file of SuperSu version 2.82
About SuperSu Zip
The SuperSU Rooting Framework’s central component, SuperSU Zip, is where all the magic of rooting takes place. A zip file containing the SuperSU Rooting Framework, which is used to root Android devices, is available. To root the Android device, this file must be flashed using a custom Android recovery like TWRP or CWM Recovery. Please be aware that SuperSU Zip only assists in rooting Android devices. The prerequisites for using SuperSU Zip are a functional custom recovery and an unlocked bootloader.
Using Kingroot
Kingroot is another popular rooting tool that can be used to root BlueStacks. This method involves downloading and installing Kingroot on BlueStacks, and then using it to root the emulator.
step-by-step guide to using Kingroot to root BlueStacks:
- Download and install BlueStacks on your computer.
- Download Kingroot from a trusted source and save the file to your computer.
- Open BlueStacks and click on the “Install APK” button.
- Select the Kingroot APK file that you downloaded and click on the “Open” button.
- Follow the on-screen instructions to install Kingroot on BlueStacks.
- Open Kingroot and click on the “Try to root” button.
- Wait for the rooting process to complete.
- Restart BlueStacks.
You have rooted BlueStacks with the help of Kingroot.
Using Magisk
Magisk is a newer rooting tool that has gained popularity in recent years. It can also be used to root BlueStacks, and it offers some additional features and benefits, such as the ability to hide root access from certain apps.
Magisk is a rooting tool that can be used to root BlueStacks. Here is a brief step-by-step guide to using Magisk to root BlueStacks:
- Download and install BlueStacks on your computer.
- Download the Magisk Manager APK file from a trusted source and save it to your computer.
- Open BlueStacks and click on the “Install APK” button.
- Select the Magisk Manager APK file that you downloaded and click on the “Open” button.
- Follow the on-screen instructions to install Magisk Manager on BlueStacks.
- Open Magisk Manager and click on the “Install” button.
- Choose the “Download” option and select the latest version of Magisk.
- Wait for Magisk to download and install on BlueStacks.
- Click on the “Reboot” button to restart BlueStacks.
You have done BlueStacks rooting with Magisk! Additionally, it’s important to download Magisk from a trusted source to avoid downloading any malicious software.
Note: It’s important to note that rooting BlueStacks using any of above method can potentially cause problems with the software or damage your computer, so it’s essential to proceed with caution and research the rooting method carefully before attempting it.
FAQ
What is BlueStacks’ most recent version, and can it be rooted?
As of April 2023, BlueStacks 5 is the most recent version. It is possible to root BlueStacks 5 using a variety of rooting techniques.
What are the benefits of rooting Android emulator BlueStacks?
Rooting BlueStacks can provide users with additional control over the software and its functions. It can also enable users to access and modify system files, install custom ROMs, and run apps that require root access.
How can you tell whether a device has root access?
By tapping the link below, you can easily get the ‘Root checker’ app from the Google Play store:
Get Root Checker (FREE)
Is it safe to root BlueStacks on Windows?
It’s vital to exercise caution and thoroughly examine the rooting process before attempting to root BlueStacks on Windows as it has the potential to break the software or harm your computer.
Can I use SuperSU to root BlueStacks on the latest version of Windows?
SuperSU can be used to root BlueStacks versions up to and including BlueStacks 3, but it may not be compatible with the latest version of BlueStacks.
What precautions should I take before rooting BlueStacks on Windows?
Before rooting BlueStacks on Windows, it’s important to back up any important data, research the rooting method carefully, and ensure that you download any required software from a trusted source.
How can I unroot BlueStacks on Windows?
To unroot BlueStacks on Windows, you can use a tool like SuperSU or the BlueStacks Tweaker to remove the root access.
What are some common issues that may arise when rooting BlueStacks on Windows, and how can they be resolved?
Some common issues that may arise when rooting BlueStacks on Windows include compatibility issues, software errors, and security vulnerabilities. These issues can be resolved by researching the rooting method carefully, using a trusted source for downloads, and taking precautions like backing up data and creating system restore points.
ad


Comments are closed.