Stellar Partition Manager For Hard Disk Download
Stellar Partition Manager Software for Mac is one of the most popular applications for creating, deleting, resizing, and formatting the Mac hard drive partitions. Using the help of this partition manager tool, you can quickly partition your Mac hard drive, SSD, and external hard disk drive (HDD).
It is a disk utility software that conveniently manages partitions including the BOOT volume on your Mac OS X hard drive. it now resizes Boot Camp partitions and NTFS formatted drives. This software ensures that no data is lost during partitioning a Mac system.
With an interactive and easy interface, this software provides you with a wide range of options to optimize your Mac hard drive and performs batch operations that prevent the risk of data loss and optimize the free space. The software is compatible with the latest Mac OS X10.10 Yosemite.
Stellar partition manager software is extremely useful. The Mac disk partition manager can format the drive in Mac systems and create a new partition from the free space available. The software allows you to shift volumes up and down so that you can resize the existing partition with 100% safety. Moreover, this Mac partition manager provides options to Hide/Reveal any partition, thereby preventing any unwanted access.
Stellar Partition Manager Features
Create Mac Partition/Volumes
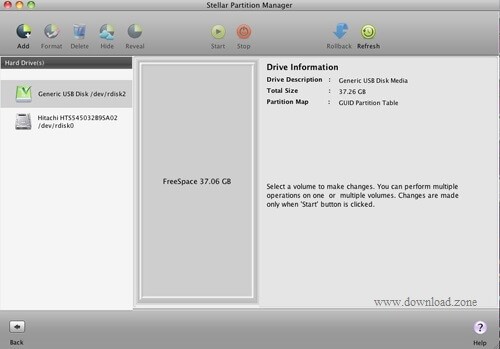
Run Stellar Partition Manager software. The main interface lists all the hard drives attached to the system. Choose the hard drive, in which you want to create a new partition and click the ‘Add’ button from the toolbar.
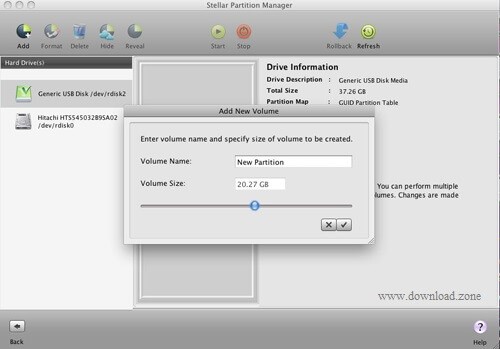
The ‘Add New Volume’ dialog box gets displayed. Give the Volume Name and specify the size of the volume using the slider. Click the Ok button.
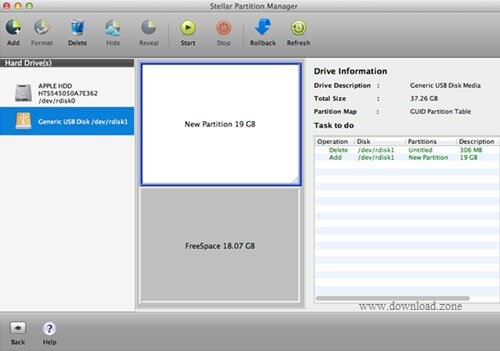
The new operation will get added to the ‘Task to do’ list. Click the ‘Start’ button on the toolbar to start the partition creation process.
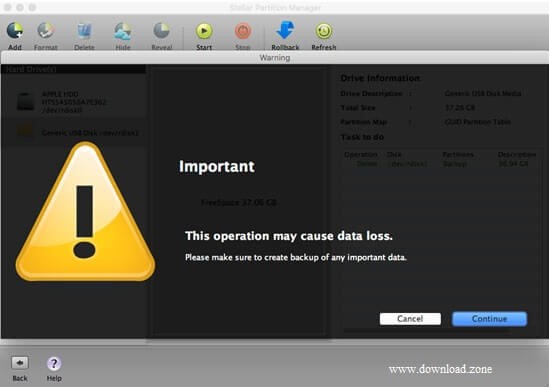
A message box will be displayed with a message to take back-up of your important data before carrying out the process. Click ‘Continue’ to create/add the new partition.
A process completion message box will be displayed. You can see the new partition in the drive along with other partitions.
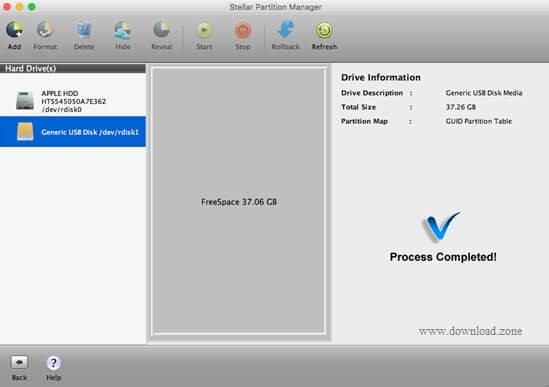
Delete Mac Partition/Volumes
Run Stellar Partition Manager utility. The initial screen with a brief about Partition Manager Software opens. Click ‘Continue’ to go to the main window.
- Select the hard drive from the left pane of the software and from the top menu click the Delete button. The software adds the job into the ‘Task to do’ list; click the ‘Start’ button to perform the deletion.
- A message window pops up with a text to take proper backup of important data before removing Mac partition.
- Click ‘Continue’ and the process of deleting the partition on Mac begin.
- Upon completion of the process, the selected partition gets completely removed from Mac hard drive.
Re-partition Without Data Loss
Sometimes, while initializing the new Mac drive, users do not have the exact idea of how many partitions they actually require. This usually leads to the re-partitioning of their existing partitions to form a greater number of volumes. Disk Utility helps in re-partitioning of your existing Mac partition, in which one of your new partitions will contain the data in the original partition. However, as re-partitioning involves some kind of disk initialization operation, it is always suggested to take a complete backup of the original Mac partition before performing any re-partitioning operation.
Re-partition Mac Start-up Drive:
Steps to Choose between OS in a multi-boot Mac
- At Start-up: While starting up your Mac machine, hold down the ‘Option’ key and you will see all the operating system-based partitions. Choose the one you want and that will boot-up.
- Switch from One OS to Other: If you are already logged in, go to the ‘System Preferences’ and select the start-up disk.
Resize Mac Partition: Run Stellar Partition Manager and select the disk, in which the partition/volume size to be increased or decreased.
How to Increase Partition Size?
Click the particular Volume/Partition from the graphical view of the volumes and follow any of the below options:
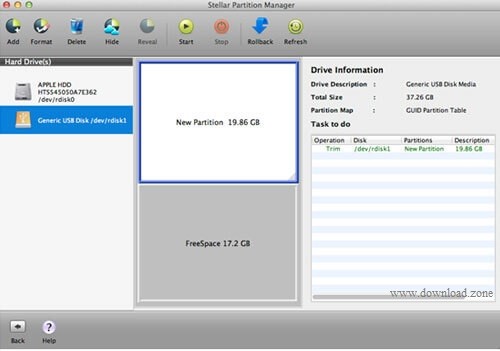
Manually, drag down the slider from the bottom of the partition, up to the desired size and click ‘Resize’.
- Choose the particular Volume/Partition and the free spaces together from the graphical view of the interface. Click the ‘Resize’ icon on the toolbar.
- Once, you click the ‘Resize’ icon, the ‘Resize Partition’ window appears. Move the slider and specify the required volume size. Click ‘OK’ and the resizing process starts.
- Upon completion of the resizing operation, the resized partition will get mounted on the desktop.
How to Decrease Partition Size?
To decrease the size of the partition or volume, follow the below steps:
- Select the particular Mac partition, you want to decrease.
- Click ‘Resize’. The resizing process starts.
Format Mac Partition
- Run Stellar Partition Manager. The interface lists all the attached drives in the system.
- Choose the drive, in which you want to format a partition. It will graphically show all the partitions/volumes in the middle pane of the interface.
- Select the particular Partition/Volume and click ‘Format’.
- The operation will get added to the ‘Task to do’ list. Click the ‘Start’ button on the toolbar to begin formatting.
- A message box will pop-up to tell you that you must take the back-up of your important data before formatting. Click ‘Continue’ to format.
- Once the process gets completed, the refreshed partition becomes ready for use.
Partitioning External Drive
- Open the ‘Application’ folder and select ‘Disk Utility’ from the ‘Utilities’ menu.
- All the attached drives to the system, including your new hard drive get listed in the left side column. Select the new hard drive from the list and click the ‘Partition’ tab.
- Click the + (plus sign) or – (minus sign) in order to add or remove the partitions. You can also assign a name and file system to each partition.
- Click ‘Apply’ to make the partitions as specified.
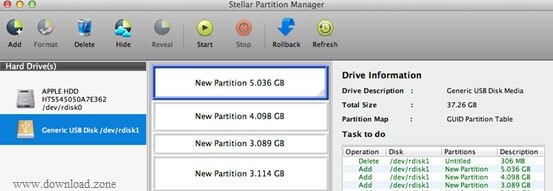
Stellar Partition Manager For Windows Benefits
- A complete Mac Partition Manager utility
- Creates new partition(s) on Mac hard drive
- Resizes Mac partition by optimizing the free space
- Resizes, formats, or deletes existing partitions
- Resizes Boot Camp & NTFS partition with ease
- Compatible with macOS Sierra 10.12, 10.11, 10.10, 10.9, 10.8, 10.7, 10.6
Pros And Cons
| Pros | Cons |
| Safe partition management | Bland design |
| Ease of use | |
| Highly Speed |
System Requirement
| Operating System | macOS Sierra 10.12/10.11/ 10.10/ 10.9/ 10.8/ 10.7 / 10.6 OS |
| Processor | Intel |
| RAM | 1 GB minimum |
| Hard Disk | 50 MB of Free Space |
- GParted
- Macrium Reflect
- EaseUS Partition Master
- AOMEI Partition Assistant
- Parted Magic
Stellar Partition Manager For Mac Overview

Technical Specification
| Version Name | 2.5 |
| File Size | 13.1 MB |
| License | Paid |
| Languages | English, German, Spanish, French, Italian, Japanese, Polish, Chinese |
| Developer | Stellar Information Technology |
ad


Comments are closed.