
Most activities on a Mac necessitate internet connectivity, making it highly frustrating when this connection is absent. While there may be multiple reasons for your Mac’s inability to connect to the internet while other devices can, the positive note is that successful connections on some devices help narrow down potential causes. This article delves into the reasons behind your Mac’s internet connection issues and offers solutions to address them.
ad
Why won’t my MacBook connect to Wi-Fi?
When other devices in your home or office are successfully connected to the internet, it confirms the functionality of your broadband connection. Therefore, if your Mac is not connecting, potential issues may arise from problems either in the connection between your Mac and the router or within your Mac itself. If the problem lies with your Mac, it’s likely a software-related issue and, consequently, should be relatively easy to fix. However, the only way to determine the exact cause is through a systematic process of trial and error, eliminating possible causes one by one.
How to fix it when your Mac won’t connect to internet
1. Turn Wi-Fi off and then on again
ad
Fixing Wi-Fi and internet connection problems can sometimes be as simple as this. Click on the Wi-Fi icon in the menu bar or use the Control Center icon to select Wi-Fi, then toggle the switch to the off position. After waiting for a few seconds, switch it on again.
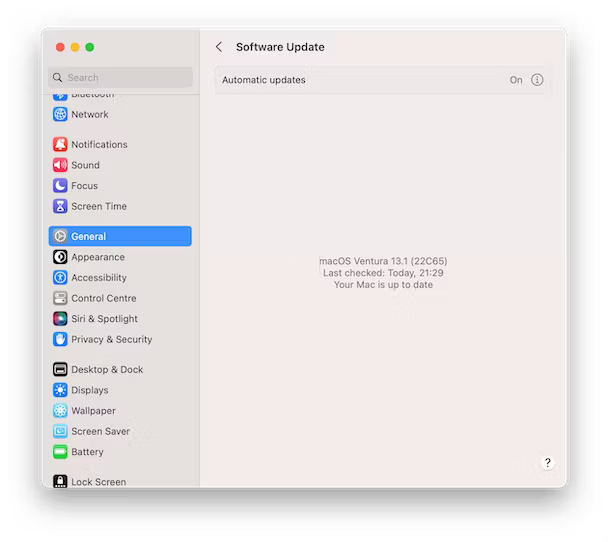
2. Restart your Mac
Before proceeding with any other troubleshooting steps, consider restarting your Mac. This action serves to clear temporary files and reboot the application you were using when attempting to connect, potentially resolving the issue. Additionally, check for macOS updates by accessing System Settings > General > Software Update or navigating to the Apple menu > About this Mac > Software Update on pre-macOS Ventura systems.
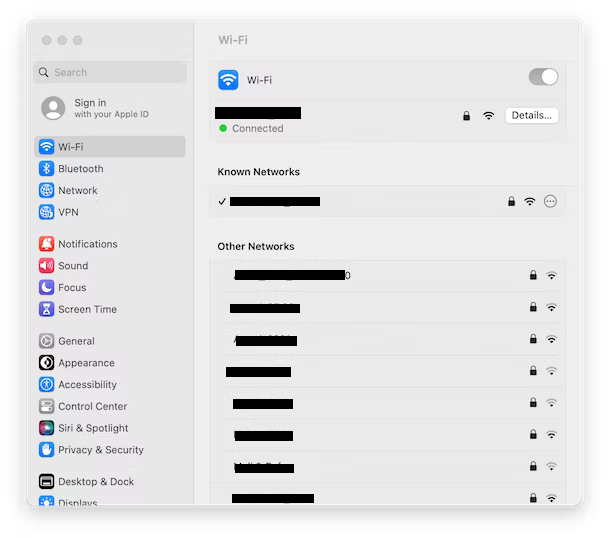
3. Check you’re connected to the correct Wi-Fi network
Your Mac is designed to automatically connect to the network with the strongest signal, but there are instances when it doesn’t follow through. If it connects to a more distant network, it may seem like there’s no connection at all, causing websites to fail to load. To address this, click on the Wi-Fi menu and check which network is highlighted in blue. If it’s the wrong one, click on the correct network to establish the proper connection.
4. Move closer to your router
If you’re using a MacBook Air or MacBook Pro, and you have the flexibility to move closer to your wireless router, it’s worth a shot. Wi-Fi signals generally weaken as you move away from the router. Even if the menu bar icon displays a strong signal, your Mac may still encounter challenges in maintaining a stable connection. Another consideration is relocating your router, if feasible. It’s advisable to position wireless routers away from walls whenever possible and, importantly, keep them at a distance from other devices that could potentially cause interference, such as microwave ovens.
5. Restart your router
Even if other devices connected to the router can access the internet, the problem might be with the router itself. For instance, it could have failed to assign an IP address to your Mac for some reason. To rectify this, simply restart the router.
📚 Also Read: Sound not working on MacBook?
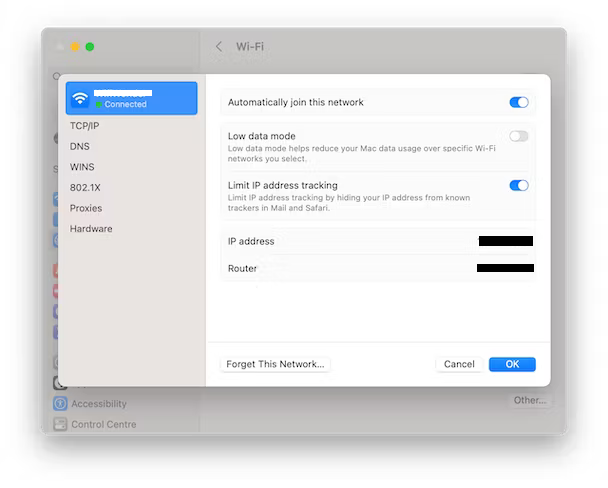
6. Reconnect to your Wi-Fi network
If your MacBook Air is unable to connect to Wi-Fi while other devices can, consider making your Mac forget the network as the next troubleshooting step. This involves re-entering your Wi-Fi password, essentially refreshing the connection.
- Click on the Wi-Fi icon in the menu bar.
- Go to Wi-Fi Settings.
- Click on “Details” next to the network name.
- Choose “Forget this Network.”
- Click on the Wi-Fi icon in the menu bar again.
- Open the dropdown arrow next to “Other Networks.”
- Select your Wi-Fi network.
- Enter your username and password.
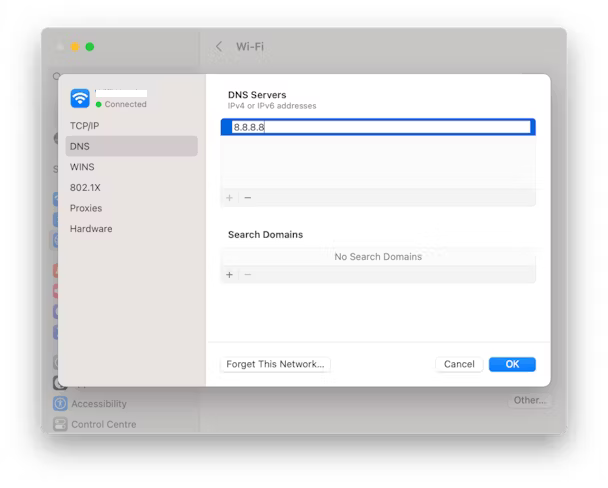
7. Change your DNS settings
When you access a website on your Mac, the web browser matches the URL with an IP address by checking against a domain name system (DNS) server. Usually, this DNS server is set by your internet service provider. If there’s an issue with that server, your Mac may encounter difficulties connecting to websites. To address this, you can modify the DNS settings on your Mac to use Google’s DNS, known for its speed and stability.
Follow these steps:
- Click on the Apple menu and select System Preferences.
- Go to Network and click on Details next to the Wi-Fi network you are connected to.
- Click on DNS in the sidebar and then select the ‘+’ symbol under DNS Servers.
- Enter the following DNS address: 8.8.8.8
- Click OK.
- Quit System Preferences.
In the future, whenever your Mac tries to reach a web address, it will check Google’s DNS server instead of the one provided by your service provider.
FAQ’s
What’s the first step to fix Wi-Fi and internet connection problems on my Mac?
Turn Wi-Fi off and then on again. Click on the Wi-Fi icon in the menu bar or use the Control Center icon to select Wi-Fi, then toggle the switch to the off position. After waiting for a few seconds, switch it on again.
Should I restart my Mac if it’s not connecting to the internet?
Yes, restarting your Mac is recommended. This helps clear temporary files and reboots the application you were using when attempting to connect, potentially resolving the issue. Also, check for macOS updates in System Settings or the Apple menu.
What should I do if my Mac is not connecting to the correct Wi-Fi network?
Check which network is highlighted in blue in the Wi-Fi menu. If it’s the wrong one, click on the correct network to establish the proper connection.
How can I address Wi-Fi issues if I’m using a MacBook Air or MacBook Pro?
Move closer to your wireless router, as Wi-Fi signals weaken as you move away from the router. Consider relocating your router if feasible, and position it away from walls and potential interference sources.
What should I do if restarting the router is necessary?
Simply restart the router. This can resolve issues, such as the router failing to assign an IP address to your Mac.
How can I reconnect to my Wi-Fi network on my MacBook Air?
Click on the Wi-Fi icon, go to Wi-Fi Settings, click on “Details” next to the network name, choose “Forget this Network,” and then reconnect by selecting the correct network and entering your username and password.
Is changing DNS settings a solution to Mac internet connection problems?
Yes, changing DNS settings can help. Follow the steps to modify DNS settings on your Mac and use Google’s DNS, known for speed and stability. This can resolve issues related to your internet service provider’s DNS server.
How does changing DNS settings affect my Mac’s internet connection?
Changing DNS settings on your Mac directs it to check Google’s DNS server instead of your service provider’s DNS server when accessing web addresses, potentially improving speed and stability.
Conclusion
Navigating the challenges of Mac internet connectivity issues can be frustrating, but understanding potential causes and applying systematic solutions is key. From simple steps like toggling Wi-Fi off and on to more intricate measures such as adjusting DNS settings, this article provides a comprehensive guide. A well-connected Mac ensures a smoother digital experience, and with these tools, you can overcome challenges and maintain a reliable internet connection on your Mac.
ad
Comments are closed.