
Apple hides certain files from the average Mac user to prevent accidental damage. However, you may need to access these hidden files or the ~/Library folder to troubleshoot issues. You might also want to delete hidden files to free up space on your Mac.
By default, files that are hidden typically start with a period, such as .htaccess, .bash_profile, or .svn directory. Other hidden areas include folders like /usr, /bin, and /etc. The Library folder, which contains application support files and other data, is also hidden from view.
ad
How to see hidden files in macOS
A quick and simple method to view hidden files within a folder is to open Finder and press Command + Shift + . (period). However, there are additional options you might find useful, which we explain below.
To stop viewing the hidden folders, press Command + Shift + . again.
ad
Where is the Library folder?
Many of these hidden files are stored in a Library folder, which is also hidden from view.
To add to the confusion, there are multiple Library folders, and not all of them are hidden. We’ll clarify the differences and show you how to find each Library folder—including ~/Library—on your Mac below.
The situation is further complicated by recent changes Apple has made to Finder, so some tutorials may refer to features that are no longer available. For instance, the Home folder, which has a home icon and is named according to what you’ve assigned to your Mac, is found in the Users folder. Neither of these is visible by default in macOS Big Sur or later, but we’ll guide you on how to locate them below.
Similarly, Macintosh HD is usually labeled with the name you’ve given your Mac and is not visible by default. We’ll also explain how to make these visible.
How to find ~/Library
The first Library folder to locate is the hidden one in your Home folder, often referred to as ~/Library.
The Home folder is not as easily located as before and is typically labeled with your name, though it has an icon that looks like a house.
Here are several ways to access your Home folder:
- Open Finder and press Command + Shift + H.
- Alternatively, click on Go in the menu and select Home.
- You can also add this Home/User folder to the Finder sidebar by going to Finder > Settings (or Preferences) > Sidebar and checking the box next to your name in the Favorites section.
Once you’re in the Home folder, you can press Command + Shift + . to view hidden files, including the hidden Library folder.
Another method to access this hidden Library (~/Library) is through the Finder’s Go menu:
- Open Finder.
- Select Go from the menu bar.
- Choose Go to Folder (or press Shift + Command + G).
- Type ~/Library into the text box and click Go.
Using this method, the hidden folder will be visible without needing to press Command + Shift + ., but it will not remain visible after you close the Finder window.
There’s an even simpler way to find your hidden ~/Library/ folder:
- Open Finder.
- Hold down the Option (Alt) key and choose Go from the dropdown menu bar at the top of the screen.
- The ~/Library folder will appear below the Home folder. Click on it to access the folder directly.
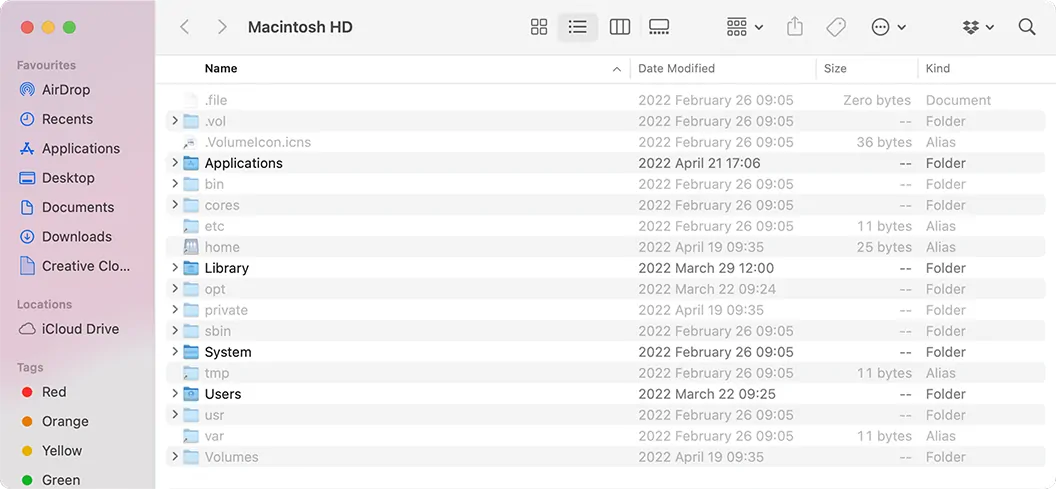
How to find Library in Macintosh HD
The second Library folder isn’t hidden, but it can be challenging to locate due to changes Apple has made to Finder over the years.
This Library folder is found within what is commonly called the Macintosh HD folder, though it will likely be named according to what you’ve named your Mac. If you don’t see a Macintosh HD folder (or the name you’ve given your main disk) in the left-hand column of Finder, follow these steps:
- Open Finder.
- Click on Finder > Settings (or Preferences).
- Go to the Sidebar tab.
- Under Locations, check the box next to your Mac’s name.
You’ll then see your disk in the Locations section of Finder (or the Devices section in older macOS versions). This folder contains Applications, Library, System, and Users, along with many hidden folders and files.
Press Command + Shift + . to reveal these hidden items.
How to find System Library
The third Library folder is found within the System folder, which is one of the folders inside the Macintosh HD folder mentioned earlier. This Library folder holds all the files that macOS requires to operate.
How to keep the hidden ~/Library folder visible
If you use the Go method to access ~/Library, the folder will stay visible until you close the Finder window. When you open Finder again, it will be hidden.
To keep the folders visible, press Command + Shift + . to reveal the hidden folders. To hide them again, press Command + Shift + . once more.
Alternatively, you can keep the hidden ~/Library folder visible by dragging its icon from the Finder window to the Finder sidebar. This way, it will remain accessible even after you’ve closed Finder.
Showing hidden files via Mac Finder
The first and easiest method to show hidden files on a Mac is by using Finder:
- Open the folder where you want to search for hidden files.
- Press the “Command” + “Shift” + “.” (period) keys simultaneously.
- The hidden files will appear as translucent in the folder.
- To hide the files again, press “Command” + “Shift” + “.” (period) once more.
Mac terminal: show hidden files
Another way to show hidden files is by using the Mac Terminal:
- Open Terminal by typing “Terminal” in the Mac search bar. Alternatively, click on Go in the menu bar, select “Applications,” scroll down to “Utilities,” expand the folder, and click on “Terminal.”
- Type in
defaults write com.apple.Finder AppleShowAllFiles trueand press “Enter.” - Type in
killall Finderand press “Enter” again. - Once you run the script, the hidden files should appear in Finder.
To hide the files again, follow these steps:
- Open Terminal.
- Type in
defaults write com.apple.Finder AppleShowAllFiles falseand press “Enter.” - Type in
killall Finderand press “Enter” again.
You can also use Terminal to hide specific files:
- Open Terminal.
- Type in
chflags hidden. - Drag the files you want to hide into the Terminal window.
- Press “Enter” to hide the files.

📚 Also Read: How to recover unsaved Word document on a Mac
Unhide hidden folders using AppleScript
AppleScript is a scripting language used in macOS, which can be viewed and edited in an application called Script Editor. It can be used to show macOS hidden files and folders by creating commands. This method is more complex than the previously described methods. Here’s a detailed guide for first-time users:
- Open the Script Editor application from Launchpad.
![Open the Script Editor]() Click the New Document button.
Click the New Document button.- Paste the provided code into the editor’s window (omit the period at the end!).
![Paste the provided code into the editor’s window]() Click the Run button.
Click the Run button.- Click True to show hidden files and False to hide them.
- Save this file for future use.
 Click the New Document button.
 Click the Run button.
FAQ’s
Why does Apple hide certain files on my Mac?
Apple hides certain files to prevent accidental damage by users who might not understand their importance. By keeping these files out of sight, Apple helps ensure that essential system files and settings are not inadvertently altered or deleted.
How can I view hidden files on my Mac using Finder?
To view hidden files in Finder, open the folder where you want to search for hidden files and press Command + Shift + . (period). The hidden files will appear as translucent. To hide them again, press Command + Shift + . (period) once more.
Where is the Library folder on my Mac, and why is it hidden?
The Library folder is hidden to prevent accidental changes to important system and application support files. You can find the hidden Library folder (~/Library) in your Home folder by pressing Command + Shift + H in Finder. Then press Command + Shift + . (period) to reveal hidden files.
How do I access the hidden ~/Library folder using Finder’s Go menu?
Open Finder, select Go from the menu bar, and choose Go to Folder (or press Shift + Command + G). Type ~/Library into the text box and click Go. This method will reveal the hidden Library folder until you close the Finder window.
How can I keep the ~/Library folder visible at all times?
To keep the ~/Library folder visible, drag its icon from the Finder window to the Finder sidebar. This way, it will remain accessible even after you close Finder.
How do I find the Library folder in Macintosh HD?
The Library folder in Macintosh HD is not hidden but can be tricky to locate. Open Finder, click on Finder > Settings (or Preferences), go to the Sidebar tab, and check the box next to your Mac’s name under Locations. Your disk will then appear in the Locations section of Finder. Press Command + Shift + . (period) to reveal hidden items.
What is the System Library folder, and where is it located?
The System Library folder is located within the System folder inside Macintosh HD. It contains all the files that macOS needs to operate. To access it, follow the steps to locate Macintosh HD, then navigate to the System folder.
How can I hide specific files using Mac Terminal?
Open Terminal and type chflags hidden. Then drag the files you want to hide into the Terminal window and press Enter. This will hide the selected files.
How can I use AppleScript to show or hide hidden files?
Open the Script Editor application from Launchpad, click the New Document button, and paste the provided code into the editor’s window. Click the Run button, then click True to show hidden files or False to hide them. Save this file for future use to easily toggle the visibility of hidden files.
Conclusion
Accessing hidden files on your Mac is essential for troubleshooting and storage management. While Apple hides these files to prevent accidental damage, you can reveal them using Finder shortcuts, Terminal commands, or AppleScript. Handle these files with care to maintain system integrity. By following these methods, you can confidently manage your Mac’s hidden files.
ad
Comments are closed.