
If you’ve recently moved from Windows to Mac and are finding the scroll direction on your Mac mouse or trackpad inconvenient, don’t fret. This article will show you how to change the scroll direction on your Mac.
Why you might need to change direction of scroll on Mac
ad
By default, macOS has configured both mice and trackpads to have a “natural” scrolling direction. This means that the contents of a window move in the same direction as your fingers, akin to the behavior on touchscreens where swiping up results in scrolling down. If you’re accustomed to using Windows, this default setting on a Mac might be bothersome when using a mouse or trackpad. Allow us to guide you on how to change the scrolling direction on Mac. It’s a simple adjustment!

How to change scroll direction on Mac
Here’s a detailed guide on adjusting the Mac scrolling direction for the mouse:
ad
- Click on the Apple logo at the top left corner of your Mac screen.
- Select System Preferences.
- Navigate to the Mouse section in the left sidebar.
- Choose the Point & Click option.
- Toggle the switch next to Natural Scrolling to turn it on or off and modify the scrolling direction of the mouse.
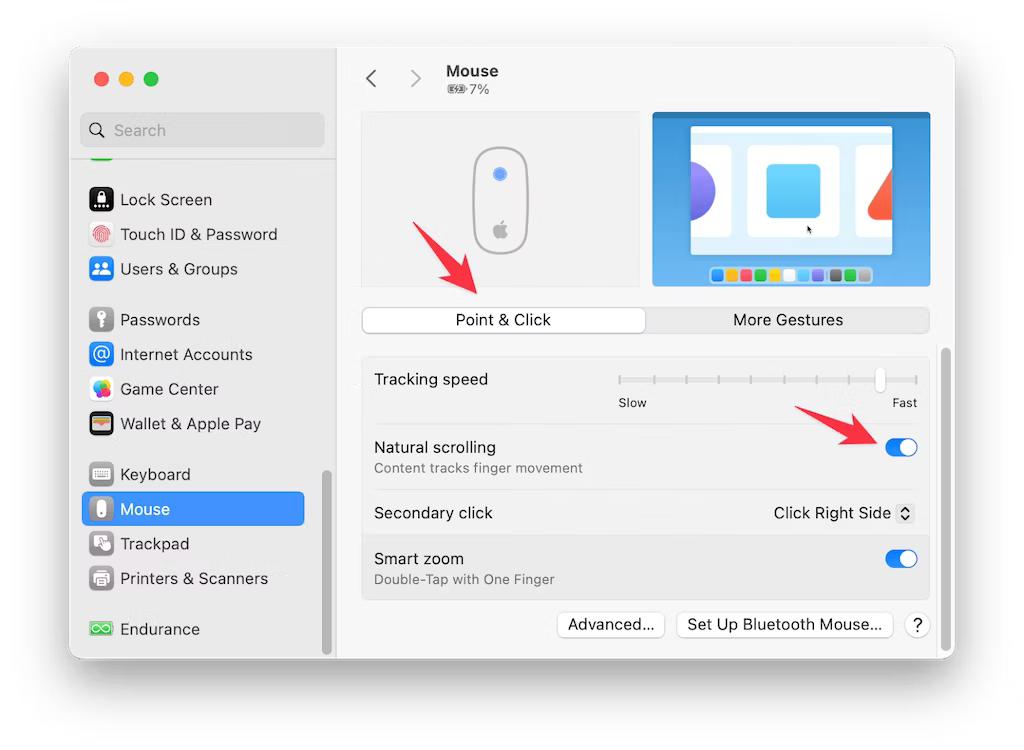
Having Natural Scrolling enabled allows you to move the contents of a window in the same direction as your fingers.
This is how you change the mouse scroll direction on a Mac.
📚 Also Read: How to fix it when left click on Mac is not working
Change scrolling speed on Mac
If you feel that the scrolling speed of the Magic Mouse and Magic Trackpad is a bit slow, you’ll be happy to know that you can increase it. Making these changes allows you to speed up scrolling while navigating through a page without any additional effort. Interestingly, you also have the flexibility to slow down the scrolling speed if desired. Let’s explore how to do this.
- Connect your Magic Mouse or Trackpad to your Mac and access the Apple menu > System Preferences.
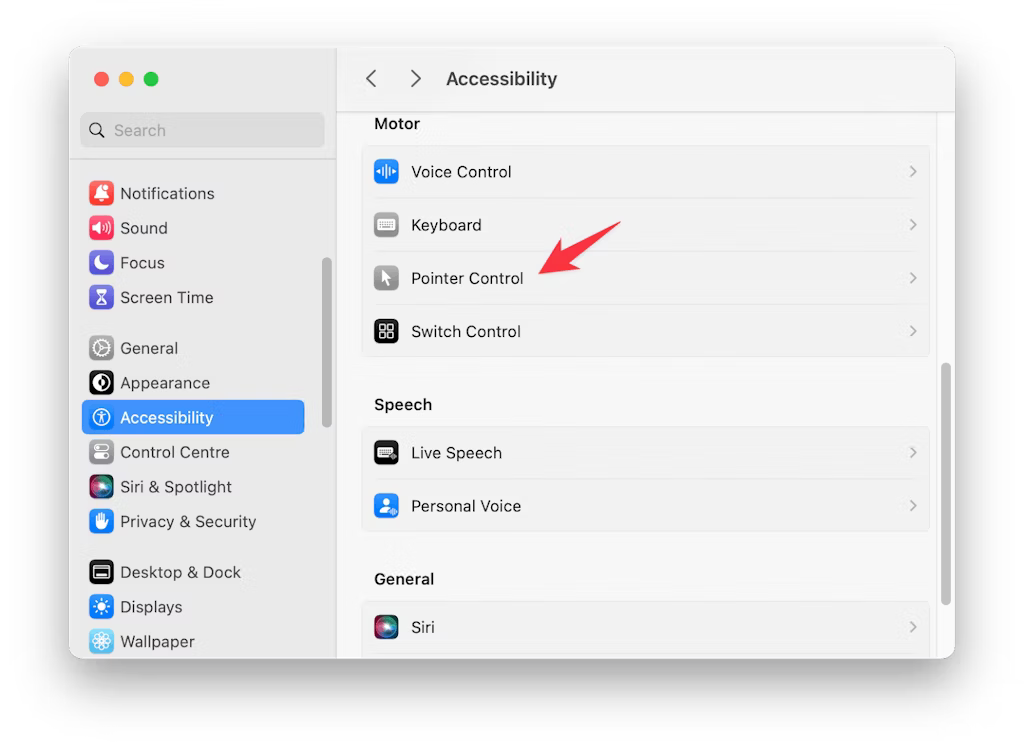
- Choose Accessibility from the left sidebar.
- Click on Pointer Control.
![Click on Pointer Control]() Depending on whether you are using a Magic Mouse or Magic Trackpad, select either Trackpad options or Mouse options.
Depending on whether you are using a Magic Mouse or Magic Trackpad, select either Trackpad options or Mouse options.![select either Trackpad options or Mouse options.]() Adjust the scrolling speed to your preference and then close the window. You can also make real-time adjustments to test different speeds and find the scrolling setting that suits you best.
Adjust the scrolling speed to your preference and then close the window. You can also make real-time adjustments to test different speeds and find the scrolling setting that suits you best.![Adjust the scrolling speed]()
 Depending on whether you are using a Magic Mouse or Magic Trackpad, select either Trackpad options or Mouse options.
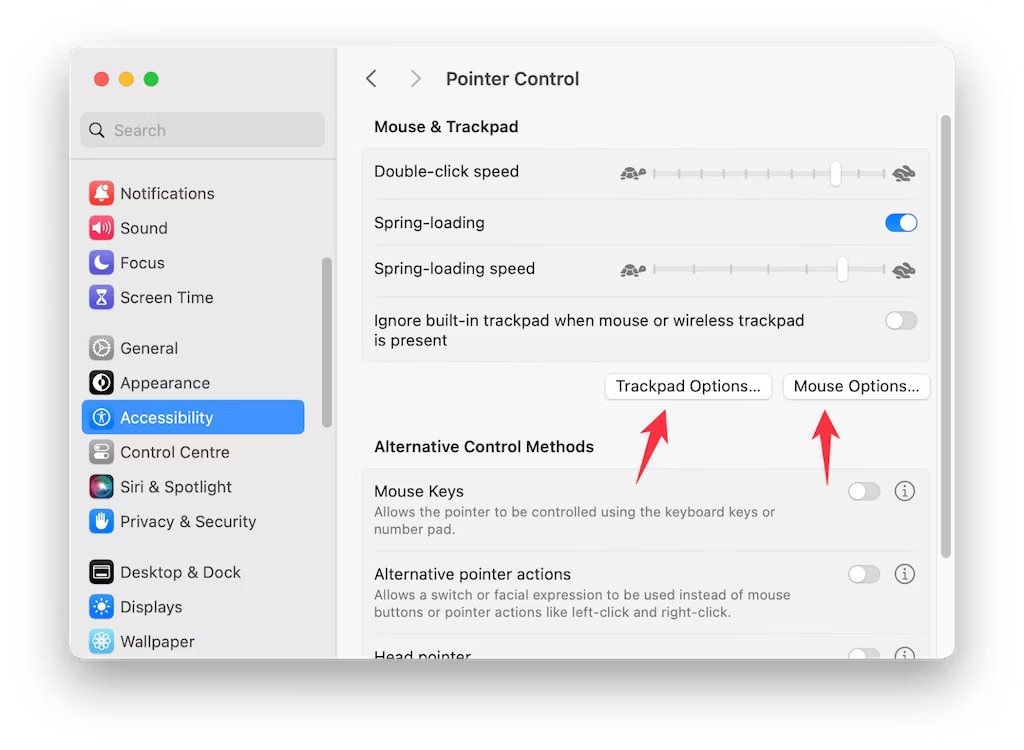 Adjust the scrolling speed to your preference and then close the window. You can also make real-time adjustments to test different speeds and find the scrolling setting that suits you best.
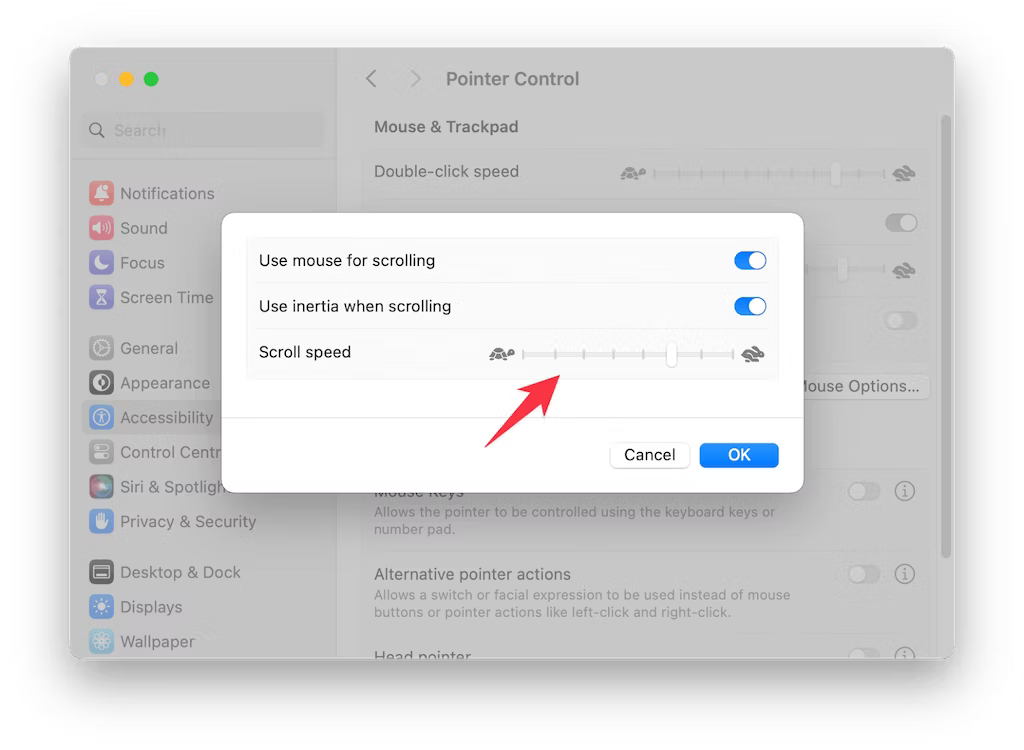
How to Disable Inertia Scrolling on Your Mac
Inertia scrolling allows scrolling to continue even after lifting your finger from the mouse or trackpad until it gradually comes to a stop. In simpler terms, scrolling gains a bit of momentum after removing your finger until it slows down.
Despite being a beneficial feature on the Mac, some individuals find inertia scrolling frustrating to use.
Here’s how to deactivate inertia scrolling on a Mac:
- Connect the Magic Mouse or Trackpad to your Mac and access the Apple menu > System Preferences.
- Choose Accessibility from the left sidebar.
- Click on Pointer Control.
- Depending on whether you are using a Magic Mouse or Magic Trackpad, select either Trackpad options or Mouse options.
- Disable the toggle next to “Use inertia when scrolling.”
![Disable the toggle next to Use inertia when scrolling.]()
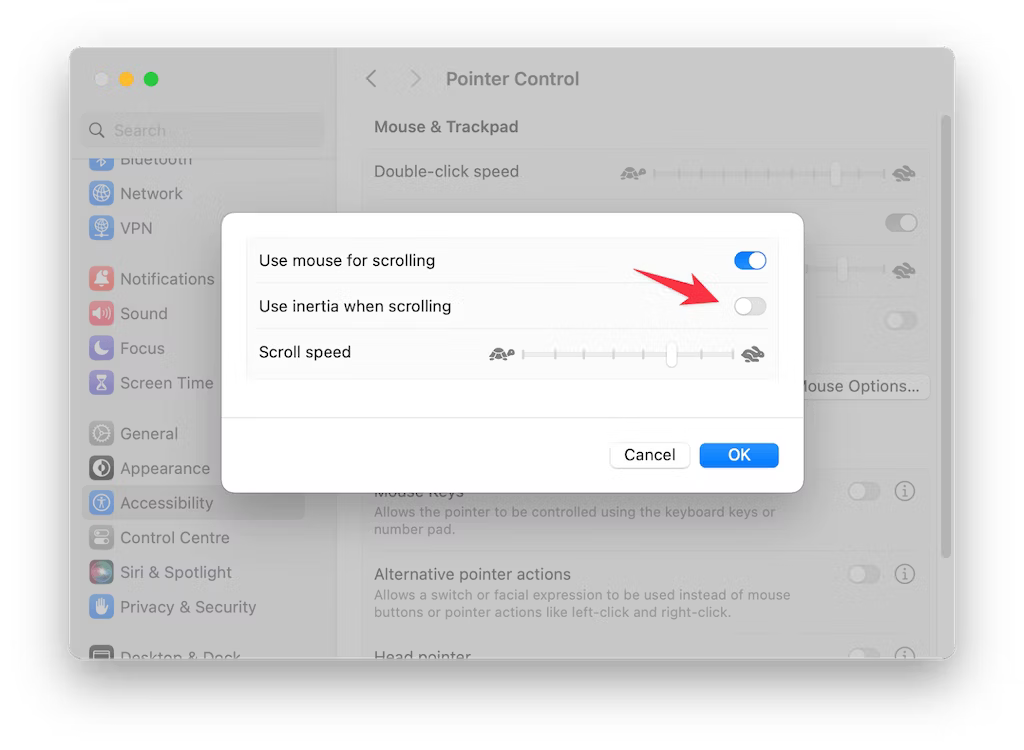
When you wish to utilize inertia scrolling again, simply enable the toggle next to “Use inertia when scrolling.”
Change scroll direction on Mac using Automator
If you enjoy experimenting with different features on your Mac, this option is tailored for you. Follow the steps below to change the scroll direction:
- Open Automator by pressing Command + Space to initiate Spotlight Search, typing “Automator,” and hitting Enter.
- Create a new document using Command + N or navigating to File > New, and choose “Application” as the document type.
- Add the “Run AppleScript” action to the workflow.
- Input one of the provided AppleScripts found at the bottom of this answer (refer to the notes below the instructions). Ignore any permissions errors encountered when running it initially.
- Save the document as “Reverse Scrolling with File Format Application” in your Applications directory using Command + S or navigating to File > Save As…
- Close the Automator document.
- Go to the Apple menu > System Preferences > Security & Privacy > Privacy > Accessibility. Add the “Reverse Scrolling” app (located in your Applications folder) to the list, allowing apps to control your computer.
- Return to Automator and create a new document, opting for “Quick Action” as the document type. This allows you to add the action to the Services submenu in every application.
- Configure the workflow to require no input, specifying “Workflow receives no input in any application” at the top of the document edit pane.
- Add the “Launch Application” action to the workflow.
- In the application chooser dropdown, select “Other…” and navigate to your Applications directory. Choose the “Reverse Scrolling” app.
- Save the document as “Reverse Scrolling” using Command + S or File > Save As…, and it’s acceptable to use the same name as before.
- Go to the Apple menu > System Preferences > Keyboard > Shortcuts > Services. Under the General subsection in the right checkbox pane, click “Reverse Scrolling” and then “Add Shortcut.”
- Press the desired key combination, ensuring it doesn’t conflict with existing shortcuts.
If you’ve followed all instructions correctly, you should now find a “Reverse Scrolling” menu item in the Services menu of each application, with your chosen keyboard shortcut listed next to it.
Test the setup by scrolling, observing the scroll direction, activating the keyboard shortcut, and then repeating the scroll test. The scrolling should reverse without any error pop-ups or system permission requests.
AppleScript for macOS Ventura:
on run {input, parameters}
    do shell script "open x-apple.systempreferences:com.apple.Trackpad-Settings.extension"
    delay 1.0
    tell application "System Events"
        tell process "System Settings"
            click radio button 2 of tab group 1 of group 1 of group 2 of splitter group 1 of group 1 of window 1
            click checkbox "Natural scrolling" of group 1 of scroll area 1 of group 1 of group 2 of splitter group 1 of group 1 of window 1
            tell application "System Settings" to quit
        end tell
    end tell

    return input
end run
AppleScript for macOS Monterey:
on run {input, parameters}
    tell application "System Preferences"
        reveal anchor "trackpadTab" of pane id "com.apple.preference.trackpad"
    end tell

    tell application "System Events" to tell process "System Preferences"
        click checkbox 1 of tab group 1 of window 0
    end tell

    quit application "System Preferences"

    return input
end run
How to Switch Scrolling Direction on Mac using Terminal
You can also modify the scrolling direction through Terminal, the command-line interface enabling users to issue specific requests to their operating system.
Here’s how to alter the scroll direction on Mac using Terminal:
- Open the Terminal app: Press Command + Space to initiate Spotlight Search, type “Terminal,” and press Enter.
- Copy the relevant command syntax:
- For traditional scrolling:
defaults write -g com.apple.swipescrolldirection -boolean NO - For natural scrolling:
defaults write -g com.apple.swipescrolldirection -boolean YES
- For traditional scrolling:
- Paste the command syntax into Terminal and press Enter.
- Reboot your Mac to apply the changes.
📚 Also Read: How to create a folder on Mac
How to Change the Trackpad Scroll Direction on Mac
If you are inclined towards using the Trackpad, here’s how to adjust the Trackpad scroll direction on a Mac:
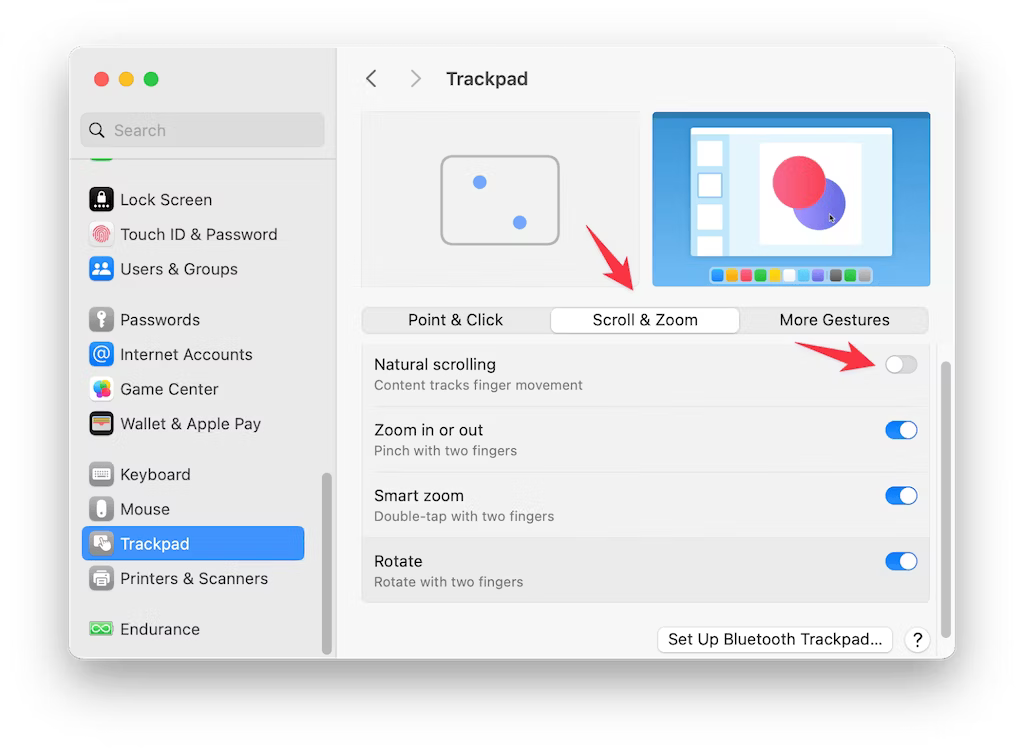
- Go to the Apple menu > System Preferences.
- Click on Trackpad in the left sidebar.
- Select Scroll & Zoom.
- Turn on/off the toggle next to Natural Scrolling to invert the scrolling direction of the Trackpad.
![Turn onoff the toggle next to Natural Scrolling to invert the scrolling direction of the Trackpad]()
FAQ’s
Why would I need to change the scroll direction on my Mac?
If you’ve recently switched from Windows to Mac, the default “natural” scrolling direction might feel inconvenient. Changing it can enhance your user experience with a mouse or trackpad.
How can I change the scroll direction on my Mac?
Follow these steps: Click the Apple logo > System Preferences > Mouse > Point & Click > Toggle “Natural Scrolling.”
Is it possible to adjust the scrolling speed of my Magic Mouse or Magic Trackpad on a Mac?
Certainly. Connect your device, navigate to Apple menu > System Preferences > Accessibility > Pointer Control, and fine-tune the scrolling speed.
What does inertia scrolling do, and how do I disable it on my Mac?
Inertia scrolling lets content continue scrolling after lifting your finger. To disable it, connect your device, go to Apple menu > System Preferences > Accessibility > Pointer Control, and uncheck “Use inertia when scrolling.”
How do I change the scroll direction on my Mac using Automator?
Open Automator, create a new application, add a “Run AppleScript” action, input the provided script, and save. Add the app to Accessibility settings, then configure a Quick Action to change the scroll direction.
Can I modify the scroll direction through Terminal on a Mac?
Yes, you can. Open Terminal, copy the appropriate command syntax (for natural or traditional scrolling), paste it, and reboot your Mac for the changes to take effect.
How can I adjust the Trackpad scroll direction on a Mac?
For Trackpad users, go to Apple menu > System Preferences > Trackpad > Scroll & Zoom > Toggle “Natural Scrolling” on/off.
Conclusion
optimizing your scrolling experience on a Mac, especially after switching from Windows, is essential for a personalized and efficient user interface. Whether adjusting scroll direction, speed, or inertia preferences, macOS provides versatile customization options through System Preferences, Automator, and Terminal. These modifications empower users to tailor their Mac experience, ensuring a seamless transition and an enhanced computing journey.
ad
Comments are closed.