
The usual procedure for emptying the Trash folder—sometimes known as the Bin in certain regions—is a swift one. You simply access the folder and click on the Empty button located in the top-right corner.
That’s typically all it entails. However, there are instances where the Trash may hinder the permanent deletion of specific files.
ad
This guide addresses such situations, providing guidance on how to ascertain if files are in use or locked. It also outlines steps for conducting disk repairs in cases where a disk-related issue is impeding the Trash from being emptied. Furthermore, the guide explores the utilization of the Terminal to forcibly empty the Trash.

Restart Your Mac
In an ideal situation, closing an app or a file should release the CPU memory it utilizes for its operation. However, there are rare instances where this doesn’t happen, and the program persists in holding onto the memory space on your computer, causing potential issues.
ad
To rule out this possibility, a quick restart is worth trying before exploring more complex solutions.
So, go ahead and reboot your Mac, then attempt to empty the Trash once again. If the issue persists, proceed to the next section.
How to Empty the Trash on Mac When Files Are in Use
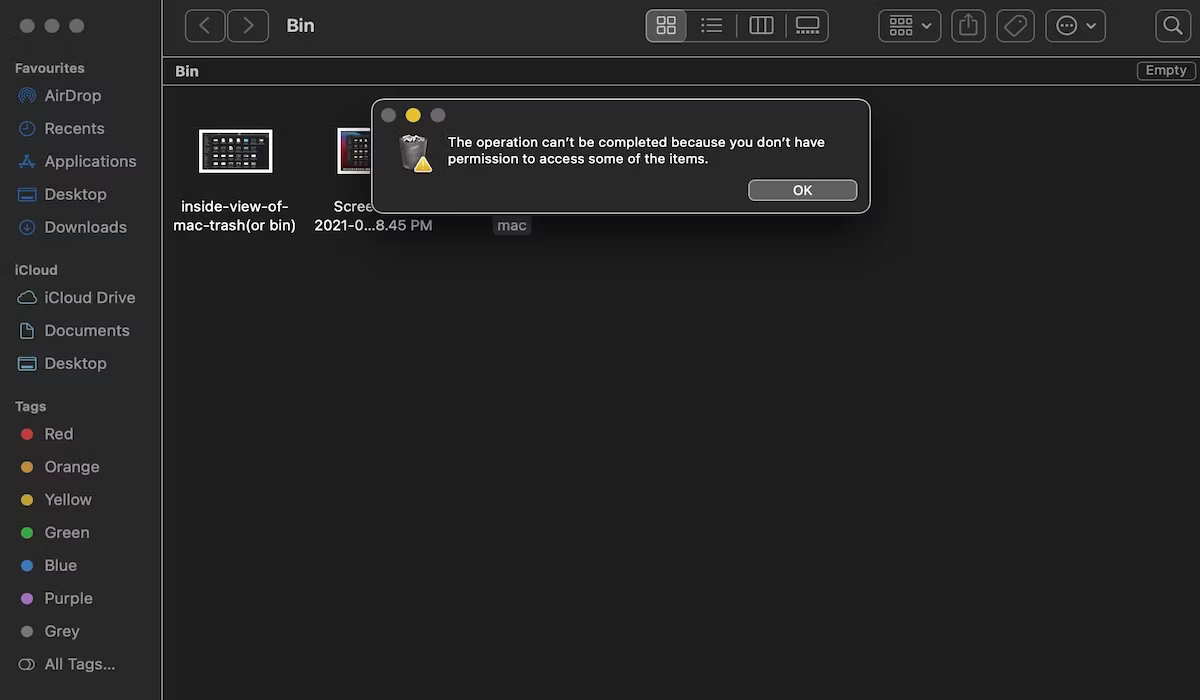
Frequently, the Trash folder on your Mac refuses to empty due to certain files still being in use.
Another application or some background operational process might be utilizing these files. You can confirm this when a popup message indicates something like: “The operation can’t be completed because the item is in use.”
This implies that you need to close the file before being able to delete it permanently. For instance, if it’s a Word document, you must close it in Word. If it’s an application, you need to quit that app, and so forth.
In some instances, pinpointing where the file is open may be challenging. In such cases, it’s possible that a background process is using it. To check for this, press Option + Cmd + Esc to open the Force Quit window.
Subsequently, close any additional programs you suspect might be hindering you from clearing the Trash on your Mac.
Advanced File Usage Troubleshooting
Alternatively, the file in question might be in use by a startup or login item. You can overcome this by initiating your Mac in Safe Mode, preventing some software from automatically starting up.
To boot your Mac in Safe Mode and empty the Trash:
- Shut down your Mac.
- Turn on your Mac and immediately hold Shift.
- Once booted up in Safe Mode, open the Trash.
- Click the Empty button (located in the top-right corner).
This action will delete the file if a startup app was using it. If not, another option is to use Terminal to check which app has the file locked. Here’s how you can do that:
- Open Trash.
- Press Cmd + Space to launch Spotlight.
- Type Terminal and press Return.
- Type
lsofand press Space. This command lists open files and displays a list of files in use with the processes that opened them. - Return to Trash and drag the file you want to delete to the Terminal.
- Press Return to execute the command.
This action will generate a list of the apps currently using the file. In our case, it doesn’t do so because the file is not in use by any program.
However, if you do see a list, you’ll need to close all the programs. Keep in mind that Terminal might not display the complete names of apps, so you may have to attempt closing several apps.
How to Empty the Trash When Files Are Locked
In an alternative situation, the files you’re attempting to delete could be locked. You can easily resolve this by going to the Trash and unlocking them. Follow these steps:
- Open the Trash.
- Control-click on the file you want to delete.
- Click on Get Info.
- Uncheck the Locked checkbox.
This will unlock the file, enabling you to delete it. Once again, you can accomplish this by clicking the Empty button. Alternatively, you can Control-click on the file and choose Delete Immediately.
How to Empty Trash When Your Disk Needs Repairing
A hard disk issue can potentially hinder the emptying of your Trash. To check for this, you can run a test by launching Disk Utility and utilizing the First Aid function.
Follow these steps to complete the process:
- Press Cmd + Space to activate Spotlight.
- Type Disk Utility and press Return.
- Choose your hard disk’s name, ensuring it’s the one containing the file you want to delete.
- Click on First Aid, then select Run.
The First Aid function will notify you if it detects any errors, but it cannot address issues on your main drive while in operation. You’ll need to restart your Mac in Recovery Mode to resolve disk problems on your startup drive.
Repairing your Mac’s disk is a viable option when faced with a problem that other steps haven’t resolved. Typically, a disk repair should enable you to permanently delete items in the Trash.
If a disk issue is not the underlying cause of your problems, you might need to compel the Trash to empty.

How to Force the Trash to Empty
There are various methods to forcibly empty the Trash.
If a file is locked, and unlocking it proves challenging, attempt deleting it while holding down the Option key. Try holding Option while clicking the Empty button. By doing so, your Mac will bypass any file locks.
This proves beneficial when your Mac refuses to unlock files.
Another alternative is to employ a Terminal command to compel the Trash to empty. This overrides file locks and deletes in-use files, circumventing any other errors preventing the Trash from emptying.
While effective for permanently deleting files, be cautious as macOS might prevent file deletion for a valid reason. You may have inadvertently placed something crucial for a specific app’s operation in the Trash.
Exercise caution when utilizing the following method:
- Press Cmd + Space to activate Spotlight.
- Type Terminal and press Return to open it.
- Type
sudo rm -Rand press Space; this command enforces file deletion. - Return to the Trash, and drag the files you wish to delete to the Terminal window.
- Press Return.
- Enter your Mac’s administrator password to authorize the command; it won’t be visible as you type, ensuring security.
- Press Return to confirm and execute the command.
This process will promptly delete the files dragged into the Terminal window, providing assurance that your Mac is free of that particular trash.
📚 Also Read: Mac won’t connect to Wi-Fi: all fixes
How to automatically empty the Trash on a Mac
To avoid running out of free space on your Mac, it’s essential to regularly empty the Trash. Alternatively, you can set your Mac to automatically empty the Trash.
When this option is enabled, your Mac retains files in the Trash for only 30 days, automatically removing them afterward. However, it’s advisable to use this feature only if you are confident that you won’t need to recover anything from the Trash after the 30-day period.
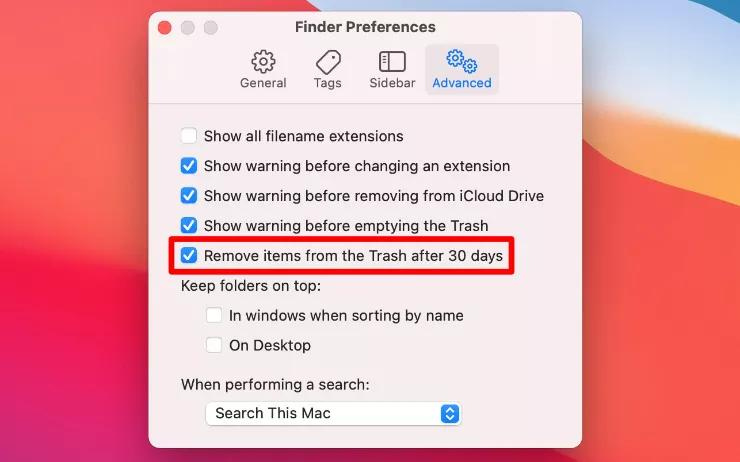
To enable automatic Trash emptying on your Mac:
- Open Finder and go to Finder > Preferences from the menu bar.
- Navigate to the Advanced tab.
- Activate the option to Remove items from the Trash after 30 days.
Files moved to the Trash from iCloud will be automatically deleted after 30 days, regardless of whether you activate this option or not. This is because iCloud retains deleted files for only 30 days.
FAQ’s
Why won’t my Trash empty on my Mac?
There could be various reasons, such as files being in use or locked. This guide provides steps to troubleshoot and resolve issues preventing the Trash from emptying.
What should I do if a file is in use and preventing Trash emptying?
If a file is in use, you need to identify the application or process using it. Use the Force Quit window to check, and close the relevant programs.
Can I empty the Trash when files are locked?
Yes, you can. Open the Trash, right-click the locked file, select Get Info, and uncheck the Locked checkbox. Afterward, you can either click Empty or use the Delete Immediately option.
How do I check for disk issues affecting Trash emptying?
Run Disk Utility’s First Aid function by pressing Cmd + Space, typing Disk Utility, selecting your hard disk, and clicking on First Aid. If issues persist, consider repairing your Mac’s disk in Recovery Mode.
Is there a way to force-empty the Trash using Terminal?
Yes, you can use Terminal to force-empty the Trash. Be cautious, as this method overrides locks and can permanently delete files. Follow the provided steps carefully.
How can I automatically empty the Trash on my Mac?
Open Finder, go to Finder > Preferences, navigate to the Advanced tab, and activate the option to Remove items from the Trash after 30 days. This ensures automatic Trash emptying to avoid space issues.
What happens to files in iCloud Trash after 30 days?
Files moved to the Trash from iCloud are automatically deleted after 30 days, as iCloud retains deleted files for that duration. This occurs regardless of whether you activate the automatic emptying option.
Conclusion
Effective management of your Mac’s Trash involves more than a simple emptying process. This guide offers practical solutions to address issues like files in use, locked items, and disk-related problems. Whether using standard procedures or advanced Terminal commands, these steps ensure efficient storage space utilization. Caution is advised in more drastic measures to avoid unintended consequences. By following these guidelines, users can streamline Trash management for a more organized and optimized Mac experience.
ad
Comments are closed.