
[vc_row][vc_column][vc_column_text]Clonezilla For Windows is a partition and disk imaging/cloning program similar to True Image. It helps you to do system deployment, bare metal backup, and recovery. Three types of the app are available, Clonezilla lives, Clonezilla lite server, and Clonezilla SE (server edition).[/vc_column_text][/vc_column][/vc_row][vc_row][vc_column][vc_tta_tabs style=”modern” active_section=”1″][vc_tta_section title=”About” tab_id=”aboutf856-8f345f03-ec03″][vc_column_text]Clonezilla live is suitable for single machine backup and restore. While Clonezilla lite server or SE is for massive deployment, it can clone many (40 plus!) computers simultaneously. It saves and restores only used blocks in the hard disk. This increases the clone efficiency. With some high-end hardware in a 42-node cluster, a multicast restoring at a rate of 8 GB/min was reported.

Designed as an alternative to expensive disk cloning apps, Clonezilla is capable of creating backups for the entire hard drive or individual partitions. When disaster strikes, you can use Clonezilla’s disk or partition image to put everything back to its place and retrieve your lost files.
There are two downloading options Clonezilla offers ISO and ZIP packages, each for different booting media: the first for CDs/DVDs or PXE servers, the second for USB flash / hard drives. Deployment is not difficult but a boot disk creating the application (such as Tuxboot, LinuxLive USB Creator, or Rufus). Alternatively, experienced users can perform this operation manually.
Booting from the Clonezilla media opens a menu where you can choose the running mode for Clonezilla Live and run memory tests. The console data configuration options are displayed as you proceed, allowing you to select the keymap policy.
There are two options you can choose from after running Clonezilla, namely to clone or restore a disk or a partition using a previously created image, or clone (backup) a disk or a partition. Obviously, when running Clonezilla for the first time, you must take the time to create an image, which can be stored in various locations, namely a local or external drive, a SSH / Samba / NFS / WebDAV / AWS S3 server, an OpenStack Swift server, or the local memory (existing ‘/home/partimag/’). The latter option is not recommended, as it can overwrite data and render your computer unusable unless you know exactly what you are doing. More experienced users will be happy to find out that there are some advanced parameters they can tamper with.
Once the image is created, you can either enter the command line prompt, start Clonezilla over, as well as power off, or reboot your computer to access the host operating system.


Pros And Cons of Clonezilla
| 优点 | 缺点 |
| Zero cost | Any partition must be at least half the drive’s size |
| Compatibility with many file management systems | Incremental backup is not supported |
System Requirements
| Operating System | Windows 7, 8, 10 |
| 处理器 | X86 or x86-64 processor |
| 内存 | 196 MB of system memory (RAM) |
| Additional Information | Boot device, e.g. CD/DVD Drive, USB port, PXE, or hard drive |
[/vc_column_text][/vc_tta_section][vc_tta_section title=”Feature” tab_id=”featuref856-8f345f03-ec03″][vc_column_text]
Clonezilla Disk Imaging Software Features
- Many File systems are supported: (1) ext2, ext3, ext4, reiserfs, reiser4, xfs, jfs, btrfs, f2fs and nilfs2 of GNU/Linux, (2) FAT12, FAT16, FAT32, NTFS of MS Windows, (3) HFS+ of macOS, (4) UFS of FreeBSD, NetBSD, and OpenBSD, (5) Minix of Minix, and (6) VMFS3 and VMFS5 of VMWare ESX.
- Therefore you can clone GNU/Linux, MS windows, Intel-based Mac OS, FreeBSD, NetBSD, OpenBSD, Minix, VMWare ESX, and Chrome OS/Chromium OS, no matter its 32-bit (x86) or 64-bit (x86-64) OS. For these file systems, only used blocks in partition are saved and restored by Partclone. For an unsupported file system, sector-to-sector copy is done by dd in the app.
- LVM2 (LVM version 1 is not) under GNU/Linux is supported.
- Boot loader, including grub (version 1 and version 2) and syslinux, could be reinstalled.
- Both MBR and GPT partition formats of a hard drive are supported. It also can be booted on a BIOS or uEFI machine.
- Unattended mode is supported. Almost all steps can be done via commands and options. You can also use a lot of boot parameters to customize your own imaging and cloning.
- One image restoring to multiple local devices is supported.
- The image could be encrypted. This is done with ecryptfs, a POSIX-compliant enterprise cryptographic stacked filesystem.
- Multicast is supported in Clonezilla SE, which is suitable for a massive clone. You can also remotely use it to save or restore a bunch of computers if PXE and Wake-on-LAN are supported in your clients.
- BitTorrent (BT) is supported in the lite server, which is suitable for a massive clone. The job for BT mode is done by Ezio.
- The image file can be on local disk, ssh server, samba server, NFS server, or WebDAV server.
- AES-256 encryption could be used to secures data access, storage, and transfer.
- Based on Partclone (default), Partimage (optional), ntfsclone (optional), or dd to image or clone a partition. However, the app, containing some other programs, can save and restore not only partitions but also a whole disk.
- By using another free software drbl-winroll, which is also developed by us, the hostname, group, and SID of cloned MS windows machine can be automatically changed.
Limitations
- The destination partition must be equal or larger than the source one.
- Differential/incremental backup is not implemented yet.
- Online imaging/cloning is not implemented yet. The partition to be imaged or cloned has to be unmounted.
- Due to the image format limitation, the image can not be explored or mounted. You can _NOT_ recovery a single file from the image. However, you still have a workaround to make it, read this.
- Recovery Clonezilla live with multiple CDs or DVDs is not implemented yet. Now all the files have to be in one CD or DVD if you choose to create the recovery iso file.
[/vc_column_text][/vc_tta_section][vc_tta_section title=”Screenshots” tab_id=”screenshotsf856-8f345f03-ec03″][vc_column_text]
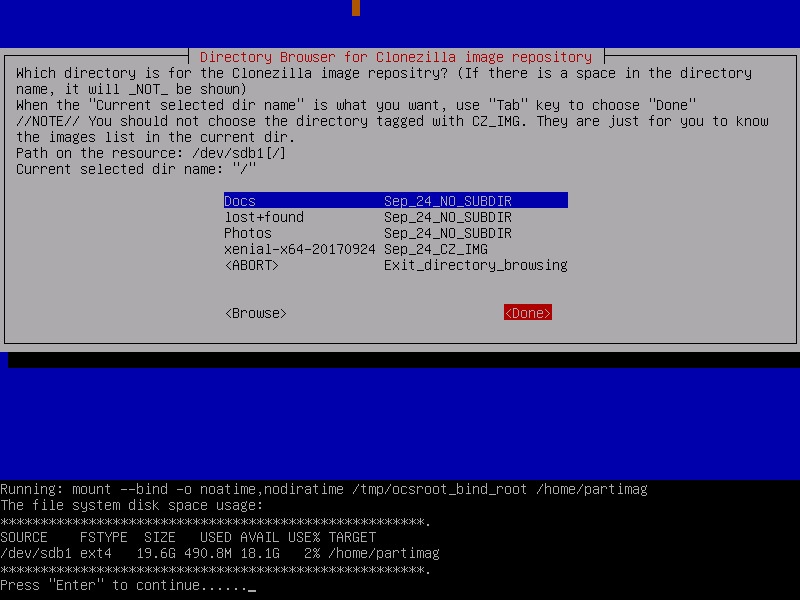
Screenshots of Clonezilla Computer Program
[/vc_column_text][vc_gallery interval=”3″ images=”60488″ img_size=”575×471″ title=”Use Local Device”][/vc_tta_section][vc_tta_section title=”Video” tab_id=”videof856-8f345f03-ec03″][vc_column_text]
Official Video Intro Clonezilla Computer Program
[/vc_column_text][vc_video link=”https://www.youtube.com/watch?v=EW4_tqBaczw” align=”center” title=”Cloning/Imaging Hard Disks with Clonezilla Live”][/vc_tta_section][vc_tta_section title=”FAQs” tab_id=”faqsf856-8f345f03-ec03″][vc_column_text]
Clonezilla Computer Program FAQs
[/vc_column_text][vc_toggle title=”How to clone your hard drive with Clonezilla?”]While there are plenty of backup programs out there to keep your favorite files safe, very few are capable of making an exact copy of your hard drive, complete with passwords, bookmarks, and any other settings you’ve customized.
Clonezilla Live is a free disk cloning and data recovery program that allows you to do just that. The special ‘Live’ image of Clonezilla can be copied to a USB stick or DVD. As Clonezilla boots into your RAM memory, it can easily copy data on your hard disk to an external drive.[/vc_toggle][vc_toggle title=”How can I debug in the PXE initrd when clients boot ?”]In the early stage in PXE initrd when client boots, there is NO log file. However, you can try to debug by:
1. edit /usr/lib/mkpxeinitrd-net/initrd-skel/linuxrc
或
“/usr/lib/mkpxeinitrd-net/initrd-skel/linuxrc/udhcpc-post”
insert some code to debug, or just put a shell (/bin/sh) so you can enter the shell.
2. run “mknic-nbi” to generate the PXE initrd.
3. reboot the client, then you can see some logs or enter the shell.[/vc_toggle][vc_toggle title=”Is it possible to run a script on the client after Clonezilla finishes cloning ?”]Yes, but not from dcs. You have to use drbl-ocs like this:
drbl-ocs -l 0 startdisk restore -p “mount -t ntfs /dev/hda1 /mnt; chntpwd…; reboot -f -n”
For more info, check “drbl-ocs –help”.[/vc_toggle][vc_toggle title=”How can I share the printer in the server to clients ?”]Take Fedora Core 3 as an example:
Assume the DRBL server IP address is 192.168.0.254,
1. Installed the driver and setup the local printer in DRBL server (such as via LPT PORT), and config the CUPS to share the printer (Note: in Fedora Core 3, the default setting of CUPS is DENY ALL, so remember to open that to clents in /etc/cups/cupsd.conf).
2. In DRBL server, config the CUPS network printer, which means set the local printer as network printer. The path is CUPS ipp://192.168.0.254/printers/epsonc60 (You can find the string in /etc/cups/cupsd.conf), and set the network printer as the default printer. Here epsonc60 is just an example, so use yours.
3. Run “drblpush -i” again
4. Boot the client, you will see the network printer, which is the default printer.[/vc_toggle][/vc_tta_section][vc_tta_section title=”Alternatives” tab_id=”1613204936455-cd1a2326-6b56f856-8f345f03-ec03″][vc_column_text]
- Macrium Reflect
- dd
- Redo Rescue
- Rescuezilla
- Win32 Disk Imager
- Acronis True Image
- Carbon Copy Cloner
- FOG Project
- EaseUS ToDo BackUp
- Parted Magic
[/vc_column_text][/vc_tta_section][/vc_tta_tabs][/vc_column][/vc_row][vc_row][vc_column][vc_column_text]
Clonezilla Overview
[/vc_column_text][vc_single_image image=”60490″][vc_column_text css=”.vc_custom_1628338618109{margin-top: 10px !important;}”]
技术规格
| 版本 | 20210609 |
| 文件大小 | 378 MB |
| 语言 | English |
| 许可证 | 免费 |
| 开发人员 | Steven Shiau |
[/vc_column_text][/vc_column][/vc_row][vc_row][vc_column][vc_column_text]结论
Clonezilla enables you to clone disks and partitions, storing resulting images on a backup storage device of your choice.
While there is no Windows interface to work with and intuitive wizards where clicking ‘Next’ is enough, It does offer a good option for creating disk and partition backups and keeping data files intact in case you need to restore them.
[/vc_column_text][/vc_column][/vc_row]