
[vc_row][vc_column][vc_tta_tabs style=”modern” active_section=”1″][vc_tta_section title=”About” tab_id=”aboutf856-8f3495fb-030b”][vc_column_text]Custom Resolution Utility – CRU allows custom resolutions to be defined for both AMD/ATI and NVIDIA GPUs by creating EDID overrides directly in the registry without dealing with .inf files. This software can now read extension blocks from connected monitors with AMD/ATI and NVIDIA. It will automatically add a blank extension block in the registry and .inf files if necessary to work around NVIDIA driver issues. It adds monitor resolutions, not scaled resolutions. Lower resolutions will be scaled up if GPU scaling is enabled, but higher resolutions won’t be scaled down by the GPU. Higher resolutions will only work if the monitor can handle them.
Custom Resolution Utility – CRU makes it possible for users to define new resolutions for their AMD/ATI or NVIDIA GPUs on Windows Vista and later. The application is capable of adding new monitor resolutions, not scaled ones, meaning lower resolutions can be scaled up and not the other way around. However, the monitor must support the defined resolutions for the application to work.


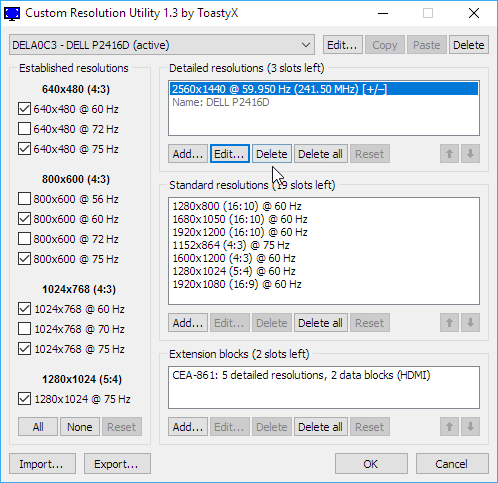
Getting started with Custom Resolution Utility In Windows 10
- Run CRU.exe.
- Choose a monitor from the drop-down list.
- “(active)” means the monitor is connected and recognized by the graphics driver.
- “*” means changes were made and an override was saved in the registry.
- Edit the configuration as desired. Please read the sections below for more information.
- Repeat steps 2-3 for other monitors if required.
- The “Copy” dan “Paste” buttons at the top can be used to copy the resolutions, extension blocks, and range limits if included. It will not copy the name or serial number, but it will copy the inclusion of these items using the monitor’s own information. Import follows the same logic unless “Import complete EDID” is selected.
- Click “OK” to save the changes.
- Run restart.exe to restart the graphics driver.
- If the display does not return after 15 seconds, press F8 for recovery mode. This will temporarily unload all the EDID overrides without deleting them. Restart the driver again to reload any changes.
- Set the resolution in the Windows display settings. To set the refresh rate:
- Windows 10: right-click on the desktop > Display settings > Advanced display settings > Display adapter properties > Monitor tab
- Windows Vista/7/8/8.1: right-click on the desktop > Screen resolution > Advanced settings > Monitor tab

To reset a display back to the default configuration, use the “Delete” button at the top to delete the override from the registry and reboot. To reset all displays, run reset-all.exe, and reboot. This can be done in safe mode if necessary.
Various parameters can be configured manually for detailed resolutions, such as the horizontal and vertical active resolution, the sync width, blanking options, the sync polarity, and the refresh rate. Up to six entries are permitted and the first entry is considered to be the preferred resolution. Lower scaled resolutions are automatically added by the graphics driver, regardless of the GPU type.
And if users prefer not to take care of the timing conditions themselves, there are predefined automatic options for LCD and CRT monitors. The ‘LCD standard’ option defines parameters that are commonly used with HDTVs, while the ‘LCD reduced’ option can reduce the pixel clock to achieve higher refresh rates.
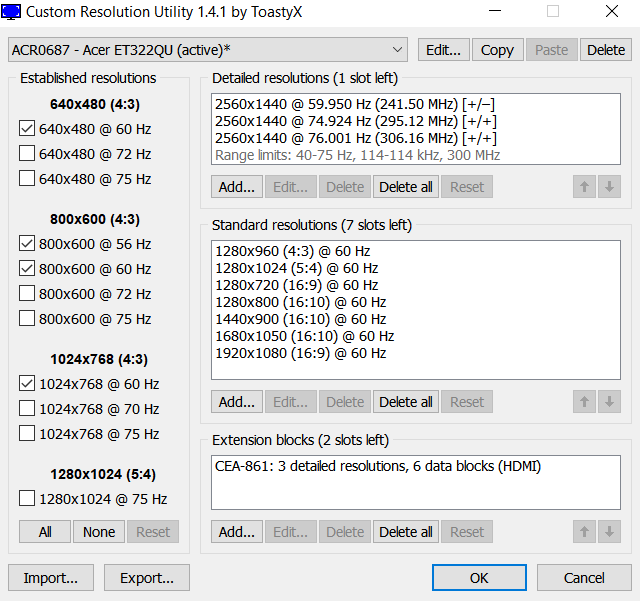

Standard resolutions
- Standard resolutions are mostly useful for CRT monitors and for adding lower resolutions with LCD monitors. Do not add the native resolution as a standard resolution.
- AMD/ATI only supports the resolutions in the drop-down list. Other resolutions will be ignored by the driver. These will be listed in gray.
- NVIDIA does not support more than 8 standard resolutions.
- Standard resolutions are limited to 60-123 Hz. Use detailed resolutions to add other refresh rates.
While it may seem easy to use, the capabilities of Custom Resolution Utility are broader than the average user can understand. It can be used in various situations, making it possible for certain old or outdated monitors to work with higher resolutions.
FAQ of Custom Resolution Utility
ow to set custom resolution on Windows 10?
1. Use the Nvidia Control Panel
- Right-click on your desktop and choose NVIDIA Control Panel.
- In the left side-panel, under Display, click on Change resolution.
- In the right section scroll a bit, and under Choose the resolution click the Customize button.
- In the new window that appears, check Enable resolutions not exposed by the display and then click on Create Custom Resolution.
- Now, fill in the boxes with the desired values and then hit the Test button.
- If the test is successful and you’re satisfied with the result, Save the resolution. If not, revert to the previous one.
How to uninstall this software
To remove a custom resolution for your HDTV display
Note: You must be an advanced user and have knowledge of display timing concepts in order to work with custom timings for your display.
-
From the NVIDIA Control Panel navigation tree pane, under Display, click Change resolution.
-
Click the image that represents the display you want to affect.
-
Click Customize, then check the Enable resolutions not exposed by the display check box.
-
From the list that appears in the Resolutions box, select the custom resolution you want to remove.
-
Click the Delete icon or press Delete on your keyboard.
-
Repeat steps 4 and 5 for each custom resolution you want to remove.
System requirements
- Windows Vista or later (Windows XP does not support EDID overrides)
- AMD/ATI or NVIDIA GPU with the appropriate driver installed (Microsoft Basic Display Adapter driver does not support EDID overrides)
- Some Intel GPUs and laptops with switchable graphics are supported with one of these drivers:
- 6th/7th generation (Skylake/Kaby Lake): Intel Graphics Driver for Windows [15.45]
- 4th/5th generation (Haswell/Broadwell): Intel Graphics Driver for Windows [15.40]
- 4th generation (Haswell) for Windows 7/8.1: Intel Graphics Driver for Windows 7/8.1 [15.36]
[/vc_column_text][/vc_tta_section][vc_tta_section title=”Video” tab_id=”videof856-8f3495fb-030b”][vc_column_text]
Official Video Intro Custom Resolution Utility
[/vc_column_text][vc_video link=”https://youtu.be/X6cFVLAAAOw” align=”center” title=”How to Overclock Your Monitor w/ Custom Resolution Utility! (AMD)”][/vc_tta_section][vc_tta_section title=”Alternatives” tab_id=”1613204936455-cd1a2326-6b56f856-8f3495fb-030b”][vc_column_text]
- PowerStrip
- Strobelight
[/vc_column_text][/vc_tta_section][/vc_tta_tabs][/vc_column][/vc_row][vc_row][vc_column][vc_column_text]
Custom Resolution Utility Overview
[/vc_column_text][vc_single_image image=”70644″][vc_column_text css=”.vc_custom_1634361185398{margin-top: 10px !important;}”]
Spesifikasi Teknis
| Version | 1.5.0 |
| File Size | 555 KB |
| Languages | English |
| License | Free |
| Pengembang | ToastyX |
[/vc_column_text][/vc_column][/vc_row][vc_row][vc_column][vc_column_text]
Conclusion of Custom Resolution Utility
For instance, note that NVIDIA processing units only support 8 standard resolutions (limited to 60-123 Hz) and require at least 2 bytes for storing data blocks. It would really be useful to have all this information and a guideline inside a help file. Nevertheless, in case you want the default settings restored, you can use the ‘reset-all.exe’ app inside the downloaded archive.
[/vc_column_text][/vc_column][/vc_row]